Wooden Game Boy Is A Challenging Intro CNC Project

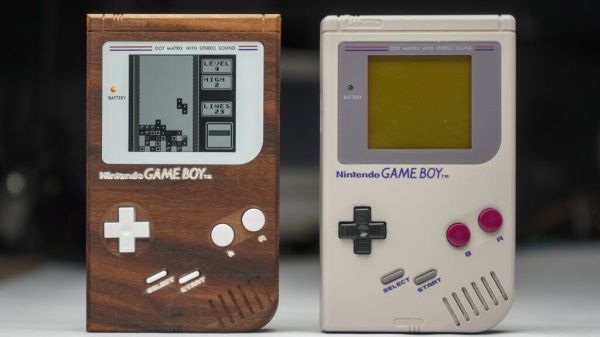
[Sebastian] describes himself as “a total noob” when it comes to CNC, so in an attempt to get to know his new CNC router, he chose about the most complex possible project — replicating an original Game Boy case in wood. And spoiler alert: he nailed it.

Of course, he did have a few things going for him. At least from a straight woodworking perspective, it’s hard to go wrong by choosing walnut as your material. Then again, it can be unforgiving at times, and picky about tooling, which is probably why [Sebastian] used nine different tools to get the job done. But where he upped the difficulty level was in reproducing so many of the details of the original injection-molded plastic case. There are top and bottom shells, each of which has to be milled from both sides. This makes registration tricky when the parts are flipped. Specific indexing holes were used for that, along with the old “blue tape and CA glue” fixturing trick, which seemed to work quite well. For our money, though, the best bit is the lettering on the front face, which was milled out with an engraving bit and then filled with a spritz of white spray paint. A surfacing bit then came along to knock the overspray down, leaving labels that contrast beautifully with the dark wood. Gorgeous!

It wasn’t all easy sailing, though. There are just some things plastic can do that wood can’t, like holding screw threads in small studs without splitting. So, the case had to be glued shut once the mix of salvaged and new components went in. Still, it looks fabulous, and [Sebastian] says what we see in the video below is the one and only piece. Pretty sweet for the first try. Surprisingly, it doesn’t seem as if we’ve seen a wooden Game Boy before — a wooden NES, sure, but not a Game Boy.

Continue reading “Wooden Game Boy Is A Challenging Intro CNC Project”

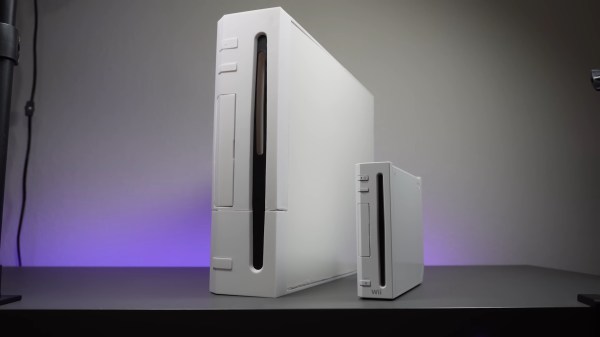
A white Wii console sits on a grey table in the vertical orientation with its front facing the camera and its back away from the camera at a slight angle to the right. Next to it is a 2x sized replica which dwarfs the diminutive console. A purple light runs across the back edge of the table.

Wii XL Is Twice As Nice

The Wii was a relatively small console when it released, but it packed a big punch when it came to its game library and the impact it had on the industry. [Bringus Studios] wanted a Wii that physically matched the grandeur of one of Nintendo’s greatest successes, and built the Wii XL.

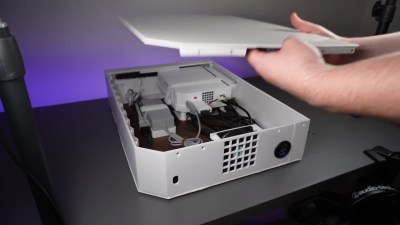
Basing the scale of this console around an 80 mm case fan, the final product has twelve times the volume of the original Wii. This leaves plenty of room for an unmodified original Wii, its power brick, and all the various cables and adapters necessary to bring the ports to the exterior of the case. To power the fan, [Bringus Studios] designed his first PCB to leach power off one of the USB connectors while still allowing data to pass through.The inside of a 3D printed and melamine case designed as a 2x copy of a Wii console. It is sitting flat on a grey table with the side removed so you can see the actual Wii console and power adapter mounted inside the case.

Given the size constraints of his 3D printers, he used melamine MDF for the sides and had to print the other panels in multiple pieces, resulting in some gapping in the front panel where the prints peeled off the print bed. We really love the use of a modular design that leaves room for future improvements, since no project is ever truly done.

Power is routed through a figure eight power connector on the outside to a female two prong plug on the inside while USB and HDMI are routed out the back via a combination panel connector intended for RV and boat use. If you don’t remember the Wii having HDMI out, that’s because it didn’t, but HDMI adapters are easy to come by for the machine.

In case you want to see more supersized projects checkout this giant XBox Series X or ponder if it would’ve been better with an enormous 555.

Continue reading “Wii XL Is Twice As Nice”

An M1 Mac mini sits next to a white Wii on a wooden table. In the background are various Edison-style LED light fixtures with an incadescent-like light profile.

This Wii Has An Apple M1 Inside

The conveniently tiny logic board of the M1 Mac mini has lead to it giving the Mini ITX format a run for its money in case mods. The latest example of this is [Luke Miani]’s M1 Wii. (Youtube via 9to5Mac)

[Miani] chose the Wii as a new enclosure for this Mac mini given its similar form factor and the convenient set of doors in the top to maintain access to the computer’s I/O, something he wasn’t able to do with one of his previous M1 casemods. The completed build is a great stealth way to have a Mac mini in your entertainment center. [Miani] even spends the last several minutes of the video showing the M1 Wii running Wii, GameCube, and PS2 games to really bring it full circle.

A Microsoft Surface power brick was spliced into the original Wii power cable since the Wii PSU didn’t have enough wattage to supply the Mac mini without significant throttling. On the inside, the power runs through a buck converter before making its way to the logic board. While the Mini’s original fan was too big to fit inside the Wii enclosure, a small 12V fan was able to keep performance similar to OEM and much higher than running the M1 fanless without a heat spreader.

If you’d like to see some more M1 casemods, check out this Lampshade iMac or the Mac Mini Mini.

Continue reading “This Wii Has An Apple M1 Inside”

Hackaday Links Column Banner

Hackaday Links: December 29, 2019

The retrocomputing crowd will go to great lengths to recreate the computers of yesteryear, and no matter which species of computer is being restored, getting it just right is a badge of honor in the community. The case and keyboard obviously playing a big part in that look, so when a crowdfunding campaign to create new keycaps for the C64 was announced, Commodore fans jumped to fund it. Sadly, more than four years later, the promised keycaps haven’t been delivered. One disappointed backer, Jim Drew, decided he was sick of waiting, so he delved into the world of keycaps injection molding and started his own competing campaign. Jim details his adventures in his Kickstarter Indiegogo campaign, which makes for good reading even if you’re not into Commodore refurbishment. Here’s hoping Jim has better luck than the competition did.

Looking for anonymity in our increasingly surveilled world? You’re not alone, and in fact, we predict facial recognition spoofing products and methods will be a growth industry in the new decade. Aside from the obvious – and often illegal – approach of wearing a mask that blocks most of the features machine learning algorithms use to quantify your face, one now has another option, in the form of a colorful pattern that makes you invisible to the YOLOv2 algorithm. The pattern, which looks like a soft-focus crowd scene rendered in Mardi Gras colors, won’t make the algorithm think you’re someone else, but it will prevent you from being classified as a person. It won’t work with any other AI algorithm, but it’s still an interesting phenomenon.

We saw a great hack come this week about using an RTL-SDR to track down a water leak. Clayton’s water bill suddenly skyrocketed, and he wanted to track down the source. Luckily, his water meter uses the encoder receive-transmit (ERT) protocol on the 900 MHz ISM band to report his usage, so he threw an SDR dongle and rtlamr at the problem. After logging his data, massaging it a bit with some Python code, and graphing water consumption over time, he found that water was being used even when nobody was home. That helped him find the culprit – leaky flap valves in the toilets resulting in a slow drip that ran up the bill. There were probably other ways to attack the problem, but we like this approach just fine.

Are your flex PCBs making you cry? Friend of Hackaday Drew Fustini sent us a tip on teardrop pads to reduce the mechanical stress on traces when the board flexes. The trouble is that KiCad can’t natively create teardrop pads. Thankfully an action plugin makes teardrops a snap. Drew goes into a bit of detail on how the plugin works and shows the results of some test PCBs he made with them. It’s a nice trick to keep in mind for your flexible design work.

Grate Design On This Cutting Edge Raspberry Pi Case

Love ’em or hate ’em, you’ve got to hand it to Apple: they really know how to push people’s buttons with design. Their industrial designers can make a product so irresistible – and their marketing team can cannonball the hype train sufficiently – that people will stand in line for days to buy a new product, and shell out unfathomable amounts of money for the privilege.

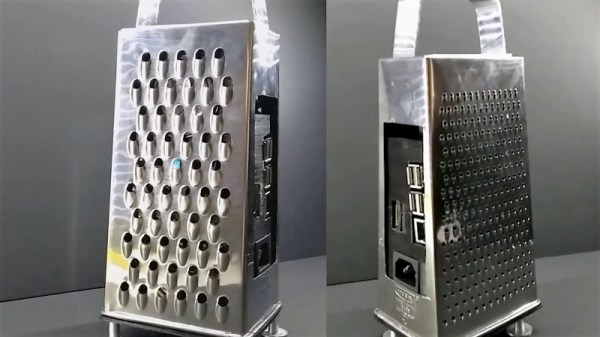
But what if you’re a poor college student without the budget for such treasures of industrial design? Simple – you take matters into your own hands and stuff a Raspberry Pi into a cheese grater. That’s what a group of engineering students from the University of Aveiro in Portugal called [NeRD-AETTUA] did, in obvious homage to the world’s most expensive cheese grater. The video below for the aptly named RasPro is somewhat less slick that Apple’s promos for the Mac Pro, but it still gets the basics across. Like the painstakingly machined brushed aluminum housing on the Mac, the IKEA cheese grater on the RasPro is just a skin. It covers a 3D-printed chassis that houses a beefy power supply and fan to go along with the Raspberry Pi 3. There’s also a speaker for blasting the tunes, which seems to be the primary use for the RasPro.

All things considered, the cheese grater design isn’t really that bad a form factor for a Pi case. If that doesn’t appeal, though, take your pick: laser-cut plywood, an Altoids tin, or even inside your PC.

Continue reading “Grate Design On This Cutting Edge Raspberry Pi Case”