Wooden Game Boy Is A Challenging Intro CNC Project

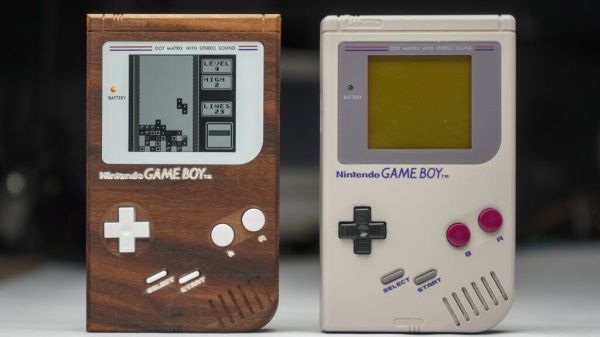
[Sebastian] describes himself as “a total noob” when it comes to CNC, so in an attempt to get to know his new CNC router, he chose about the most complex possible project — replicating an original Game Boy case in wood. And spoiler alert: he nailed it.

Of course, he did have a few things going for him. At least from a straight woodworking perspective, it’s hard to go wrong by choosing walnut as your material. Then again, it can be unforgiving at times, and picky about tooling, which is probably why [Sebastian] used nine different tools to get the job done. But where he upped the difficulty level was in reproducing so many of the details of the original injection-molded plastic case. There are top and bottom shells, each of which has to be milled from both sides. This makes registration tricky when the parts are flipped. Specific indexing holes were used for that, along with the old “blue tape and CA glue” fixturing trick, which seemed to work quite well. For our money, though, the best bit is the lettering on the front face, which was milled out with an engraving bit and then filled with a spritz of white spray paint. A surfacing bit then came along to knock the overspray down, leaving labels that contrast beautifully with the dark wood. Gorgeous!

It wasn’t all easy sailing, though. There are just some things plastic can do that wood can’t, like holding screw threads in small studs without splitting. So, the case had to be glued shut once the mix of salvaged and new components went in. Still, it looks fabulous, and [Sebastian] says what we see in the video below is the one and only piece. Pretty sweet for the first try. Surprisingly, it doesn’t seem as if we’ve seen a wooden Game Boy before — a wooden NES, sure, but not a Game Boy.

Continue reading “Wooden Game Boy Is A Challenging Intro CNC Project”

The Best-Sounding Walnut You’ll Hear Today

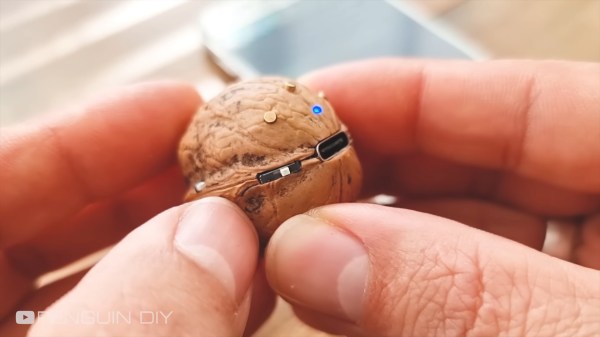
Do you ever find yourself eating walnuts and think, this would make a great enclosure for something like a Bluetooth speaker? That seems to be exactly what happened to [Penguin DIY].

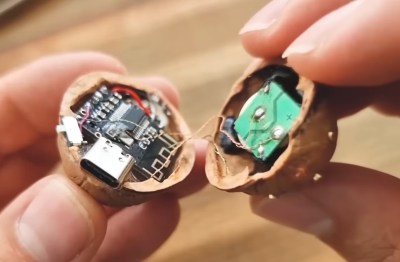
In the mesmerizing video after the break, you’ll see [Penguin DIY] do what seems to be impossible. They start with a tiny 5 V power bank module which is still not small enough to fit, so they remove all the components and dead-bug them back together.

This is really just the beginning. There of course has to be a female USB of some type, so [Penguin DIY] Dremels out the perfect little slot for it.

They did manage to stack and fit a MH-MH18 Bluetooth audio module and an HXJ8002 mini audio amplifier module in the walnut, but of course, it took a lot of fiddly wiring to extend the LEDs and wire them up.

Then in the other half of the shell went the 4Ω 2 W mini speaker. [Penguin DIY] of course drilled a ton of little holes in the shell for the sound to come through. Also on this side are three tiny switches for play/pause and previous and next track, and the latter two can be long pressed to control the volume. Definitely check this out after the break.

Do the notifications of your Bluetooth speaker annoy you? There’s a hack for that.

Continue reading “The Best-Sounding Walnut You’ll Hear Today”

Walnut Case Sets This Custom Arduino-Powered RPN Calculator Apart From The Crowd

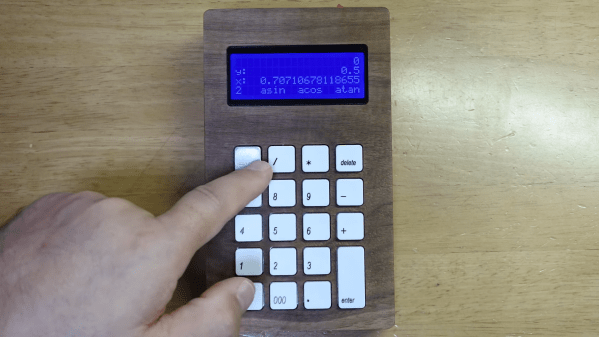
How many of us have an everyday tool that’s truly unique? Likely not many of us; take a look around your desk and turn out your pockets, but more often than not, what you’ll find is that everything you have is something that pretty much everyone else on the planet could have bought too. But not so if you’ve got this beautiful custom RPN calculator in a wooden case.

This one comes to us from [Shinsaku Hiura], who generally dazzles us with unique mechanical clocks and displays. This calculator solves a more practical problem — the dearth of RPN calculators on the market with the correct keyboard feel, specifically with the large keys and light touch he desired. Appropriately, the build started with a numeric keypad, which once liberated of its USB interface was reverse-engineered to figure out how the matrix was wired. Next up, a custom PCB to connect the keypad to an Arduino and a 20×4 LCD display was milled up, while a test case was designed and printed to check fitment. The final case was milled from a block of solid walnut and fitted with an acrylic window, for a sharp look with clean lines and pleasing colors.

As for the calculator itself, the demo below shows it going through its paces. The code is clever because it leverages the minimal number of keys available by hiding all the scientific and engineering functions behind a “secret silver key” that was once the equals key and obviously not needed in RPN. Hats off to [Shinsaku] for a handsome and unique addition to his desk.

Continue reading “Walnut Case Sets This Custom Arduino-Powered RPN Calculator Apart From The Crowd”

Heirloom Knife Will Carve Pumpkins For Years To Come

Halloween may be behind us, but that just means that we’ve reached the best time to buy pumpkins. After all, it’s still fall, and there are pies to be made and tables to be decorated. Why should carved-up pumpkins be restricted to spooky season?

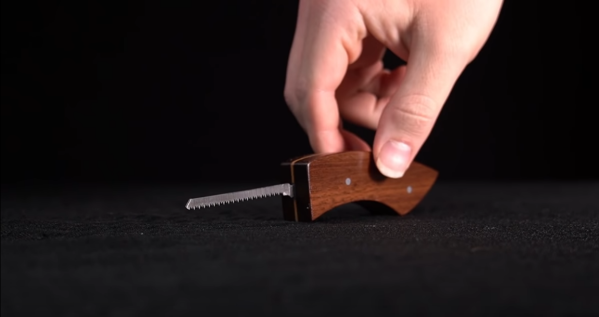
The only problem is that it’s 2022, and we’re still expected to use those terrible little serrated knives to carve our pumpkins. Those orange-handled garbage ‘knives’ are hardly suited to cut the lid, much less carve any of the intricate designs that come in the little booklet. So what’s a pumpkin-carving enthusiast to do? If you’re [XYZ Create], you make your own out of walnut, maple, and a gently-used jigsaw blade that’s still way sharp enough to tear through pumpkin flesh.

[XYZ Create] started with a nice chunk of walnut, which he split lengthwise in order to insert the blade, which sits in a cavity within a thin piece of maple. Once [XYZ Create] had the handle ready to go, he inserted the jigsaw blade and epoxied the sandwich together. After sanding down the edges to make a comfortable grip, he finished off the build by rubbing a bit of carving board wax into the handle. Check out the build video after the break.

Continue reading “Heirloom Knife Will Carve Pumpkins For Years To Come”

A New Wrinkle On Wooden Ribbon Microphones

Not too many people build their own microphones, and those who do usually build them out of materials like plastic and metal. [Frank Olson] not only loves to make microphones, but he’s also got a thing about making them from wood, with some pretty stunning results.

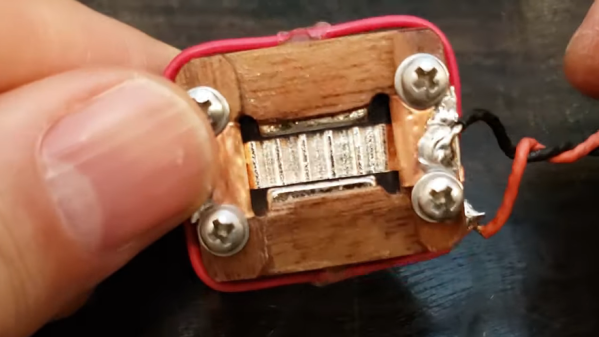
[Frank]’s latest build is a sorta-kinda replica of the RCA BK-5, a classic of mid-century design. Both the original and [Frank]’s homage are ribbon microphones, in which a thin strip of corrugated metal suspended between the poles of magnets acts as a transducer. But the similarities end there, as [Frank] uses stacked layers of walnut veneer as the frame of his ribbon motor. The wood pieces are cut with a vinyl cutter, stacked up, and glued into a monolithic structure using lots of cyanoacrylate glue. The video below makes it seem easy, but we can imagine getting everything stacked neatly and lined up correctly is a chore, especially when dealing with neodymium magnets. Cutting and corrugating the aluminum foil ribbon is no mean feat either, nor is properly tensioning it and making a solid electrical contact.

The ribbon motor is suspended in a case made of yet more wood, all of which contributes to a warm, rich sound. The voice-over for the whole video below was recorded on a pair of these mics, and we think it sounds just as good as [Frank]’s earlier wooden Model 44 build. He says he has more designs in the works, and we’re looking forward to hearing them, too. Continue reading “A New Wrinkle On Wooden Ribbon Microphones”

Sol-20 reproduction

Retro Reproduction Captures The Style Of The Sol-20

In the early years of the computer revolution, a machine like the Sol-20 really stood out. Where most hobbyist machines had front panels that bristled with toggle switches and LEDs, the Sol-20 was a sleek, all-in-one that looked like an electric typewriter in a walnut-trimmed box. Unfortunately, it was also quite expensive, so not that many were sold. This makes them hard enough to find 40 years later that building his own reproduction Sol-20 is about the only way for [Michael Gardi] to have one of his own.

In a lot of ways, the Sol-20 anticipated many of the design elements that would come into play later. Like the Apple and Commodore machines that were coming down the pike, the Sol-20 was intended to be plug and play. [Mike] celebrates that design with a full-size reproduction of the original, concentrating on its unique aesthetic aspects. The reproduction mimics the striking blue case, with its acrylic front panel and walnut sides. The keyboard is also an exact match for the original, in looks if not in function — the capacitive mechanism proved too difficult to replicate, so he opted for a kit using Cherry switches and custom keycaps. [Mike] also used his proven technique for 3D-printing the memorable Sol-20 logo for the front panel, in the correct font and color.

Under the hood, a Raspberry Pi runs an 8080 emulator, which supports a range of virtual devices, including a cassette tape drive and the video output. For fun, [Mike] also imagined what a CRT display for the Sol-20 would have looked like, and added that to his build. It’s a great-looking machine that never was, and we appreciate the attention to detail. We’ve seen that before — his 2/3-scale VT-100 terminal comes to mind, as does his reproduction of a 1960s computer trainer.

Wooden Linear Clock Aided By GPS

The notion of segmenting and quantizing the day into discrete segments of time is perhaps one of the most human things we do. Heralding back to a simpler era when a day was just a progression of sunrise to sunset, [James Wilson] created a beautiful linear clock that shows time as progress throughout the day.

For previous projects, [James] had used nixie tubes but the headache of the inverters, high voltages, and tight spaces led him to instead use mini-LED’s. Two PCBs were manufactured, one as the display and one to hold the GNSS module as it works best when mounted horizontally to point at the sky. Two rows of 112 tightly packed LEDs make a great stand-in for bar graph style tubes and are are controlled by TLC5926 shift registers. The venerable STM32G0 was chosen as the microcontroller to power the clock. With the help of some approximating functions and the location provided by the GNSS module [James] had the position of the sun which he then could turn into a % of progress through the sky.

The enclosure was modeled after the mid-century modern look and made of several pieces of wood CNC’d and then glued together. Machining it out of a solid piece of wood would have been difficult as finding long enough end mills that could carve out the interior is tricky. We think the resulting clock looks wonderful and the walnut accents the maple nicely.

The writeup is highly detailed and we love the honest explanations of what choices were made and why. The code is available on GitHub. Or if perhaps you’d rather eschew the LED’s and go for something more physical there’s always this ratcheting linear clock to draw inspiration from.