We’ll admit it. The closer a project is to completion, the less enthusiasm we have for it. Once the main design is clearly going to work on a breadboard, we’re ready to move on to the next one. We don’t mind the PCB layout, especially with modern tools. However, once the board is done, you have to do the case. Paradoxically, this was easier in the old days because you just picked some stock box, drilled some holes, and while it looked terrible, it was relatively easy.
Today, the bar is much higher. You’ll probably 3D print or laser cut an enclosure. If it looks no better than what you did in the 1970s, you won’t win many admirers. We routinely cover projects that could easily pass for commercial products. So how do you do it?
The Parts
The enclosure may even be the easy part. There are plenty of scripts and generators that will make you a nice box that meets your specifications. You can probably even get the holes made as you build. Back in the day, it was a challenge to cut odd-shaped holes for things like serial port connectors. Now, no problem. The printer or laser will just make a hole with any shape you like. You may even want to try a new angle on 3D printing.
Mounting the PCB isn’t that hard, either. With 3D printing, you can create standoffs, but even if you laser cut, you can easily use conventional standoffs. In a pinch, we’ve used long bolts with nuts.
The real problem, it seems to us, is the front panel. Only Star Trek can get away with front panels containing a bunch of knobs and dials with no markings. And although we call them “front” panels, sometimes you need markings on the back or even the sides, too.
Front Panel Options
There are companies that will make front panels for you, and those are usually silk-screened with legends. You could, of course, silk screen yourself if you have the ability to do that. What are your other options?
Labels aren’t going to cut it anymore. However, you can use rub on letters if you are very careful. We’ve used water slide paper — the same kind you see in model kits. You can find water slide paper that will run through computer printers.
Another option is to do the toner transfer trick you often see for PCBs, but use it on your front panel. Since that takes heat, it isn’t going to work on 3D-printed panels, though. For that matter, you can just use a PCB as a front panel and then make it the same way you make other boards. Silk screening is easy, then, and here’s a secret: you can make PCBs with no copper on them at all! You can even use them for the entire enclosure.
We have seen good-looking laminated color prints that look better than labels. If you don’t want to do your own printing, sign companies can print Dibond aluminum, which works well. You can laser engrave acrylic and fill the engraved areas with ink or wax for contrast or even use a two-tone material made for laser etching.
The video below uses multicolor 3D printing to create custom panels in a way we haven’t seen before. These panels go in an airplane simulator and are made to have good visibility in different lighting conditions.
Over To You…
What’s your go-to method for creating marks on panels? When do you go through the trouble? After all, if you are building a one-off piece of gear for your own use, maybe a label maker is all you really need. Let us know in the comments. The good news is that there are many ways to make great-looking panels now. The bad news is now we are expected to make them!
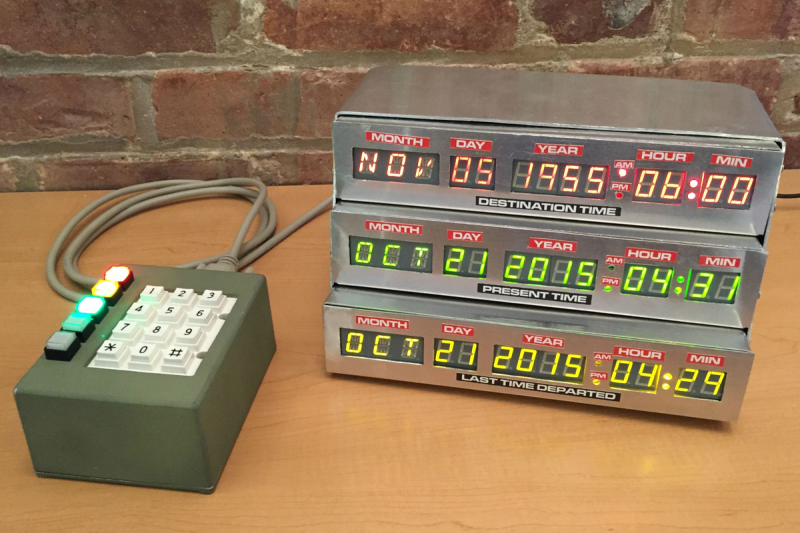
Featured image from this sweet hack.


Hey, this is me!
I love the designing and building part, but I have a shelf of projects in antistatic bags and plastic bins that effectively died at the enclosure stage.
I get the process to make an enclosure, and have a few things i want to try like the hammond boxes with the pcb covers instead of cutting aluminum. (I also really like Takachi enclosures)
Then I get to the state where it needs an enclosure and I always find issues with the design that make me reconsider layout and I want to redesign it again for a better user experience… then I get to the part of the enclosure and find issues… and repeat…
Before 3D printers I often felt that good enclosures were too expensive for cutting into when you aren’t 100% sure of your design. And being 100% sure was hard without a prototype.
Old candy tins from the thrift shop though… it didn’t feel as guilty to cut into those.
Or you can prototype w/ cardboard. I’ve had things go into use and stay that way before.. still cardboard!
I love how I can see it, even move it around in 3 dimensions on the screen then print it now. And while I am trying to print fewer test pieces (to produce less waste) there is a lot less riding on getting it right the first time than with a $100 project box. (Yes, the really good looking ones did get that high and I’m talking 1990s dollars!)
Cardboard Aided Design. The original CAD.
I use that all the time with metalworking. Saves so many problems. I make prototypes like that and it’s so great as I can easily trace the design onto metal.
Exactly! Great way to ensure things fit before you drill holes.
>good enclosures were too expensive for cutting into
I never understood that point – the face plate is something you make separately out of some nice stock if you want it to look any good. A 3D printed face plate looks just as cheap as off-drilled holes in your store-bought box – it’s just a different kind of cheap.
Pretty killer!
If I am designing a 3d printed enclosure then I work the label into that.
Even if I am using someone else’s design, if I think it needs some labeling I might import it and add my labels before printing.
I currently only have a single extruder so just how I accomplish this depends on the geometry.
If I can print the panel flat, parallel to the bed then that is ideal.
I subtract the labels from the top of the panel making them debossed.
But that alone doesn’t look so great and isn’t as visible as one might like.
I fix this in the slicer by adding a pause a couple layers below the depth of the debossing and a second pause just above that.
After the first pause I switch filaments to another color that stands out well. After the second pause I switch back. The result is that on the face of the panel, the second color is all covered up except for the text and markings of your label. There you can see down to it and the color choice makes it pop.
So long as you use chunky characters with no parts too fine for your printer to accurately capture this turns out looking pretty good!
Of course.. that does leave a stripe along the edge of the panel. If you are printing the panel separate from the rest of the box then that can be covered up with a shadowline. Otherwise… you have a stripe around the edge of your box. Consider it an extra decoration that comes for free.
Of course.. if you aren’t printing the panel separate.. and it cannot be easily oriented to be parallel to the bed.. then this isn’t going to work. Not with just one nozzle and anything approaching a reasonable number of filament changes.
In this case, instead of subtracting the label to deboss it I add the label embossing it. Then I just go ahead and print it all one color. When I am done, then I take a sharpie, color chosen to stand out and go over just the top of the embossing.
That way.. isn’t great.. but it’s better than labels or coloring by hand! Where I have done this I used white ABS and a black sharpie. I wouldn’t say it looked factory made.. but it actually wasn’t all that bad!
Sometimes… successfully pausing and resuming a 3d print takes some tweaking of the printer’s firmware and/or slicer.
For example, I’ve had to re-compile Marlin to add in pause support.
I also had to switch my slicer from relative to absolute positioning.
And if you want to use the “pause for filament change” command, not just a generic pause…
The default Marlin settings for that… once I enabled it.. came with so much retraction they caused a clog in my coldend every time! (All you Boden Tube users really are living in a different world from us Direct Drive users)
So.. anyway.. the point is.. don’t try this for the first time 23 hours in to your 24 hour print. Try some filament changes on a small test piece first. Make yourself a stripey calibration cube or something!
Or use a slicer like Prusa slicer that handles the filament change pauses for you.
I do use Prusa.
But that just creates the G-Code. M600 for filament change, something else, I don’t remember what for just plain pause.
Your printer has to understand it and do the right thing when it receives it. Thus all the talk about recompiling Marlin. Maybe yours came ready to go? Mine is scratch-built so I had to build Marlin myself originally. And those options aren’t enabled by default and are configured in a why that is really bad for my printer until tweaked once they are turned on.
I don’t know about all the latest and greatest commercially built printers out there. But my understanding is at least many of the cheap ones are still shipping with Marlin and with the pause command support disabled. So… their customers would have to rebuild Marlin too.
Besided that… I don’t know. When I first did this I was using Prusa’s parent project Sic3r. With it’s default setting of relative movements the hotend wouldn’t return back to it’s original spot automatically. I’d lift it and move it over to change filament. Un-pause… and it would just print from that spot in mid-air!
That was just a regular pause command though… I’m not sure M600 was a thing yet or if it was I didn’t know about it. Maybe it wouldn’t have been an issue with M600.
I imported those settings from Slic3r to Prusa years ago so I don’t know if today’s out of the box Prusa behaves better or not.
A good method I’ve used before is to print the label on a standard printer, similar to the lamination technique. Then use a clear acrylic spray either on the panel or the back of the paper, and fix the two together. When dry you use a sharp knife for all the cutouts then finish with another clear coat or 2. Done right it can look fantastic.
Rear etched polycarb/acrylic, sprayed with the desired lettering colour so it sinks into the etching then sanded lightly and oversprayed with the background colour looks really good (I think so anyway, your opinion may differ)
I’ve also used printable transparencies, laminated printed paper and I’ve not long ago got my hands on a vinyl cutter that was intended for crafters which makes decent lettering and symbols .
I’ve also mulled over using a crafter’s embossing machine with 3D printed dies to make aluminium front panels (like dog tags or licence plates)
But, as I commented on the digital sampler, I’d love the skill to hand paint front panels, even if they are ‘amateurish’ throwbacks to the 70s
Plus one for colored laminated panel covers. I used this with great effect for my CHESSmate reproduction (https://hackaday.io/project/194011-commodore-chessmate-reproduction). Also embossing or debossing labels on 3D printed panels is one of my favorite gotos provided the text is not too small.
Spray paint a piece of clear acrylic black, engrave text mirrored on painted side and cut holes and outline on CO2 laser cutter, spray paint white. The white is only visible where the black was engraved away, and this leaves you with a white-on-black front panel, which is flat since the engraving was done on the backside.
This is the exact method I have been using since I got my 75 watt Epilog over 10 years ago. I have not found a better/easier method yet.
I do this too on my CNC. The only other add I have: You can also do this on thin acrylic and mount that on an identically cut (sans lettering of course) Al panel, using spray adhesive. Great for rack gear.
Normally this article describes me. Once I know a project works I lose interest….. My current project however I may have found a decent approach.
This project was my first full scale complete project: determine and purchase parts, design and make the pcb for the parts, design and make the enclosure, create the firmware.
I started out with the firmware after breadboarding and got a decent way on it and started getting bored. So I switch to PCB design. The large version was easy, but the miniaturized final hardware took 2 iterations because of errata.
After those were done I was a bit fed up with both software and PCB’s so I bought a 3d printer and started on the case. It has been a long time since I used SolidWorks in college, but I found fusion to be very similar and easy to pick up. Multiple iterations later I had a very nice case. Didn’t want to use a service as it is a sandwich design that holds through friction, and multiple orders from a service would almost make it worth buying the printer. Plus Bambu makes a great product.
Went back to firmware and trying to wrap up the bare minimum functionality on the multiple month project sometime soon. I still have more to add to it fw wise after that, but it isn’t a rush.
The last time I had to do this for a small production run was so long ago that I made my own art with Letraset – remember that? Then I made my own frames and stretched silkscreen fabric onto them, and used a tanning lamp to expose Novastar film before applying it to the screens. Then I used said screens both to letter the front panels, and to ‘ink’ the PCB’s before etching them myself. (The front panels were clear lids on Hammond boxes. I used a mailing label to mask off the display area, spray-painted the lids, peeled the labels off, then silk-screened the lettering onto the spray paint).
Gah, that was four decades ago. Nowadays I send out Gerber files and have PCB’s shipped back to me. I haven’t had to do front or rear panels in a long time. But if I had to do it today, and the panels were metal, I’d have a go at using the Toner Transfer method, followed by a matte clear-coat. Any colour you want, as long as it’s black…
Speaking of Toner Transfer – if the panels were aluminum, I’d probably also try transferring a negative image onto the panel, masking off the edges and the back side, and putting it in ferric chloride for as long as it took to etch the image. Apply some enamel to the etched areas, squeegee / wipe off the excess, and call the job done.
Many of those Hammond cases work really well with PCB panels. The bezels hide the PCB edges. Shielding is an obvious thing to use the copper layer for, but you can also abuse the copper and the solder mask to make backlit labels etc. I haven’t tried capacitive touch buttons but I see no reason why those couldn’t work too. Just don’t use the the cheap lead-based HASL for stuff you are going to touch!
I make my enclosures out of wood. This used to be some ugly scraps screwed together, but as I’m doing a fine woodworking course, I would love to see what I can come up with now I know how to properly handle a chisel.
I’m trying to figure out how to make a front panel with LEDs behind it. I want something like what the PiDP-11 has.
I could have a transparent red acrylic sheet, but there seems to be no way to print on it.
I could print a vinyl sticker to put on top of the acrylic, but I don’t have a good way to precisely cut holes to match the holes in the acrylic.
Anyone have a method?
Make a sheet covering the entire panel and cut the holes out with a hobby knife using the actual acrylic as the template – really lessens the chances for messing up the holes and the alignment.
You can even float the sheet into place with soapy water and squeegee the water out when everything is properly located. Give it 24 hours to dry and you’ll be ready to trim. You’ll need a waterproof ink for that though.
Draft it up as if it were a PCB, and have one of the Chinese manufacturers make you a nice FR4 or aluminum panel with silkscreening and cutouts professionally done
I have a single extruder 3D printer with a physical hall-effect ABL sensor (BL Touch). When I wanted a nice cover for a project box, I first printed the flat portion of the cover in black. Once the print completed, I left it still stuck down on the bed and started a new print in white filament for just the text. I tweaked the g-code so that it homed the Z axis, but didn’t do a full ABL. Since the part was still in the center of the bed, the ABL sensor encountered it during homing and determined the top of it was the new bed height. Because I hadn’t moved the printed part after it had finished printing, the X and Y were still aligned. The lettering printed directly on top of it, and it worked out quite well.
I have done this by breaking the face part into multiple layers that stack with beveled edges. Think puzzle that can only be assembled 1 way.
Then you can print what you want in the desired colors and just glue or screw it in with a backer piece depending on how you want to customize it.
The nice thing about doing it this way is you can change things after the fact and the largest part of your enclosure doesn’t need to be reprinted.
Printing in color on a photographic paper at a high quality and then using a clear matte laminate sheet (available at many craft stores) makes a great one-off (or low quantity) labels for panels (as well as information labels as well). Punch holes for LEDs to shine through and the label even works to activate pushbuttons if you get the mechanics right.
I’ve made many such labels for early prototypes for customers over the years for things like tradeshow devices and other similar needs as well as making more finished things for myself.
Works great and you can use the same artwork to have commercial labels produced if you want to go that way.
Laser engraver and either direct etch on anodized aluminium or Rowmark LaserLITES label stock.
I bought a pack of laser-printable vinyl covers – in silver colour.
Using this to design and cover the entire face of my controller made it look very nice for a home DIY job.
Pic here for the curious https://www.instagram.com/p/Cd2GijzPkMu
Nice woodworking on the link!
(I don’t have a login for Meta, so I could only see the thumbnails)
Electrical, Software, Timber, 3d Printing…. hacking and creating in many ways :D
Looks good! Do you have a product/brand name for the printable vinyl that I can put into a search engine?
Whatever happened to 3M Scotchcal UV sensitive labels? Years ago, you would tape and letraset your design onto clear film, sandwich that over some Scotchcal adhesive label material, expose to UV light, then wash-off unwanted colour with isopropanol alcohol. A quick coat of clear spray lacquer, and hey presto!
The advent of laser printers made the whole process even easier. Print the design onto tracing paper (no, not overhead transparencies), place toner side down over the label material before exposure (just like homemade PCBs), and the results were even more impressive.
I´ve successfully used 2 colour 3d printing for this. I have a Bamboo A1 but without the AMS so I have to change colours manually but it works perfectly. The viewed side is printed onto the printer plate to guarantee a flat finish. I use Freecad for the design. I also have successfully printed a multi 7-segment led display bezel in a mix of black plus transparent for diffusing light from high intensity LED´s for a HUD I made for my plane. Very happy with the results I have obtained.
If I’m being sloppy: sharpie
If I’m being neat: laser engraver or sticker cutter
If I’m having fun: find some vintage control panel in the junk pile and modify it
I have definitely done 1 and 3. Old enclosures are great too, I still have an old modem that I’ve been planning to put my pi-hole into since 202. Maybe I should just accept that it’s a “stand” for a bare Pi, and will may never actually enclose it :-)
I used to do all the enclosures modifying other old cabinets by hand and the help of a Dremel, but I got tired. It is messy, it takes too much time and work. Now I use the 3d printer, whic is great for that. I don’t have a lase cutter, but I also seems a good option for this kind of work.
And one question: can anybody recomend a cheap one or tow online services to create color front panels ?
https://www.frontpanelexpress.com/
+1 to frontpanel express!
Depends on your definition of “cheap”, but https://www.protocase.com/ is very good, and very fast. Many labeling and panel options: full color UV prints, engraving plain or ink-filled, rubber stamp, silkscreen, dot peening… https://www.protocase.com/resources/faq/faq-graphics.php
Highly recommended. No affiliation, just a happy customer.
I use to reuse enclosures from old stuff. A few times reused those fitted blown tool cases. A couple of times completely by hand using thin steal as the sides and thin plywood for the top and bottom. The last case by hand I made was using copper clad PCBs Now I use 3D printers to do it.
I’ve had luck at the local antique fair, grabbing old photographic or electronic equipment, then designing a new faceplate with my laser cutter. This one in particular I also ended up with ~20 precision pots and metal knobs that would have cost me ~$50 to purchase separately!
https://imgur.com/nerd-activity-center-qtOTQiZ
Bare or painted Al:
CNC engrave, fill with paint or pastel, clean off excess, then lacquer
Anodized Al:
CNC with an engraving bit
I also have vinyl and transfer tape, which I can CNC with a drag knife, but picking off excess for panels loaded with a lot of small lettering I think would be tedious and accident prone.
3D printer to make bezels or whole cases. Print some labels with a label maker. Not the fastest, but cheap and turns out nice.
The one option not mentioned that I’ve used myself is to use a regular laser printer to print the mirror of the labels, then with an iron or solvent you can transfer the toner to object (folks have used this method to etch their own PCB). Print onto something slightly shiny like magazine paper and it tends to release the toner really easily when ironed. Is really quite durable as a finish and looks really good if you do it right, though I don’t think it would be a good choice on any FDM print, it might be possible but seems like you would probably be flying quite close to the sun to get the toner to transfer without harming the print.
I’d also join the group suggesting using transparent materials with the label on the inside of the project – really not needed on every project but it is rather hard to argue with the durability and legibility after being exposed to real life. And for the quicker/cheaper projects it is really really hard to argue with the results you can get from a sharp craft knife, colour printer and laminator. Though honestly for most things I find the embossed plastic ribbon tape label to be the right choice – not pretty, but far from ugly and very easy.
For cardboard aided design, I sometimes use Milk / juice / Tetrapak carboard. It’s very high quality cardboard with plastic foil laminated on it on two side, so it’s also water resistant (except where you cut it)
When I had an inkjet, I’d print mirror onto a transparency sheet, then stick that sheet on to the boxes aluminium faceplace. The ‘ink’ being sandwitched between the transparency and the aluminium making it impossible to scratch off.
Though I have made a few one of my fav’s is to copy black on a projector slide so only lit LEDs are visible. Other labeling can also be included. Makes for possibly faster completion repetibility.