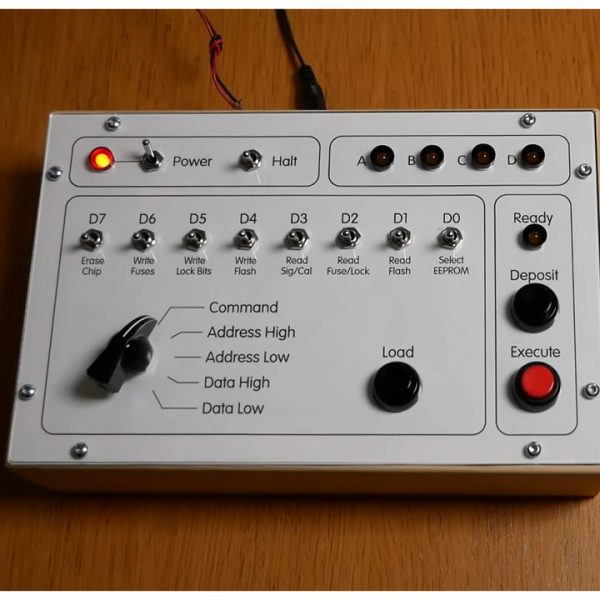
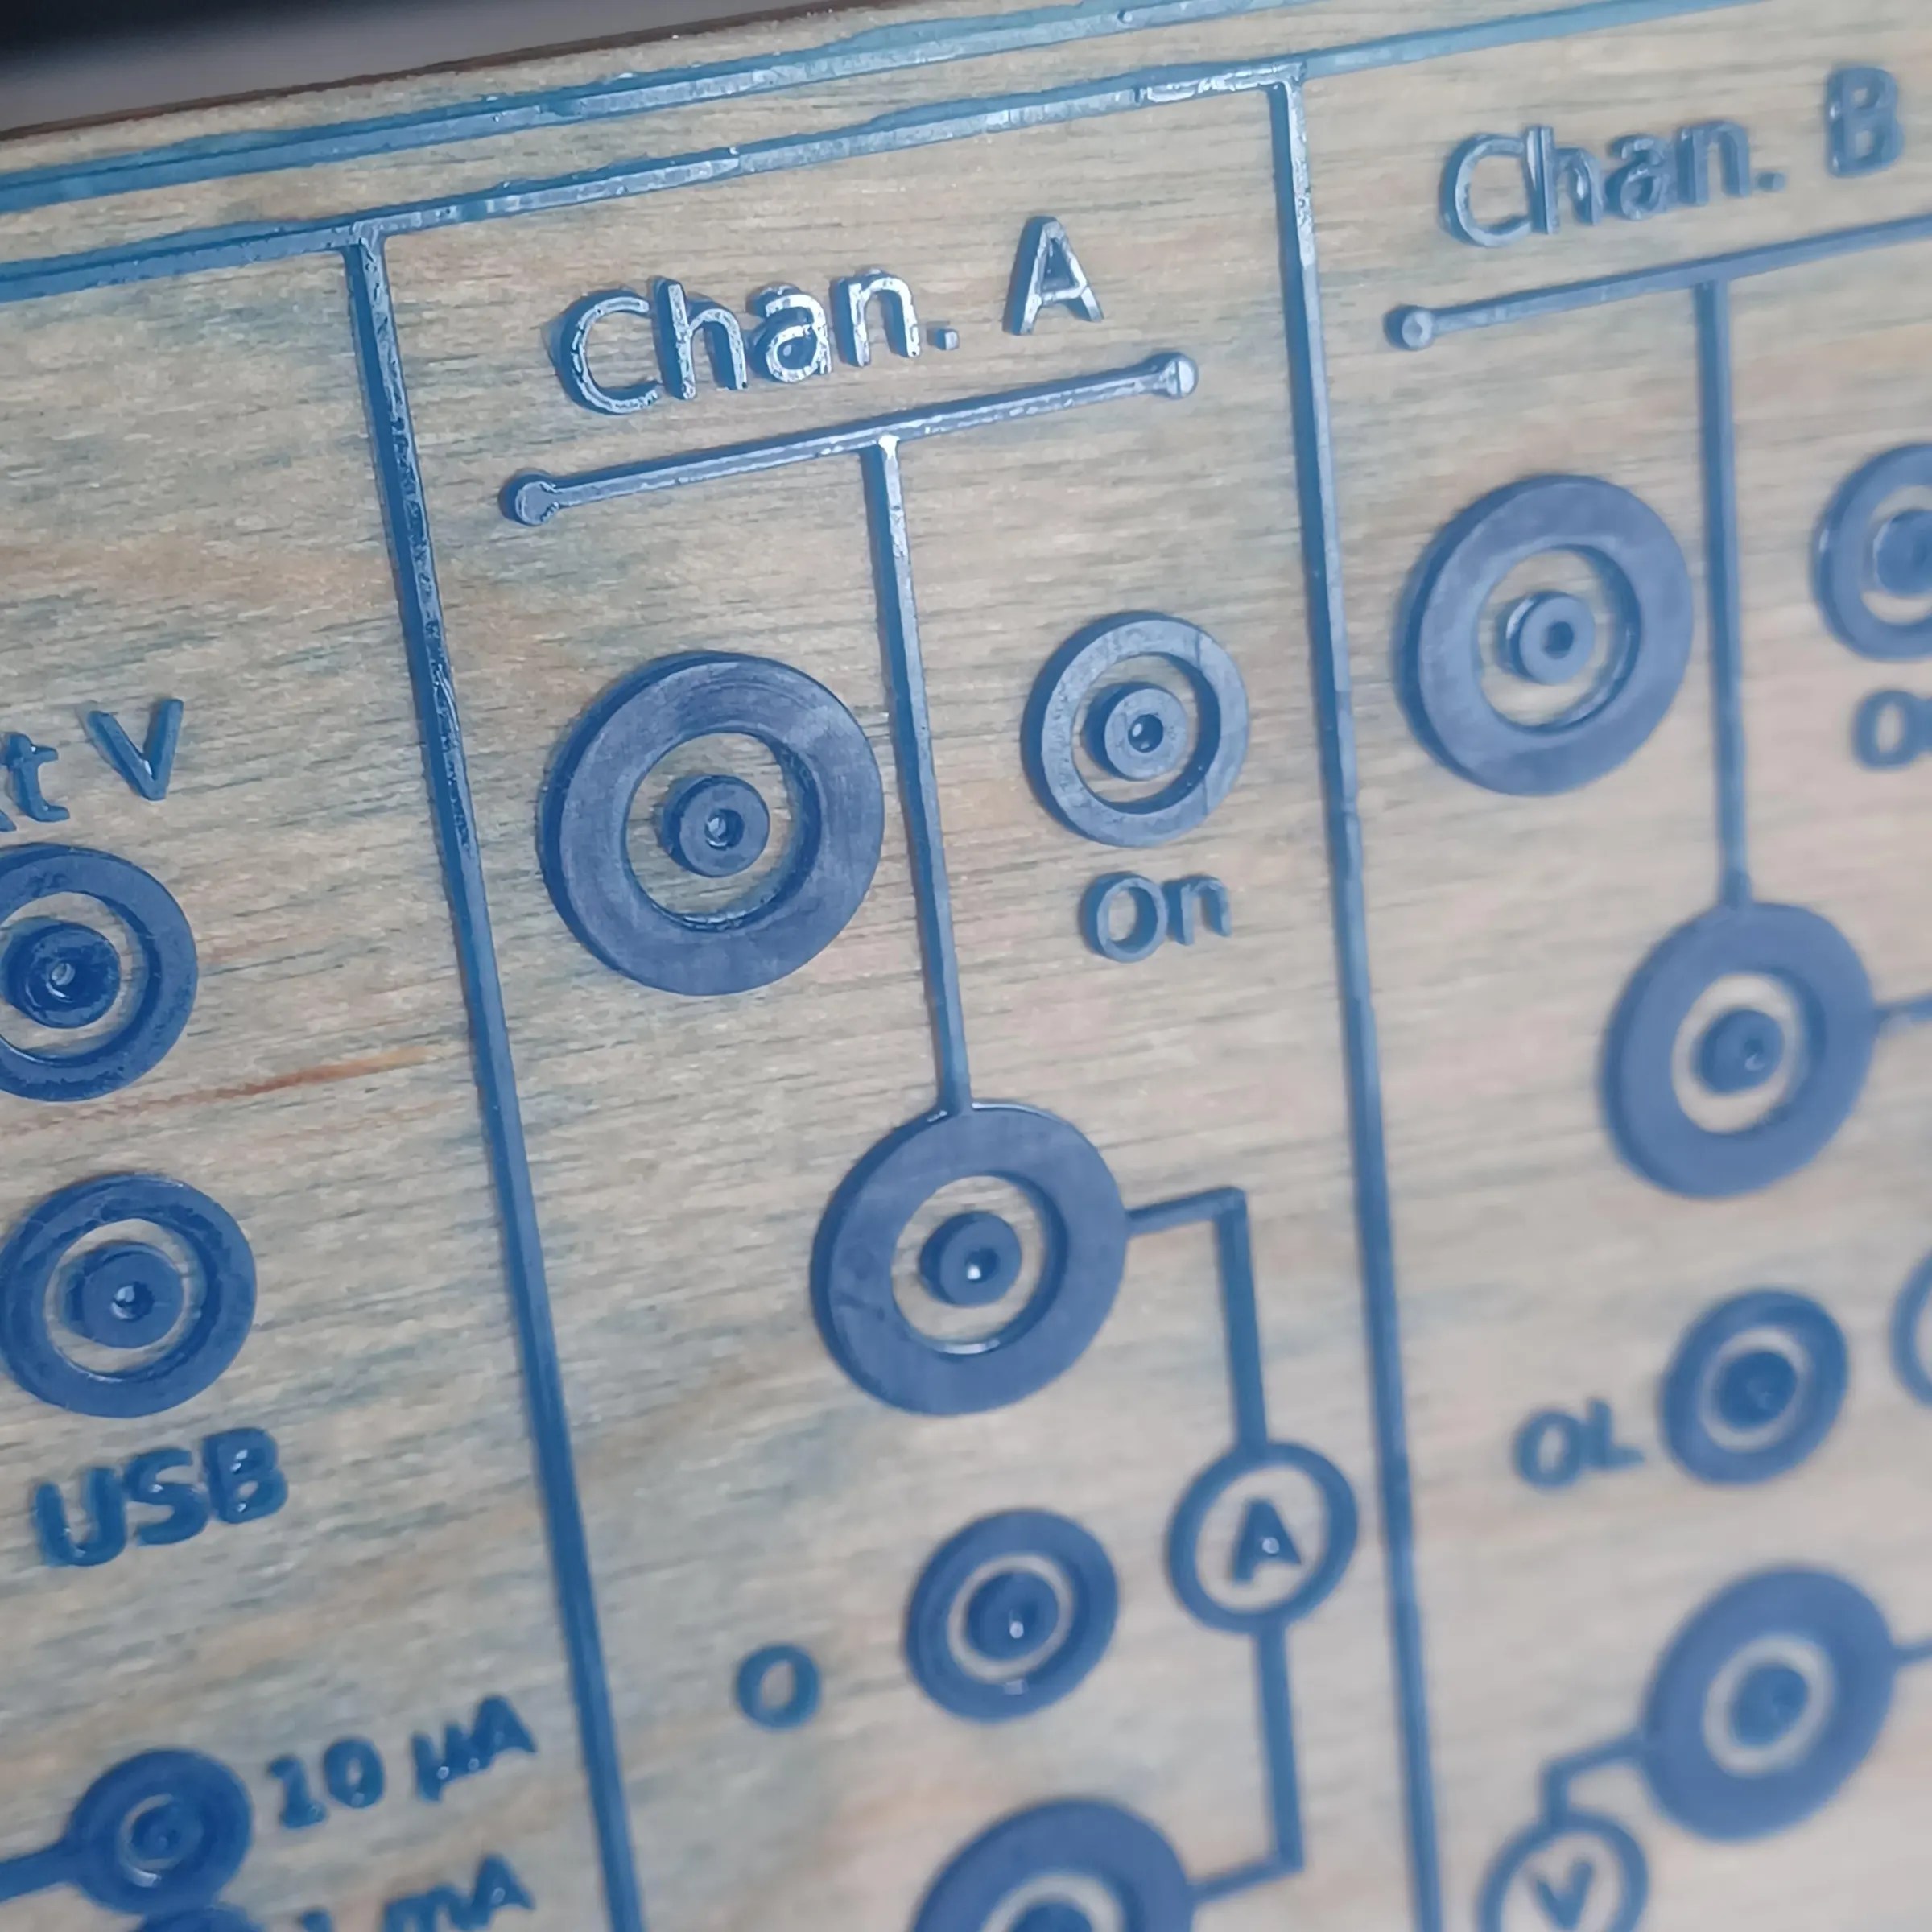
This CRT-Style Pi Portable Gets All The Details Right

A quick glance at the “Pi Terminal” built by [Salim Benbouziyane], and you might think he pulled an old CRT monitor out of a video editing bay and gutted it. Which, of course, is the point. But what you’re actually looking at is a completely new construction, featuring a fully 3D printed enclosure, a clever PCB control panel, and some very slick internal engineering.

[Salim] started the design by recreating the principle components of the build, namely the 8 inch 4:3 IPS LCD panel and Raspberry Pi 4, digitally in CAD. This let him design the enclosure around the parts, rather than trying to cram everything in after the fact. After printing the case, which clearly took considerable inspiration from broadcast video monitors of the early 2000s, he then painstakingly post-processed the parts using tips and techniques picked up from prop builders. To really finish things off, he designed his control panel as a PCB so he could have it professionally fabricated, and used heat set inserts to hold everything tight. Continue reading “This CRT-Style Pi Portable Gets All The Details Right”

Improve Your Front Panels

For many of us, the bane of electronic projects is making a professional-looking enclosure. Sure, 3D printing has made it easier to make the actual enclosure, but there’s still the problem of labeling it. [Richard Langner] has the answer with something he calls easy front panels. You can read about it or watch the tutorial video below.

The concept is easy enough. You create your beautiful artwork in your choice of graphics programs. The example uses Inkscape, but you could do it in anything, even PowerPoint. You print it out and cut it to size. You could, of course, print it in color or — as the example does — color it in by hand.

Continue reading “Improve Your Front Panels”

Reverse Engineering A Topfield VFD Front Panel

Hackers love the warm glow of a vacuum fluorescent display (VFD), and there’s no shortage of dead consumer electronics from which they can be pulled to keep our collective parts bins nicely stocked. Unfortunately, figuring out how to actually drive these salvaged modules can be tricky. But thanks to the efforts of [Lauri Pirttiaho], we now have a wealth of information about a VFD-equipped front panel used in several models of Topfield personal video recorders.

The board in question is powered by a Hynix HMS99C52S microcontroller and includes five buttons, a small four character 14-segment display, a larger eight character field, and an array of media-playback related icons. There’s also a real-time clock module onboard, as well as an IR receiver. [Lauri] tells us this same board is used in at least a half-dozen Topfield models, which should make it relatively easy to track one down.

After determining what goes where in the 6-pin connector that links the module with the recorder, a bit of poking with a logic analyzer revealed that they communicate over UART. With the commands decoded, [Lauri] was able to write a simple Python tool that lets you drive the front panel with nothing more exotic than a USB-to-serial adapter. Though keep in mind, you’ll need to provide 17 VDC on the appropriate pin of the connector to fire up the VFD.

What’s that? You don’t need the whole front panel, and just want to pull the VFD itself off the board? Not a problem. Our man [Lauri] was kind enough to document how data is passed from the Hynix microcontroller to the display itself; critical information should you want to liberate the screen from its PVR trappings.

If you manage to get your hands on one of these modules, it would be an ideal addition to a custom media streamer. Though we suppose simply turning it into a network-controlled clock would be a suitable alternative if you’re looking for something a bit easier.

Continue reading “Reverse Engineering A Topfield VFD Front Panel”

A Physical Front Panel For Oscilloscope Software

For hackers on a tight budget or with limited bench space, a USB oscilloscope can be a compelling alternative to a dedicated piece of hardware. For plenty of hobbyists, it’s a perfectly valid option. But while the larger discussion about the pros and cons of these devices is better left for another day, there’s one thing you’ll definitely miss when the interface for your scope is a piece of software: the feel of physical buttons and knobs.

But what if it doesn’t have to be that way? The ScopeKeypad by [Paul Withers] looks to recreate the feel of a nice bench oscilloscope when using a virtual interface. Is such a device actually necessary? No, of course not. Although one could argue that there’s a certain advantage to the feedback you get when spinning through the detents on a rotary encoder versus dragging a slider on the screen. Think of it like a button box for a flight simulator: sure you can fly the plane with just the keyboard and mouse, but you’re going to have a better time with a more elaborate interface.

The comparison with a flight simulator panel actually goes a bit deeper, since that’s essentially what the ScopeKeypad is. With an STM32 “Blue Pill” microcontroller doing its best impression of a USB Human Interface Device, the panel bangs out the prescribed virtual key presses when the appropriate encoder is spun or button pressed. The project is designed with PicoScope in mind, and even includes a handy key map file you can load right into the program, but it can certainly be used with other software packages. Should you feel so inclined, it could even double as a controller for your virtual spaceship in Kerbal Space Program.

Affordable USB oscilloscopes have come a long way over the years, and these days, using one is hardly the mark of shame it once was. But the look and feel of the classic bench scope is about as timeless as it gets, so we can certainly see the appeal of a project that tries to combine the best of both worlds.

Continue reading “A Physical Front Panel For Oscilloscope Software”

Altair Front Panel Tutorials

If you aren’t old enough to remember when computers had front panels, as [Patrick Jackson] found out after he built a replica Altair 8800, their operation can be a bit inscrutable. After figuring it out he made a pair of videos showing the basics, and then progressing to a program to add two numbers.

Even when the Altair was new, the days of front panels were numbered. Cheap terminals were on their way and MITS soon released a “turnkey” system that didn’t have a front panel. But anyone who had used a minicomputer from the late 1960s or early 1970s really thought you needed a front panel.

Continue reading “Altair Front Panel Tutorials”

Building A Front Panel For The RC2014 Computer

The RC2014 is a slick Z80 computer kit that’s graced these pages a number of times in the past. It allows anyone with a soldering iron and a USB-to-serial adapter to experience the thrill of early 1980s desktop computing. But what if you’re looking for an even more vintage experience? In that case, this custom RC2014 front panel from [James Stanley] might be just the thing to scratch that Altair itch.

The front panel allows you to view and alter the contents of memory with nothing more complex than toggle switches and LEDs, just like on the early microcomputers of the 1970s. If you’ve ever wanted to learn how a computer works on the most basic level, single-stepping through instructions and reading them out in binary is a great way to do it.

[James] says he was inspired to take on this project after reading a 1978 issue of Kilobaud Magazine (as one does), and seeing an article about building a homebrew Z80 machine with a front panel. Obviously he had to modify the approach a bit to mate up with this relatively modern variation on the venerable CPU, but the idea was essentially the same.

His documentation for the project is sure to be fascinating for anyone enamored with those iconic computers of yesteryear, but even readers with more modern sensibilities will likely find some interesting details. The way [James] coaxes the data and various status states out of the kit computer takes up the bulk of the write-up, but afterwards he talks about how he designed the PCB and wraps up with his tips for creating a professional looking front panel.

This isn’t the first time we’ve seen a modern Z80 computer kitted out with blinkenlights, but it’s certainly one of the most professional looking. If you combine the RC2014 kits available on Tindie with the details provided by [James], you’ll soon be learning the fine art of programming a computer with toggle switches.

Continue reading “Building A Front Panel For The RC2014 Computer”

A Mobile Terminal For The End Of The World

If civilization goes sideways and you need to survive, what are the bare essentials that should go in your bunker? Food and fresh water, sure. Maybe something to barter with in case things go full on The Postman. That’s all sensible enough, but how’s that stuff going to help you get a LAN party going? If you’re anything like [Jay Doscher], you’ll make sure there’s a ruggedized Raspberry Pi system with a self-contained network with you when the bombs drop.

Or at least, it certainly looks the part. He’s managed to design the entire project so it doesn’t require drilling holes through the Pelican case that serves as the enclosure, meaning it’s about as well sealed up as a piece of electronics can possibly be. The whole system could be fully submerged in water and come out bone dry on the inside, and with no internal moving parts, it should be largely immune to drops and shocks.

But we imagine [Jay] won’t actually need to wait for nuclear winter before he gets some use out of this gorgeous mobile setup. With the Pi’s GPIO broken out to dual military-style panel mount connectors on the front, a real mechanical keyboard, and an integrated five port Ethernet switch, you won’t have any trouble getting legitimate work done with this machine; even if the closest you ever get to a post-apocalyptic hellscape is the garage with the heat off. We especially like the 3D printed front panel with integrated labels, which is a great tip that frankly we don’t see nearly enough of.

This is actually an evolved version of the Raspberry Pi Field Unit (RPFU) that [Jay] built back in 2015. He tells us that he wanted to update the design to demonstrate his personal growth as a hacker and maker over the last few years, and judging by the final product, we think it’s safe to say he’s on the right path.