
Is your multimeter one of your trusty friends when building up boards, repairing broken gadgets, and reverse-engineering proprietary ones? Is it accompanied by a logic analyzer or an oscilloscope at times?
Having a proper probing setup is crucial for many a task, and the standard multimeter probes just won’t do. As a PCB is slipping under your grip as you’re trying to hold the standard multimeter probes on two points at once, inevitably you will ponder whether you could be doing things differently. Here’s an assortment of probing advice I have accumulated.
Beyond The Norm
There’s the standard advice – keep your board attached firmly to a desk, we’ve seen gadgets like the Stickvise help us in this regard, and a regular lightweight benchtop vise does wonders. Same goes for using fancy needle probes that use gravity to press against testpoints – they might be expensive, but they are seriously cool, within limits, and you can even 3D-print them!
Both of these become insufficient at some point, sadly – sometimes you need to change the probing spots so often that the gravity probes become bothersome, sometimes the board is double-sided and you need to flip it for tracing a connection, and sometimes you want to do current injection where the probing point actually matters. Default multimeter probes are nice, but they are also dull to the point it’s easy to short adjacent IC pads if you’re not careful.
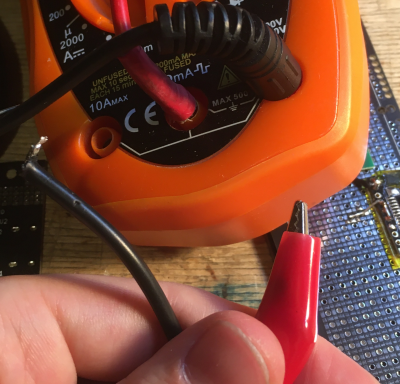
So, where do you go? My advice is, fashioning your own probes or buying nonstandard ones. Ever find a set of broken multimeter probes? Good, you can use them up as banana jack pigtails, a piece of solderable wire with a banana jack on one end. Don’t got some broken probes? Just buy a cheap set and harvest wires from it, or build some out of screwpost banana jacks. You can fashion a fair few things with solderable banana leads – let’s take a look!
Just Solder It On
The first advice I have is literally soldering such pigtails to a GND pad on your board. This is wonderful if you have to constantly probe voltages relative to GND, soldering a wire to GND is a serious timesaver – it frees up one of your hands, and unlike crocodile clip probes, it is not terribly likely to break off silently while you’re in the middle of debugging. If you must probe between two non-soldered-to points, feel free to temporarily swap in a usual probe – that’s why I recommend a spare probe wire for this!
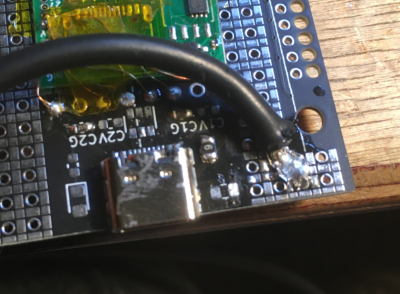
If GND is your reference and you’re tempted to use something that looks like it should be GND, make sure your probe soldering point is GND-connected! USB-C sockets are a good starting point for this – all USB-C sockets must have their shield grounded, no matter the device. Of course, before assuming that a certain connector shield is ground, you must check that it actually connects to the board’s ground, which should be easy to find on your board’s inevitably present decoupling capacitors.
Soldering won’t work for smaller testpoints, unless you use a piece of magnet wire for the last-inch part and hotglue or tape the probe wire to the board. If you don’t do one of these, the wire will either break away from the board easily, or even tear your testpoint off the board completely; many times I have foolishly tried to directly solder thick wires to small pads, and it invariably resulted in torn off pads, so I recommend you skip this step. For logic analysis, soldering 2.54 mm header wires in the same fashion is pretty convenient – I often use stray female-male wires from my bench for this.
Of course, if you have a multimeter lead with a solderable end, you can easily convert it to a croc clip end – those are also quite handy for times when you don’t want to bother soldering or can’t do it! You can buy a set of decent croc clip probes, but if you haven’t yet, a broken probe and a croc clip end will do just fine. Apart from the usual things you would use a crocodile clip for, there’s one more purpose you might not have considered!
Reusing Metal Brushes And Tweezers
I’ve done a fair bit of reverse-engineering where my task was to figure out all connections to a certain pad, usually on multi-layer boards with no visible tracks in sight. In laptop repair, you would usually use a boardview for this, but they’re rarely available for generic devices, and while that Nintendo Switch flying wire reverse-engineered boardview is impressive, it’s not about to become a hacker household staple, unless everyone levels up their skills real quick.
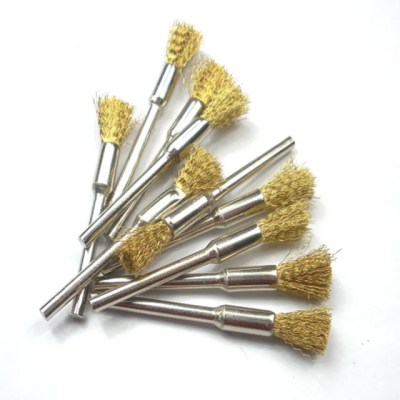
Enter metal brushes – of the kind you find in dremel and other rotary tool kits. Where does a certain pin of an IC lead? One probe wire held onto the pin, another probe is a croc clip holding the metal brush that you gently caress your board with; not too strongly so as to scratch the soldermask, but strongly enough to break through the oxides on the solder joints. I keep two sizes – one large and one small, using the large one first to find the general contact areas, and then using the small brush to narrow it down.
These are instrumental for many a black box board, and so are metal SMD tweezers – as long as they’re sharp to a point, you can use them as super sharp multimeter probes. Spread the tweezer legs, insert your wire up to the very top of the join point, then release the tweezers, and make sure it doesn’t fail a continuity test. Congrats, you have just acquired a probe sharp enough to probe 0.5 mm pitch pins with ease. As long as your parallax vision doesn’t fail you, you will do just fine, which is to say, it will be less of a struggle than usual. I use Rhino tweezers that you can get on Adafruit, Dangerous Prototypes, or Aliexpress – they are super sharp and durable in long term.
Much More Cool Stuff To Learn
Summary – have some solderable banana jack pigtails handy, which you can make out of old or cheap probes. You can use them to free up a hand while probing or do current injection. In a pinch, you can use metal brushes held in croc probes for reverse-engineering, and tweezers holding solderable leads for fine point probing. With these tricks, you will find that many kinds of probing and repair work gets easier and way less failure-prone.
Now, these aren’t the only probe hacks; for instance, when using an oscilloscope and measuring high-speed signals or power rails, upgrading your ground connection can give you a significantly cleaner signal. Also, don’t be afraid of making custom jigs for testing your boards, and don’t forget about probing for ESD diodes!


Be careful when sliding your (sharp) probe across small pitched IC legs, like TQFP. I think i managed to create a short once that killed an entire project (unobtainium IC and stuff). :-/ The advice (in this article) is great, but you really have to get the amount of “contact pressure” (?) right.
You can make a one-sided probe from a piece of PCB. That avoids accidental shorting.
I think there is some confusion. I was not talking about probing a live circuit (for this your advice is something to remember) but tracing connections on an unpowered board.
Salom
In the past I have used acupuncture needles as fine pitch probes. If you get the ones with copper windings on the end then you can solder to them. The resistance was about 0.4 Ohm so low impact, all you need is a 3D printed clamp/holder.
Messed up my eBay recommendations for about a year :)
Stuffed animal needles are similar and widely available too.
I use them for scratching traces from PCBs for rework too.
My cheep default is an alligator clip on a safety pin
For probes, I made my own long ago, and these are the best I ever had. I started with some 2mm banana plugs from Hirschmann, drilled an hole (a few mm deep) axially in the tip, and then soldered in the tip of a sowing needle. They are really sharp hardened steel. Easy to prick though anything worth probing, from cable insulation to oxide layers.
For a logic analyzer, you can also clamp or glue (dot of hot snot) a header to the PCB, and then solder short enameled wires between this connector and your points of interest. This makes it relatively easy to probe a bunch of pins on a QFP, or even an QFN if the pads are long enough and extend a bit outside of the package.
For beeping out connections, I like a DMM with a really fast beeper. With that you can run one probe over a whole row of pins from a DIP, or QFN package really quickly. If your DMM beeps, you go back slower to figure out on which of the pins it beeped.
Another one of my most useful tools is a broken ceramic tweezer. One of the legs of one of my ceramic tweezers was broken, and I ground the other leg at approx 50 degree with a diamond disk. It is now a quite sturdy little chisel, and it does not short out your circuit wile you are working on it when it’s energized.
I have also mostly stopped using banana jacks. Instead I have cut thin stranded silicone insulated wire to pieces, stripped about 15mm on each end and soldered them together with just enough solder to hold the strands together. You can now use these wires with WAGO 221 to make semi permanent high current connections. For example build an H-bridge for testing. I do not like test leads with banana plugs, they are almost always far to long and the plugs are too big. Test wires of approx, 100mm are often quite long enough with the WAGO’s, and I have a roll of fresh wire on stock, so I can quickly and easily make them in any length I want. Ferrules also work, but you have to buy longer ones, because the standard ferrules are too short for use with WAGO 221.
Great idea about using WAGO 221’s to swap out custom lead lengths on test leads! It’ll also allow me to go with wet noodle wire (the super flexible variety of silicone wire). I’m absolutely going to do that, as it’ll fix the three most significant issues with my (quite wide) selection of test leads: some not having super flexible leads, the leads inevitably being too long and just getting in the way, and the space required to store/organize them all.
I recently found a set of wires on AliExpress with screw terminals on each end of the wire and 4 screw-on banana plugs, 4 clamps and 2 probes. Combined with sharp needle that slide onto a banana jack and have a cap with a hole in the side so you can stab a wire and keep it on the wire, this is the greatest set I’ve ever had without having to carry a ton of wires.
I’m actually updating my little variable power supply to have a storage space for the plugs and ordered more for my multimeters.
Surprised I didn’t see PCBite mentioned! Excellent bit of kit for probing PCBs, here is Dave’s EEVBlog review: https://www.youtube.com/watch?v=GS0WqUKZ-3c
That is one example of those “gravity probes” mentioned above.
I just got this the other day:
https://www.amazon.com/dp/B0D21Z7KPZ?ref=product_details&th=1
And gave it 5 stars as a VINE reviewer.
The real question is: How long will this last? I had cheap silicone insulated multimeter probes from Aliexpress, they were fine (for low voltage stuff) but did not last long – wire broke inside the insulation, probably just after the probe. So i bought some from Probe Master with really fine, spring loaded (?) tip and i expect them to last a lot longer… The ones supplied with my Brymen are fine but as said, waaay to big for electronics.
At work I have similar set from Fluke. From my experience adding long needle tip to regular probes is problematic – probes are heavy and add a lot of leverage. It really sucks when you are testing M12 female connector on some difficult to reach position and your precision needles are too long. the same goes for clips. Better to have banana connectors and add accessories through this connection. Fluke has also that but you need to carry also Fluke price point.
This solution looks interesting for low energy bench use:
https://www.amazon.de/-/en/Universal-Multimeter-Extension-Cable-S4001N/dp/B099619C7H
Although it doesn’t look long lasting and those cables probably have very good storage shape memory.
Off topic: don’t go to German Amazon to buy an item imported from China by a Czech company. Buy it directly from China and it’ll be half the price. I bought this exact same set from AliExpress for about 4€.
I like the russian approach to making your own probes using old ball point pens. You can use a sewing needle for the tip. Drill at hole at the end for the wire to come out. Not everybody is rich.
I have a couple of “Micro-Scale Test Lead Kits” salvaged from the wreckage of local Radio Shacks — alligator clips, micro- and nano-plungers, pin sockets and breadboard pins, magnetic probes, and an inline thing for battery current, all on sockets that snap onto standard multimeter probes, and in a nylon wallet. Definitely worth the clearance price I paid for them.
Pretty sure I have the exact same kit, picked it up a few years before the local RS shuttered.
Neodymium magnets are great too, I use them for attaching alligator clips (usually magnetic) to batteries when I need a quick connection.
Regular meter probes are way too fat for contemporary electronics. I make tiny probes out of discarded earbud cables. Put banana plugs on the ends where the “Y” is, and micro-clips on the other, Stick sewing needles in the clips for real “needle-point” probes. Very small and flexible, and nearly non-slip. Don’t fail to use the “strength fibers” (or whatever they’re called) that are in the cables or the probes won’t last very long. Wrap the fibers around something and add a drop of superglue.
An alligator clip has the barrel end melted into a pen sized plastic probe with it’s dull end removed and a sharp needle sticking out of the mouth 1cm and the other end soldered at the rear of the alligator clip where the lead solders on. Probe or grab, everything is ready with one tool. An alligator clip is on the minus end. This setup I have used for years. Only in small stuff or short component leads do I need to a get tiny grabber lead and use it.
Do you have a picture of this grab/probe device? Having trouble visualizing it.
The standard meter probes (handles with a 1.5mm diameter spike, maybe with a cover) are about the right size to slip into a Mate-N-Lok female crimp socket, perfectly.
Solder to that a long style pogo pin (or a pogo-pin socket), and you have a replaceable, spring loaded tip, which can be sharp or broad, or whatever. (e.g. P50-B1 for a spike, but best is the 30 degree triangular cut thin tip)
Perfect for IC pins since it’s spring loaded, so easy to keep in place with gentle pressure, and very very sharp so it digs in. Replaceable too!
I searched pogo before I went to post, figuring someone would have posted about them. Pogo pins rock as probes, esp where you can give them some pressure and the spring engages, so you have pressure, but unlike an unsprung pin, it’s not as prone to slide away because your pressure changes slightly. sliding probes smack into other points on the PCB, which can be catastrophic.
While not a probe unto itself, Having a small PCB with a few probe points on it – the little SMD “D” shaped loops (Keystone 5018), or TH rings (Keystone 5006), or heck, even a row of pin headers with alternate pins removed. You can anchor to a mount hole on your DUT with a nylon spacer and nylon screw, and have flywires soldered to key test points allows you to change probe connection without the precarious torque on some tiny pin. Easy to make with a scrap of protoboard, and all the better if you put a row or two of space between different signals so your clips or probes don’t short against one another. Obviously there there are potential issues with high frequencies and little flywires. Being able to disconnect your test instruments to use for something else demanding your attention, and still being able to reconnect reliably to this DUT is handy AF. Number the testpoint connections and have a crib sheet for what they are.
Posting this gives the the motivation to get down to it this weeked and lay out a PCB and queue an order. Pin header connection to be able to connect to flywire to header on DUT (so the testpoint PCB can be re-used on other DUT without having to have multiple). and the board could have probe clips and/or 2mm type connectors (like Cal Test CT3104-2), optionally populating whatever part I want to commit to that testpoint board.
Where I worked we had bed of nails testers where the nails would “wear out” and need replacing.
All gold plated, the worn out spring pogo pins were retained by me, I’ve got a big bag of them.
Soldered to the end of existing probes they give pin-point sprung accurate low resistance connections.
Thanks for this article. I got some good tips from it, but even more from the comments! I have some mate-N-Lok crimp sockets on order and going to dig through my box of Dremel accessories looking for brass wire brushes. I’ve used clip leads on to tweezers before, which always seemed to fall off. Going to try the stripped wire wedged at the top trick. I’ve used an Xacto knife in a similar way. I put some copper foil tape around the end and soldered a lead to the tape. I find the Xacto knife easier for fine pitch ICs, a bit easier than the tweezers.
I’ll add my recommendations.
A pair of sharp probe pins that can be fitted to banana cables:
https://a.aliexpress.com/_EQDgVyt
They are dirt cheap so buy a few sets.
A set of super tiny “grabbers”:
https://a.aliexpress.com/_EjjUnHb
They are so small that I’ve successfully used them on pins of 0.5mm pitch TQFP package although it is not possible to place two probes on two adjacent pins. Anything larger than 0.5mm is super easy with them.
DIY ultra sharp and sturdy probe made of sewing needle. That was already mentioned in some comments. It is a great tool.
About links – I got some images and then “Sorry, the page you requested can not be found”. Possible some more reliable link please?
I reloaded few times and suddenly it works – sorry. And thanks for the tips! (have I just made a pun?)
Get a box of 3 position Wago terminals. Cut some cables in half and you can re splice them a million ways.
Wagos are wonderful because they make almost any random cable modular.
So do stackable banana plugs, and you can also connect them directly into an oscilloscope, or ‒ in some countries ‒ even into the mains socket.