Stripping and cutting wires can be a tedious and repetitive part of your project. To save time in this regard, [Red] built an automatic stripper and cutter to do the tiring work for him.
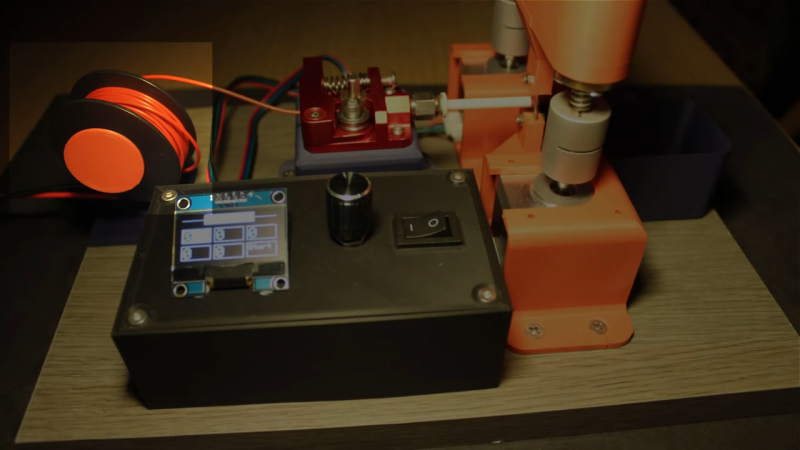
An ESP32 runs the show in this build. Via a set of A4988 stepper motor drivers, it controls two NEMA 17 stepper motors which control the motion of the cutting and stripping blades via threaded rods. A third stepper controls a 3D printer extruder to move wires through the device. There’s a rotary encoder with a button for controlling the device, with cutting and stripping settings shown on a small OLED display. It graphically represents the wire for stripping, so you can select the length of the wire and how much insulation you want stripped off each end. You merely need select the measurements on the display, press a button, and the machine strips and cuts the wire for you. The wires end up in a tidy little 3D-printed bin for collection.
The build should be a big time saver for [Red], who will no longer have to manually cut and strip wires for future builds. We’ve featured some other neat wire stripper builds before, too. Video after the break.


Should use the ESP32 to do a little simple math: it adds up how much time it would take to manually strip all the wires you process with it, and then compare that with how many hours were spent on the project… Just to see how long it takes to break even ;)
ObXKCD: https://xkcd.com/1205/
This is one of my favorite XKCD infographics. I actually have that in a frame on the wall in my office.
If you like breadboarding 8-bit computers, this project has already paid for itself.
I’ve seen these in production facilities, and was really hoping that was a thermal stripper there that they’d conjured inexpensively somehow. Alas.
I’ve always wanted to build one of these. I think this is one of the best designs yet. It has an elegant simplicity to it.
Nice…
Although, builds like this end up being more about the build than the time savings typically. The learning experience is more valuable.
It may take quite a few wires to save the time, but also the strippers tend to be able to be calibrated to not cut into the metal of the wire which is something more difficult to do repeatedly with hand tools.
The automated wire stripper in my shop has saved me a lot of time but I don’t think it would be worth the money (to me) for the cost, it came with a larger package of used equipment.
Here is a video of an industrial offering doing similar wires (in my shop). https://youtu.be/j32YuDlap5c?si=5zisjMV8XCKK3wPA
Maybe slightly raise the blades and to a pullback. This will at least on one side already remove the isolation.
For the smaller lengths, you could even do the other side. Strip it at 2 cm. Then make the indent on the other side and slide the isolation 1 cm with a pullback.
Love this! Some comments here have said that the time saved might be less than the time invested to build an automated tool like this, and maybe they’re right…
But I know the way my brain works – stripping a a bunch of wires is boring, plus the perfectionist in me worries that the wires are never the right length. That might not be a big deal, but then there’s the stress of trying to strip everything to the right length for crimp connectors. Sure all of that’s irrational, but it’s real to my brain, and sometimes it’s enough to make me put off part of a project. So while this might not save time if it saves some mental load for someone that’s an excellent outcome
Also, using a cheap off-the-shelf 3d printer extruder is an awesome idea
Awesome project. One improvement that can be made is to use 1 motor instead of 2. Another improvement is to make the entire thing portable so it fits in a toolbox.
Don’t use solid core wires in projects! They wiggle, stress-harden, and snap. Breadboarding and structural elements sure, but projects move and movement will cause them to break. Sometimes invisibly inside the insulation too.
There are millions of consumer grade, military, space and avionics products out there using solid core wire, in fact wirewrap with solid core is actually specified where vibration is so intense it might break soldered components off boards.
If you loom it correctly it’s incredibly robust.
I think almost the same result could be had by hand with 2 different tools by using EG a pill cutter and a movable stop to cut the wires to length. Then use a similar setup for the stripping.
Bench mounting it and using a stop will take many skill based parts out of the equation, also picking up and setting down tools. (although he neglects in the video to show doing the same step multiple times per tool, which you could absolutely do say 5 or 10 times without setting down the tool, that’s how modern factories usually work, each station performs one step.)
What this post entirely neglected to mention is this is specifically made for solid core wire for prototyping boards and I’m not sure how this would translate to other less stiff wires. The only projects I do with many wires is make custom PC power supply cables, and the fiddly part is crimping those, not cutting them to length.
Crazy project, looking forward to a MK2 version. Ideally you would want to see a single stepper for the cutter, I am sure you could put the other end on a pivot and it would work.
Could you use nichrome wire instead of blades to cut? Would that be better for stranded wire?
This subject takes me back to the 70’s making wiring harness for a sub contractor for Ford in the US before they closed it up and sent it to Mexico, a sore subject nowadays. I maintained strippers and crimpers. They had just one tool with a display and settings of some sort, wow digital electronics of the future! All rest were pneumatic with allen screw adjustments and a dangerous setup for wires the length of a car.
Hearing protection was suggested for workers but no one bothered. A chorus of hisses and clanks went in a 4 syllable word, extend, clamp 2 “V” blades on wire, pull, retract blades. Ca-pump-ca-cimp. Over and over from many machines at the same times. There was a strand count tolerance for missing strands, yet skid sized tubs of tiny strippings like confetti were sent off for copper recovery.
anyone have a source for the blades he used?
I’ve been noodling on building one of these as well, some of my projects become production and stripping so many wires is definitely a bore.
His design is better and simpler than what I had in mind which makes it considerably more feasible.
Could probably hack it with blades from an industrial machine. They are often sold as spares. Looks very similar to the blades for the Eubanks machine I have…but they are spendy https://www.amazon.com/Eubanks-9800-Universal-Stripping-Blades/dp/B0CB9227L7
But I was looking at Xacto #16 blades and I bet you could use 2 of them and make a pretty nice adjustable width…assuming you don’t mind the slight offset. Which is similar to the Schleuniger 2100 Unistrip https://youtu.be/OJwZQ0eJh2U
search for “Knipex 12 69 21”
Thank you!!
I just did a quick search on AliExpress for “Wire Stripper Blades” and found some similar, so doing the same might give you some keywords for your favorite parts shopping platform (one I can remember was V Blades, but searching for that wasn’t so helpful, I got all sorts of other less useful things instead).
Looks like you got a real reply while I was composing mine :)
Cutting and stripping wires is certainly more than half of build time in my projects. Quarter is crimping and the rest is photoetching and SMT soldering and other stuff.
Problem is that I use 26AWG tinned multistrand Cu MPPE isolated wires (and JST-GH connectors) for data which are really thin and those gazillion strands silicon wires for power which even at 20 AWG are flabby af and I need to keep both types of wire under tension when measuring them (with the same method as is shown at the beginning of the video – metal rules and sharpie).
I like the idea of this, and for some gauges I suspect stranded would be fine, since there’s a tube coming out of the extruder. Anything that saves me physical exertion in the long run is measurable pain saved (health–). Plus it looks fun.
I solved part of his complaint of “too many tools” by adhering the ruler to the bench top, and using a wire stripper that can be set for a specific length. I measure, hold my thumbnail on the new end location, cut it, strip both ends, done. I only needed to get out two tools (but where’s the views in that? >_>).
I tend to make the same lengths of wires for prototyping, so pre-cutting a bunch sounds really appealing. Lowering the barrier to accomplishing future projects means more get done. I bet I have the stuff on-hand to make a wire-cutter…
Brilliant! Very impressed with your design. Elegant and simple, with a design that will result in a machine that works straight away without a lot of fiddling. Cutting and stripping wires has always been an agonizing chore for me. Sadly, I don’t have a 3D printer, so making one of these is off the table for now, but hopefully I’ll get a printer sometime soon, or maybe farm it out to a friend that has one. Thank you for making your design public so we can both build the project, as well as learn from your great design. Kudos to you, Sir!