Capacitive touch sensors are entirely in the domain of DIY, requiring little more than a carefully-chosen conductive surface and a microcontroller. This led [John Phillips] to ask why not embed such touch buttons directly into a 3D print?
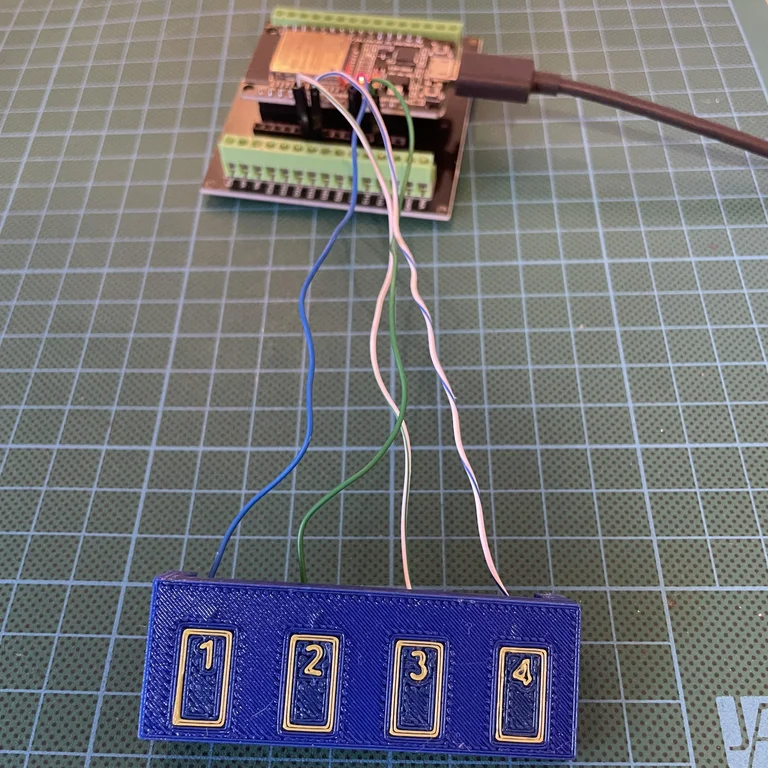
The process is not much different from that of embedding hardware like magnets or fasteners into 3D prints: one pauses the print at convenient spot, drops in the necessary hardware, then resumes printing. It’s more or less the same for embedding a touch-sensitive button, but [John] has a few tips to make things easier.
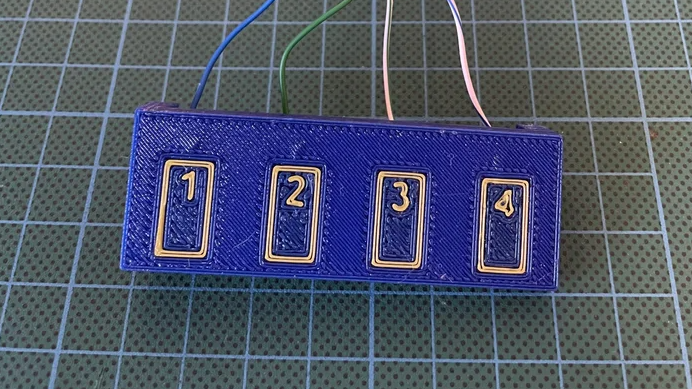
[John] suggests using a strip of copper tape, one per touch pad, and embedding it into the print near the surface. His preference is three layers in, putting the copper tape behind 0.6 mm of plastic when using standard 0.20 mm layer heights.
Copper tape makes a good capacitive touch sensor, and the adhesive on the tape helps ensure it stays in place as the 3D printer seals it in on subsequent passes.
Copper tape is also easy to solder to, so [John] leaves a small hole over the copper — enough to stick in a wire and tack it down with the tip of a soldering iron and a blob of solder after the print is complete. It might not be ideal soldering conditions, but if things get a little melty on the back side it’s not the end of the world.
On the software side capacitive touch sensors can be as simple as using an Arduino library for the purpose but [John] rolled his own code, so give it a peek.
This reminds us a bit of another way to get a capacitive touch sensor right up against some plastic: a simple spring can do the trick.


The way I’ve done this in the past has been with conductive PLA, then using a heat-set screw to then clamp a wire that goes to the MCU
I had to fix my vacuum sealer not too long ago (melted post holding the heater element sprig – I don’t know who thought plastic holding a HEATER was a good idea, but.. 🤷♂️ – and shorted MOSFET) and this is exactly how they implement the touch panel… a spring for each “button” under an adhesive label. Touchy as ‘ell! But it works…
I wonder if using conductive glue to connect the wires to the copper tape pads might avoid making things a “little melty”?
I was thinking you could just solder the wire on before embedding, if you keep the wires away from the hot end’s path.
As another point of reference, touch sensors (e.g. ttp223) are sensitive enough to penetrate several layers of printed PLA and work just fine. I’ve also used those sensors behind ABS electronic enclosures walls with no issues.
Maybe it’s a good idea to print the piece with hollow channels, which can be filled with a eutectic gallium-indium liquid metal alloy later?
;)
https://hackaday.com/2025/08/19/a-solderless-soluble-circuit-board/
Or maybe you can make the channels of such a shape that you can insert a wire, which automatically rolls itself into a coil when you keep pushing?
sigh As much as people love touch buttons because you can put them behind a front panel without the need for any cut or gap, making the front panels ideal to clean and watertight, I find their usability often really bad. They react slowly or only sometimes, the trigger point is completely unclear to me as a user.
Compared to a button or even those membrane switches, a simple touch button is usually just bad.
Yet, remember that using custom touch layouts, you can create touch sliders. That’s an input element that is really expensive to realize with mechanical hardware. So, I guess: Explore, but don’t settle for “good enough”…
Capacitive haters, unite!
Just put some texture around the button so I can find it without looking. A beep for feedback.
You could embed a vibration motor in the print for tactile feedback.
Yeah, that’s cool. Add an expensive part that is susceptible to wear instead of just using a plain, simple, cheap, tactile pushbutton.
I mentioned above the ttp223, there’s boards I bought that come with led built-in (recently bought 100pcs for $10 / 10 cent a piece, probably cheaper than any push-button!). Using thin or translucent PLA, it becomes easy to have visual feedback. Another useful feature about this chip is that it can be configured either as a toggle or push button , active high/low and has auto-calibration.
Why are so many 3d prints first layer under extruded?
z-offset not tuned.