
Although these days it would seem that everyone and their pets are running 3D printers to churn out all the models and gadgets that their hearts desire, a more traditional approach to creating physical 3D models is in the form of paper models. These use designs printed on paper sheets that are cut out and assembled using basic glue, but creating these designs is much easier these days, as [Arvin Poddar] demonstrates in a recent article.
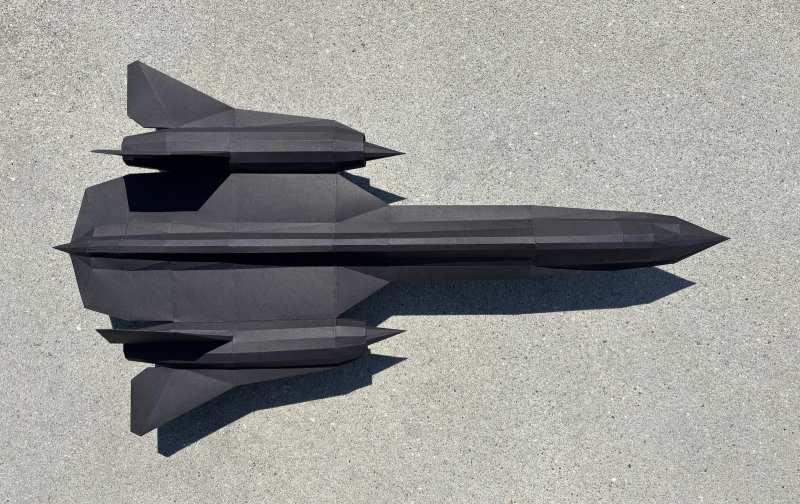
The cool part about making these paper models is that you create them from any regular 3D mesh, with any STL or similar file from your favorite 3D printer model site like Printables or Thingiverse being fair game, though [Arvin] notes that reducing mesh faces can be trickier than modelling from scratch. In this case he created the SR-71 model from scratch in Blender, featuring 732 triangles. What the right number of faces is depends on the target paper type and your assembly skills.
Following mesh modelling step is mesh unfolding into a 2D shape, which is where you have a few software options, like the paid-for-but-full-featured Pepakura Designer demonstrated, as well as the ‘Paper Model’ exporter for Blender.
Beyond the software used to create the SR-71 model in the article, the only tools you really need are a color printer, paper, scissor,s and suitable glue. Of course you are always free to use fancier tools than these to print and cut, but the bar here is pretty low for the assembly. Although making functional parts isn’t the goal here, there is a lot to be said for paper models for pure display pieces and to get children interested in 3D modelling.


Paper modeling is about as inexpensive as a hobby can get. A huge variety of highly detailed models are available for free download. How about a 1/48 scale (2.3 m, seven and a half feet!) Saturn V? Or a 1/40 scale ISS that will probably need its own room for display…
https://www.papermodelingman.com/gallery_models.html
That’s a cool resource – thanks for sharing :)
I remember papakura ages ago (10+ years?) as something I had to mess with to load and print a papercraft. I think there might have been paid upgrades to the viewer and the designer was 100% paid-only. It always struck me as the kind of thing that it would be pretty easy to write an open-source replacement for (just taking a 3D model and texture and choosing how to unfold it, then putting that on a sheet of paper to print), but I never had a strong enough need to pursue it.
Just this morning I built a model of a spherical flexure ( https://www.sciencedirect.com/science/article/pii/S0141635921000726#appsec1 ) out of cardboard with my kid. It didn’t turn out quite as accurate as the 3D printed one would have, but now I don’t have a bunch of single-use plastic to throw out.
And it felt a lot more like “doing” something than just waiting for a 3D print would have.
Wow, this is really cool!
Thanks for the link!
I remember getting kits like this as a kid.
Very neat concept. Maybe this helps with material selection. https://www.flickr.com/photos/mitopencourseware/3491556513
There is ~0.2mm thick aluminum sheet that can be cut with scissors but it does not form a tight bend very well.
Now Im considering how to make this with my kids, as well as unique use cases for such a joint
Was this inspired by the latest “Action Lab” video on YT involving chickens?
only open source
sorry mac, findows and other closed programs not for me
Blender runs on Linux, doesn’t it?
This also sounds useful for thin sheet metal designs, for those folks that have access to a good laser cutter.
Currently obsessing about a toolset to do analog computation with paper construction and replace CAD with screen-free alternatives, now that computers don’t need me to hold their hand everywhere. Free at last.
Have you written any of your ideas down anywhere? There have been various attempts at purely mechanical plotters and whatnot in the past. IIRC at least one of the designs made some kind of use of a jerk-motion network of twine to pass messages between human-operated stations.
I have long wondered about the idea of an educational machine that can give instructions for building various input and output devices meant to interface with itself. The machine would be meant to help someone rebuild a technological base from roughly the mid-18th century well into some kind of lower energy version of the late 20th. An apocalypse seed or dragon’s egg, if you will.
I have played with ideas for making useful outputs that could handle text (A Baird televisor) and print images (An open air nitrogen laser being used in a light-tight plotter fed with cyanotype paper) for sharing and archiving design information contained in the machine.
An even simple and more rugged book on information that could teach how to make the tools for useful analog computing using paper and other simple materials would dovetail into that kind of project well.
For the sake of longevity, can you apply epoxy resin to the cardboard?
With an airbrush, perhaps?
Or dissolve styrofoam in acetone to make a durable waterproof plastic lacquer. This really works and there are numerous YouTube videos about it.
Doing this is best done outdoors for obvious reasons.
So long as it doesn’t deform, while making a casting mould.
In fact, it might even be re-used.
Or dissolve styrofoam in gasoline to make kiddy napalm.
Useful when you are bored with your models.
Outdoors is probably best, but your call.
Maybe use clear UV cure nail gel?
illegal in EU :)
No, clear UV cure nail gel itself isn’t illegal in Europe, but the use of a specific photoinitiator chemical, TPO, has been banned in cosmetic products since September 1, 2025. TPO is one of the cheapeest option for photoinitiator but the percent PI required is such a small portion of a gel that the increased cost of an alternative doesnt significantly effect the per bottle cost. There are TONS of TPO free products out there already filling the market gap.
Use aluminum cans
Yes. I have made many conical paper transitions for rocketry by first forming the transition, then mixing and applying epoxy. I just rub it in with a gloved finger, and after it penetrates and turns somewhat translucent, wipe off the excess with a paper towel. Laminating epoxy–the thin stuff used for fiberglass and carbon fiber work–works best.
Hackaday has you covered: https://hackaday.com/2025/06/15/making-corrugated-cardboard-stronger-and-waterproof/ (The video starts out very hype but after a few minutes gets quite information-dense and interesting)
This is standard practice for years for building replica prop armor from movies and videogames (Iron Man, Halo, Fallout, etc)
Build the paper shape, paint on resin to stiffen it up, then fibreglass the inside and bondo on the outside to smooth it off before paint.
Is there anything bondo can’t do?
A friend of mine went into the ‘mobile body shop’ business when he was 16…
Believe it or not, he talked well enough that a couple of people trusted him to fix significant dents (this was before paintless dent repair was a thing).
On the second car, he realized he could drastically cut his bondo costs by incorporating old tennis shoes into the ‘dent repair’.
Weeelll, I used Pepakura a long time ago (15+ years). A big problem of it was that the unfolded model didn’t show all the folds (for complex models with lots of curves – like airplanes) and therefore the finnished model was off.
I kind of wonder could you use this to print out a single leaf for a parabolic dish and then cut out 10-30 from thin sheets of aluminum to make a fan like parabolic RF dish. I guess supporting it and rotating it would still be an issue, oh and wind if it was really thin sheets.
An old website that’s now shut down (paperaircrafts.com) used to create fully flying paper airframes using this kind of modelling, I bought a few of the host’s models. Youtube still has demos, from user masterpaperaircrafts, great little models!
Very interesting article.
the only tools you really need are a color printer,
Ah… What M is empty, I cant print… I dont need M… But I cant print… :)
I’ve banned yt so hopefully this wasn’t in the source and I missed it but one really useful thing with papercraft is that you can get finishes that are really hard to do with 3d print.
Want a shiny reflective daft punk helmet for Halloween? You could try and go down the pain route and spend days sanding and spraying or worse trying to figure out electroplating… oh yah did I mention this is a costume for a kid…
Anyway trip to the craft store will net you gold foil cardboard which is perfectly shiny. Throw your downloaded high poly mesh into blender, and use a “retopologize” workflow to turn it into a “low poly” look. Which also btw looks very cool and daft punk should have done it.
Oh and this same technique also works with thicker acetate sheets which are perfectly clear so you can even make a visor out of it. Again good luck getting 3dp to do that also wo like days of post processing.
A cricket plotter/cutter is a must for efficiency though.
(Not to shit on 3dp, after I finished the paper version I bought a 3dp and printed one and it didn’t end up with a nice surface but was significantly more robust and better in every other way than shininess. Kept the low poly triangulated mesh look though.)
I have been printing and making paper models for a few years. They are fun, I have even used a demo of Pepakura. I think the biggest downside to paper models is the cutting and the gluing, when you compare it to 3D printing. With paper models you have to CUT/GLUE precisely, and then assemble – precisely. With additive manufacture, even with assemblies of smaller parts, the end result is more precise and faster. I think paper models are great…and taking any 3D model and turning it into a cuttable model just opens up the possibilities for new models to build faster. But as an alternative to 3D printing…nah.