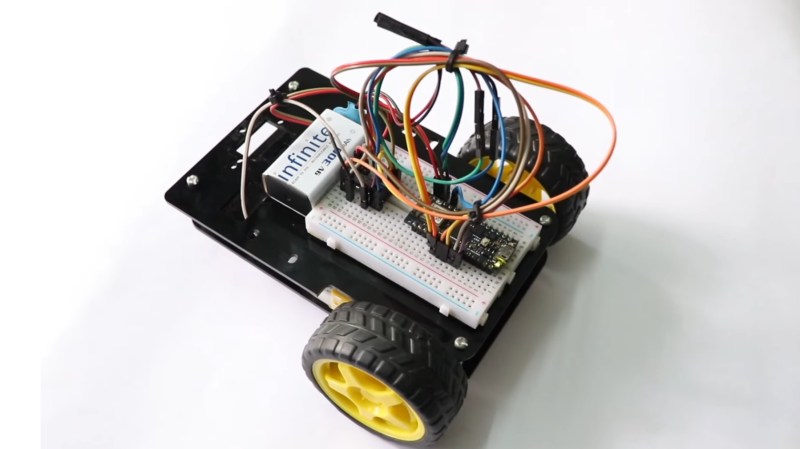
Here’s a fun build from [RootSaid] that is suitable for people just getting started with microcontrollers and robotics — an Arduino-controlled two-wheeled robot.
The video assumes you already have one of the common robotics kits that includes the chassis, wheels, and motors, something like this. You’ll also need a microcontroller (in this case, an Arduino Nano), a L293D motor driver IC, a 9 V battery, and some jumper wires.
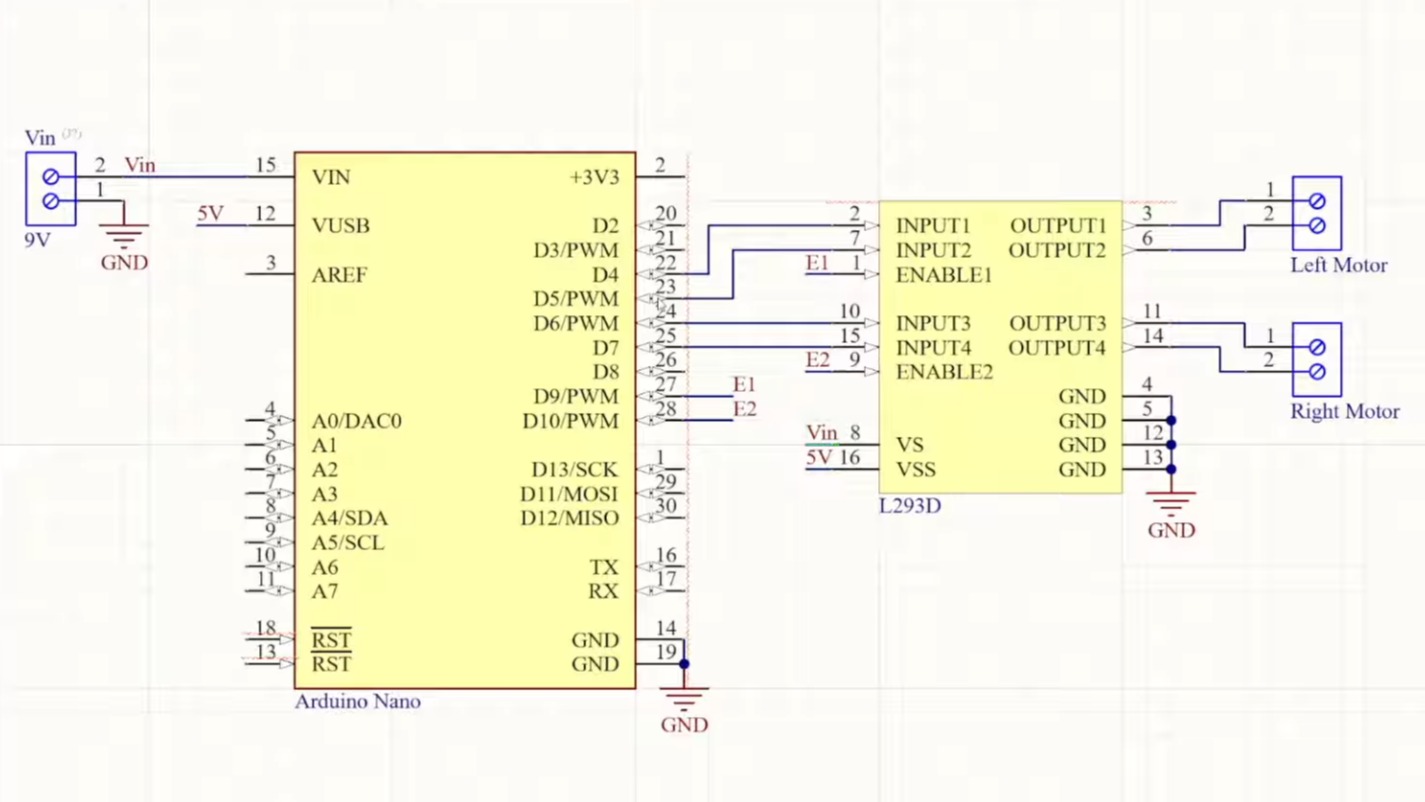 The video goes into detail about how the two wheels connected to one motor each can move the robot in various directions: forward, backward, left, and right. The motors can be made to spin either forward or backward, depending on the polarity of the power supply, using an H-bridge circuit.
The L293D motor driver IC powers and controls the motors connected to the wheels. The L293D takes its commands from the Arduino. The rest of the video is spent going over the software for controlling the wheels.
When you’re ready to go to the next level, you might enjoy this robot dog.


I’m not going to watch the clickbait but it’s just a dual H-bridge receiving predefined inputs from a microcontroller. It has no sensors or even remote control. Is it really a robot?
Yes, robots don’t require sensors. Robots without sensors can be called open-loop https://en.wikipedia.org/wiki/Open-loop_controller
https://en.wikipedia.org/wiki/Robot
A machine which performs a fixed series of actions without feedback is usually considered a clockwork mechanism or an automaton instead of a robot.
Then again, if you go to South Africa, they call traffic lights “robots” for some reason.
A 9V battery to power two motors and a microcontroller is a horrible power management. Until you understand that, you shouldn’t be making tutorials for beginners. The obligatory HC-SR04 is also missing. This makes it more of an automaton than a robot, as it cannot react to its environment.
Why?
the problem is that a 9V battery can’t deliver as much current as the DC motors would like to use. four AA batteries would be better.
Two such TT gear motors would take about 300 mA lightly loaded, both running full tilt. In this application they’d be limited by PWM most of the time. The Arduino needs about 20 mA. This is well within the capacity of a typical 9 Volt battery.
If you stall the motors, they may draw up to an amp – but that won’t lead to any dramatic malfunctions. The whole thing works even if the battery voltage crashes massively, because the Arduino isn’t that picky and the L293D motor controller accepts 2.3 Volts and above as high input.
The only actual problem you’ll see is that the battery will run down quickly, but that’s fine since this is not a real application where battery life would matter anyways.
Back in the day, I was trying to make an emergency light that took alkaline batteries (for the good shelf life) and a regular small CFL bulb. This was when LEDs weren’t yet good enough to beat CFLs in efficiency or light quality.
The challenge was to get enough current out of the batteries, because the step-up voltage converter converted the difference in voltage into a difference in current. So, to drive the CFL tube I needed about 1 Amps out of the batteries. I found out that typical alkaline cells could all deliver just about that much – inefficiently – regardless of whether you had AAA, AA, C or D cells. As you scaled up in size, you got more capacity but the rate of chemical reactions, or the internal geometry of the cells, or something just meant that they all had roughly the same internal resistance and current handling capacity under a sustained load.
Besides, four AA cells would be 6 Volts down to 3.6 Volts empty. The Arduino needs about 4.8 Volts minimum on the Vin, so you couldn’t use the whole capacity if you were using only four cells. You would reach that cut-off with about 45% charge left in the cells.
With five cells you get 4.5 Volts to empty assuming minimal load, so six cells or 9 Volts nominal really is the proper solution. At that point, it’s just a question of whether you want to use six AA cells, or six AAAA cells packed up in a 9 Volt battery.
That was a lengthy reply but Markus knows what he’s talking about.
A 9v battery is 110mAh and will run down in minutes.
At least use AA which are like 1100mAh.
There isn’t one standard 9 Volt battery. Older zinc-carbon types had around 100 mAh while modern alkaline ones are typically 500 mAh and above.
For what it’s worth, it’ll give you well over an hour of “play time”, which you probably won’t need because this robot is so simple that you’ll have no reason to actually run it for more than 5 minutes. For the majority of time, it would be hooked up to USB for programming with the motors off while you scratch your head and type in the code.
If you worry about wasting batteries, get the rechargeable version. Those give a lot more current as well.
For example, a Panasonic 6LR61AD 9 Volt battery is quoted by some at 572 mAh. This is a fairly typical battery costing 1-2€ depending on source.
The exact capacity depends on the discharge current used to calculate the rating, and the exact cut-off voltages you specify. For the typical use case, it’ll give you about 250 mAh at 1 Amps, and 500 mAh at 100 mA, and then about 600 mAh at 10 mA or less.
Two motors, at least 1 A, 40 mA when the Nano runs code, at least 100 mA for the H bridge (the L293D is notoriously inefficient due to its BJT technology). If the robot hits an obstacle and a motor stalls, the 9V battery is dead in no time. It’s a typical beginner mistake to under estimate the power the robot draws. Everybody how built a robot knows that a 9V battery isn’t the right choice. You will find hundrets of resources online. I don’t think it needs to be discussed further.
Not when the battery voltage sags. It’s self-limiting.
The motor controller output swing also has a voltage loss, so the motor does not see the full battery voltage anyways. By the data sheet it’s about 1.5 Volts less.
So?
The point of a dancing bear is not that it dances well, but that it dances at all.
Logic supply max 35 mA typical, 60 mA worst case. It’s not that bad.
In any case, the disagreement is about demanding someone to make a serious robot out of this thing, while the intent is clearly an introduction into just making it do something.
9V batteries don’t have sufficient current to drive the motor while at the same time keeping Vcc stable for the micro.
The ATMega328 on the Arduino board isn’t actually that picky about the input voltage. It will run down to 3.78V Volts with the clock set at 16 MHz without any trouble.
The Arduino board needs more than 6 Volts on the Vin to keep a steady 5 Volt output from the regulator. If it can’t have that, the voltage will simply drop and the IO signal levels with it – but that’s okay since the motor controller reads anything above 2.3 Volts as “high” input anyways.
oh, and I just discovered that the Arduino Nano includes a linear power regulator. Those are notoriously inefficient and dropping 9V down to 5V will waste a lot of energy as heat.
It’s only doing like 20 mA to run the micro and other stuff on the board. That 4 Volt drop would make a whopping 80 milliWatts of heat.
According to the data sheet, each of the two cheap plastic stepper motors draws 200 mA at 9V when idle. The 9V battery only has a capacity of 250 mA and the permissible discharge current is only 100 mA. In addition, the microcontroller and the H-bridge must also be powered. Sooner or later, this will lead to brownouts.
plastic gear motors
The rated discharge current.
9 Volt batteries will happily give half an amp, up to 1 A in a pinch – they just won’t deliver the rated milliamp-hours when you do that because the internal efficiency drops.
On the contrary. It’s actually a good thing to have a non-optimal power source because it gives rise to the problem of running out of battery all the time. Problems demand solutions, and solutions demand thinking and learning.
If there wasn’t any problem with the battery, most people would just ignore the point. They wouldn’t have to think about how much current each of these parts consumes.