
One of the most artistic applications of electrical engineering in recent memory is the burgeoning badgelife movement. This is an odd collective of people who are dedicating their time to rendering their own accomplishments in printed circuit boards. Of the entire badgelife collective, one of the most visible efforts are in Shitty Add-Ons, with a particular focus on reverse-mounted LEDs. Yes, you can install SMD LEDs upside down, and if you have your copper layers right, the light will shine through the badge.
One of the most prominent users of reverse mounted LEDs is [TwinkleTwinkie], and now finally we have a writeup on the science of reverse mounted LEDs. There’s a lot to unpack here, so buckle up and prepare to burn the tips of your fingers on a soldering iron.
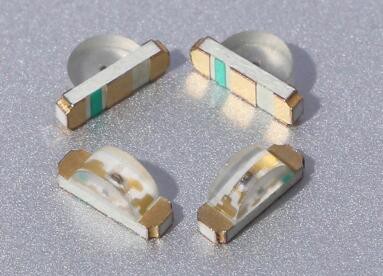
For truly reverse-mounted PCBs, there are two options. The first, and most expensive, are ‘reverse gullwing’ LEDs. These LEDs are just like normal LEDs, except the SMD pads are reversed, allowing you to mount it so the light shines into the PCB. These LEDs are expensive, rare (only three companies make them), and they don’t really give off a lot of light. The other solution to reverse-mounting a LED is simply taking a standard 1206 SMD LED and manually soldering it upside-down. This is not pick and place friendly, although I’m sure you could find an LED manufacture that would put LEDs in reels upside-down if you want.
The takeaway for reverse mount LEDs is pick two: good, fast, or cheap. Reverse gullwing LEDs are expensive, but can be pick and placed and provide sufficient illumination. Hand-soldered LEDs installed upside down are cheap, slow, but also good.
But there is another option. Side view LEDs are a thing, and they can be pick and placed. You can get them in every color, and even UV. [Twinkle] has experimented with side-view LEDs in place of reverse mounted LEDs, and the results are promising. By putting the side view LED next to part of a PCB without copper or soldermask, there is some light bleed through the PCB. It’s somewhat uneven, but with a hot melt glue diffusor, you can get a somewhat decent bar of light being emitted through a PCB.
If you want to put blinky on a PCB, you have a lot of options. If you want to put blinky on a PCB without having any visible light source, these are your options. This is the state of the art in artistic PCBs, and we’re so glad [Twinkle] could share it with us.


