Benchtop Lathe Gets An Electronic Leadscrew Makeover

The king of machine tools is the lathe, and if the king has a heart, it’s probably the leadscrew. That’s the bit that allows threading operations, arguably the most important job a lathe can tackle. It’s a simple concept, really – the leadscrew is mechanically linked through gears to the spindle so that the cutting tool moves along the long axis of the workpiece as it rotates, allowing it to cut threads of the desired pitch.

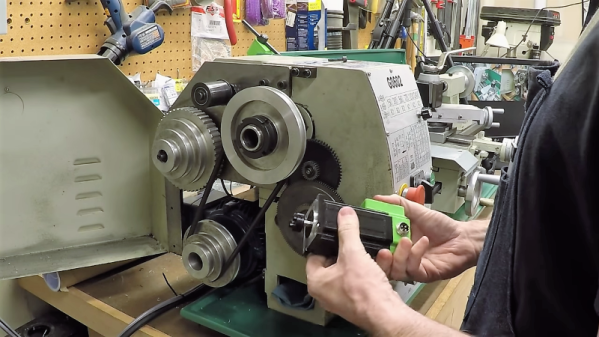
But what’s simple in concept can be complicated in reality. As [Clough42] points out, most lathes couple the lead screw to the spindle drive through a complex series of gears that need to be swapped in and out to accommodate different thread pitches, and makes going from imperial to metric a whole ball of wax by itself. So he set about building an electronic leadscrew for his lathe. The idea is to forgo the gear train and drive the leadscrew directly with a high-quality stepper motor. That sounds easy enough, but bear in mind that the translation of the tool needs to be perfectly synchronized with the rotation of the spindle to make threading possible. That will be accomplished with an industrial-grade quadrature encoder coupled to the spindle, which will tell software running on a TI LaunchPad how fast to turn the stepper – and in which direction, to control thread handedness. The video below has some great detail on real-time operating systems on microcontrollers as well as tests on all the hardware to be used.

This is only a proof of concept at this point, but we’re looking forward to the rest of this series. In the meantime, [Quinn Dunki]’s excellent series on choosing a lathe should keep you going.

Continue reading “Benchtop Lathe Gets An Electronic Leadscrew Makeover”

Cocktail Barbot Takes Things Up A Level

Mixing a cocktail is considered as much an art as a science. The practice is studied dilligently by bartenders the world over. Of course, for any given human task, there’s always another human building a robot to automate it. [CamdenS5] is one such human, with a cocktail mixing barbot with a few tricks up its sleeve.

As you’d expect, there’s a smattering of the usual alcoholic liquids and mixers, along with a battery of pumps for fluid delivery. The fun doesn’t end there, though. There’s a linear actuator capable of putting out 500 N for slicing limes, and a mint and sugar dispenser as well. If that wasn’t enough, there’s even a muddling station to help bring out the flavours just right.

This is a machine that takes a broader look at the process behind making a good cocktail. It’s not just about lumping ingredients into a glass – it takes finesse and care to get the best results. It’s not the first barbot we’ve seen – this one is built in a grandfather clock.

Add-Ons Go Electroluminescent

It’s that time of the year again, and once more we’re faced with the latest innovations in Badgelife, the movement to explore the artistic merits of electronics and manufacturing. This is an electroluminescent printed circuit board, and it’s some of the finest work we’ve seen. It’s also a Shitty Add-On that glows blue.

The process for applying an electroluminescent coating to printed circuit boards is, surprisingly, something we’ve covered before. Late last year, [Ben Krasnow] delved deep into a DIY EL display. The process is expensive, but all the products come from a company called Lumilor. The first step in this process is applying a thin conductive coating on a substrate with an airbrush. Since the entire idea of printed circuit boards is to have a layer of conductive material etched into any shape you want, the simple circuit board is the idea experimental platform for playing with EL displays. Traditionally, EL displays were made entirely with a silk screen process, like [Fran]’s ongoing attempt to recreate the Apollo DSKY display.

The electronics for this badge are simply a Microchip MIC4832 EL Driver, which converts the 3.something volts from the add-on header into 100 or so Volts AC at hundreds of Hz. This is a single-chip solution to driving EL displays, and the only other parts you need are an inductor, diode, and a few caps and resistors. An ATtiny85 can be used to blink the circuits, or, alternatively, you could copy [Ben]’s work and build a character EL display.

The process of applying an electroluminescent coating to a PCB does require a spray gun or airbrush, and the chemicals are a bit expensive. This, though, is pushing the boundaries of what can be done with artistic PCBs. It’s new applications of technology, simply as wearable electronics. It’s the best example of the possibilities of the medium and some of the best work that’s come out of the Badgelife scene.

Pocket Watch Becomes Pinhole Camera

A pinhole camera is essentially the combination of the camera obscura with photographic film. The pinhole acts as the lens, focusing the scene onto the film, and after exposure, the film can then be developed and you’ve got your picture. They’re a fun way to learn about photography, and easy to make, too. [Brooklyntonia] decided to undertake just such a build, secreted away inside a pocket watch.

The build starts with with the disassembly of the watch, which acts as the main cavity of the camera. A bellows is then constructed from leather and a toilet paper roll to allow the camera to still fold up inside the original watch case. A pinhole is then installed at the end of the bellows, and a plug is used as a shutter to allow the bellows to be properly unfolded prior to exposure.

It’s a fun build, and one that comes complete with instructions for the proper processing of film in your own darkroom – or bathroom. Pinhole cameras can be useful tools, too – particularly for things such as capturing an eclipse.

The Science Of Reverse Mounted LEDs

One of the most artistic applications of electrical engineering in recent memory is the burgeoning badgelife movement. This is an odd collective of people who are dedicating their time to rendering their own accomplishments in printed circuit boards. Of the entire badgelife collective, one of the most visible efforts are in Shitty Add-Ons, with a particular focus on reverse-mounted LEDs. Yes, you can install SMD LEDs upside down, and if you have your copper layers right, the light will shine through the badge.

One of the most prominent users of reverse mounted LEDs is [TwinkleTwinkie], and now finally we have a writeup on the science of reverse mounted LEDs. There’s a lot to unpack here, so buckle up and prepare to burn the tips of your fingers on a soldering iron.

For truly reverse-mounted PCBs, there are two options. The first, and most expensive, are ‘reverse gullwing’ LEDs. These LEDs are just like normal LEDs, except the SMD pads are reversed, allowing you to mount it so the light shines into the PCB. These LEDs are expensive, rare (only three companies make them), and they don’t really give off a lot of light. The other solution to reverse-mounting a LED is simply taking a standard 1206 SMD LED and manually soldering it upside-down. This is not pick and place friendly, although I’m sure you could find an LED manufacture that would put LEDs in reels upside-down if you want.

Side view LEDs

The takeaway for reverse mount LEDs is pick two: good, fast, or cheap. Reverse gullwing LEDs are expensive, but can be pick and placed and provide sufficient illumination. Hand-soldered LEDs installed upside down are cheap, slow, but also good.

But there is another option. Side view LEDs are a thing, and they can be pick and placed. You can get them in every color, and even UV. [Twinkle] has experimented with side-view LEDs in place of reverse mounted LEDs, and the results are promising. By putting the side view LED next to part of a PCB without copper or soldermask, there is some light bleed through the PCB. It’s somewhat uneven, but with a hot melt glue diffusor, you can get a somewhat decent bar of light being emitted through a PCB.

If you want to put blinky on a PCB, you have a lot of options. If you want to put blinky on a PCB without having any visible light source, these are your options. This is the state of the art in artistic PCBs, and we’re so glad [Twinkle] could share it with us.

What Can You Learn From An Eggbot?

An eggbot is probably the easiest introduction to CNC machines that you could possibly hope for, at least in terms of the physical build. But at the same time, an eggbot can let you get your hands dirty with all of the concepts, firmware, and the toolchain that you’d need to take your CNC game to the next level, whatever that’s going to be. So if you’ve been wanting to make any kind of machine where stepper motors move, cut, trace, display, or simply whirl around, you can get a gentle introduction on the cheap with an eggbot.

Did we mention Easter? It’s apparently this weekend. Seasonal projects are the worst for the procrastinator. If you wait until the 31st to start working on your mega-awesome New Year’s Dropping Laser Ball-o-tron 3000, it’s not going to get done by midnight. Or so I’ve heard. And we’re certainly not helping by posting this tutorial so late in the season. Sorry about that. On the other hand, if you start now, you’ll have the world’s most fine-tuned eggbot for 2020. Procrastinate tomorrow!

I had two main goals with this project: getting it done quickly and getting it done easily. That was my best shot at getting it done at all. Secondary goals included making awesome designs, learning some new software toolchains, and doing the whole thing on the cheap. I succeeded on all counts, and that’s why I’m here encouraging you to build one for yourself.

Continue reading “What Can You Learn From An Eggbot?”

Next Week Is KiCon: Come For The Talks, Stay For The Parties

KiCad is the electronic design automation software that lives at the intersection of electronic design and open source software. It’s seen a huge push in development over the last few years which has grown the suite into a mountain of powerful tools. To help better navigate that mountain, the first ever KiCad conference, KiCon, is happening next week in Chicago and Hackaday is hosting one of the afterparties.

The two days of talks take place on April 26th and 27th covering a multitude of topics. KiCad’s project leader, Wayne Stambaugh, will discuss the state of the development effort. You’ll find talks on best practices for using the software as an individual and as a team, how to avoid common mistakes, and when you should actually try to use the auto-router. You can learn about automating your design process with programs that generate footprints, by connecting it through git, and through alternate user interfaces. KiCad has 3D modeling to make sure your boards will fit their intended enclosures and talks will cover generating models in FreeCAD and rendering designs in both Fusion360 and Blender. Dust off your dark arts with RF and microwave design tips as well as simulating KiCad circuits in SPICE. If you can do it in KiCad, you’ll learn about it at KiCon.

Of course there’s a ton of fun to be had as interesting hackers from all over the world come together in the Windy City. Hackaday’s own Anool Mahidharia and Kerry Scharfglass will be presenting talks, and Mike Szczys will be in the audience. We anticipate an excellent “lobby con” where the conversations away from the stages are as interesting as the formal talks. And of course there are afterparties!

  • Friday 4/26 Pumping Station: One, the popular Chicago hackerspace now celebrating its 10 year anniversary, is hosting an afterparty (details TBA)
  • Saturday 4/27: Hackaday is hosting an after party at Jefferson Tap from 6-8:30. We’re providing beverages and light food for all who attended the conference.

If you still don’t have a ticket to KiCon, you better get one right now. We’re told that you can count what’s left on two hands. Supplyframe (Hackaday’s parent company) is a sponsor of KiCon, and we have two extra tickets that came with that sponsorship. We like seeing a diverse community at these events and have saved these tickets for people from under-represented groups (such as for example women, LGBT+, and people of color) in the hardware world. Email us directly for the tickets, your information will remain confidential.

We’re looking forward to seeing everyone next week!