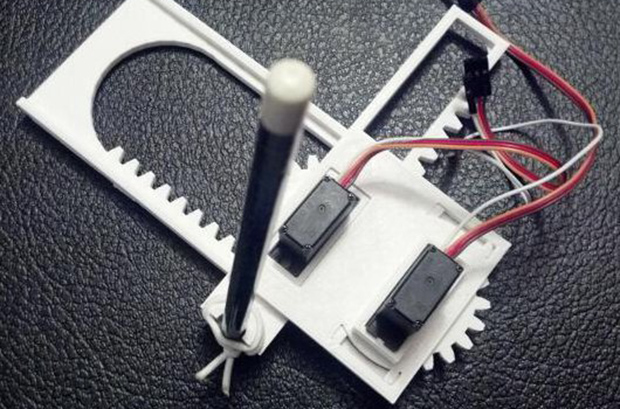
CNC machines are impressive pieces of kit. We’re all for seeing the big, burly, impressive machines, but there’s something to be said about seeing how small they can get. [Jay] has what is probably the most minimal CNC plotter we’ve ever seen, built from only six 3D printed parts.
[Jay]’s plotter is based on the Piccolo, an exceedingly small-scale CNC platform that can be built for $70 with laser-cut parts. This version, though, uses only six parts that can be downloaded from Thingiverse. Powered by an Arduino and two micro servos, this CNC plotter would be a great introduction to CNC for any robotics club or hackerspace tutorial series.
[Jay] has been doing some awesome work with CNC plotters; we saw his large format Plotterbot earlier this month, and his giant plotted HaD logo with HaD infill poster was a great submission to our Trinket contest.
Video of [Jay]’s plotter in action available after the break.


“Pieces of kit.”
Why does that bother me so much?
It is an infinite recursion. Kits are made of pieces of kit are made of pieces of kit are made of pieces of kit……….
Brain, Let me educate you: In hobbyist electronics, a collection of parts that is to be assembled by the user is called a “kit”.
Don’t try to sound cute by misusing a slang term that confused the people that the parts are available as package project for a project. You sound like a tool and non-professional comments like these really brought down the quality of HaD.
“Brain, Let me educate you:” – Were you attempting to inscribe something on your fleshy tablet or was your comment to “Brian”? Regardless, Comments like yours are completely unnecessary and out-of-place in a community like this. Constructive criticism is a good thing and here’s some for you… Get a new dictionary, as you’re obviously using something like the “Urban Dictionary”. I’m sure you didn’t intend it but you actually complimented Brian by calling him a “tool”. Look it up in a real dictionary. Have a great day! Keep the great hacks coming!
I saw “Brain, Let me educate you” and immediately started reading the post in a Pinky voice.
It’s an extremely common phrase used mostly in the UK. It does not mean an actual “parts kit” Watch the BBC for an hour, you will likely hear it a few times.
@LouLou: I get it. It is a pretty funny innuendo. It might actually be an out-uendo.
In the UK, Kit refers to equipment.
So you Kit an army. Each item needed to perform the mission
is a part of the kit.
That is likely how he is using it in this article.
That video is really really bad :S
@Eirinn: No argument there… I’ll try to put together a better video. If you hate that video though, DO NOT WATCH THIS ONE http://www.youtube.com/watch?v=GPAihIzBYKE
“DO NOT CLICK THIS LINK” … clicks link … really, its what people will do you know..
Here is the link to the blog post with more photos and assembly instructions
http://plotterbot.com/2013/11/how-to-build-a-tiny-cnc-drawing-robot/
You probably just missed to add the link this time. That happens! But please HaD create a special format (color, fontsize, icon, graphical button, whatever) for the main source link of every post you make. You feature great stuff and often after reading only the headline or seeing the first picture I know I want to jump to the source page to get more details. Don’t make it hard to locate that link. Make it stand out and put it uniformly at the top or bottom of every post. Just a friendly suggestion!
First link goes to the trinket contest, not the project page.
Here’s the link to my project page with all the step-by-step instructions: http://shor.tw/yq
What kind of resolution are we talking here, using the servos?
@ElectroNick: I’m not at all sure yet – I went from idea-to-the version you see above in just a few days trying to get it ready for the 11/20 Make Robot Hacks with most of my energy devoted to design rather than the software. The finest grain control it would be capable of would be dependent upon the smallest increment of a degree the servo is capable of and the effectiveness of the gears I’m using. (Switching to herringbone gears would help a lot with that)
I read a guy measured his servo to have about 400 positions over the ~180 degree range. For an astoundingly simple design that’s not gonna do much more than simple plots it’s pretty good, IMO!
@jordan: The gears I’m using are about 40mm in diameter, so a full rotation should translate into PI*40 = 125.6mm of linear movement. But, since it’s only 180 degrees of freedom, the maximum linear movement is half that – 62.8mm. If the servo can hold a position every half-degree, that means it would (theoretically) have a minimum movement distance of (62.8/180/2 = 0.174mm) 0.174mm. Since that’s significantly smaller than even a very fine tip pen or marker (0.5mm is pretty typical) I’d say it’s pretty decent (theoretical) resolution!
180 degrees of MOTION. degrees of Freedom is something completely different. your machine has 2 degrees of freedom.
Very cool! Whatever happened to the Piccolo though?
@Dwhacks: Diatom Studio is still around and I think they’re getting ready to release their Piccolo. If so, I’m first in line. :)
Is the pencil leaving any marks? I can’t tell from the video.
@mikemac: Yes, it is – but very very faintly. :) If you look very closely you can see them. I’ll do another drawing, this time with a marker, and take another video. :)
Could probably make an even smaller one, from the head drives out of a couple of 3.5″ floppy drives. They have some really small steppers attached to some really small screw gears.
@George: Actually… I could have built it even smaller by using smaller gears. I chose the size I did because it will allow me draw things the size of a post-it note. The big benefit of using micro servos is that they’re so very cheap – much cheaper than steppers. You can find tiny servos for as little as $2.50, shipped, on eBay.
optic drives have longer screw gears. floppy drives make good Z-axis for pens though. :)
I’ve been noodling about with just that for the last few weeks. Not smaller but it does use the DVD sleds and steppers
https://plus.google.com/106895885845521825397/posts/fZqKJTfJup8
Picked up a rotary carver for less than $10 on ebay because I had a couple of DVD drives and an old scanner around, was thinking of building something like this. Slightly hopeful it could be used to mill PCBs.
I’m going in that direction too. I’m pretty sure it won’t work because the DVD mechanisms are incredibly weak. But, with a high speed and very slow movement you never know…
How much backlash are you dealing with?
Or have you already come up with a solution?
@LouLou: Right now, probably a lot. :) However, this is a very early version. I’d like to swap out the existing rack and pinion in favor of a herringbone version – which should help reduce backlash significantly. Also, I think smaller teeth may help too.
For its size, it moves quite fast. Some nice small teeth gearing may make it really nice for…something. Your creation is so cool and cost efficient I just can’t stop trying to find something it would be good for other than a learning novelty.
Ah, is there a dremel attachment planned? ;)
@Edgey: Not as yet – but I have a few thoughts in that regard. :) Stay tuned!
I’ve just uploaded a slightly less terrible video of the robot drawing on a 3×5″ index card with a pen. http://www.youtube.com/watch?v=_0UBZxhru3o
This is insanely awesome. I can imagine other uses than just drawing. What a simple but perfect design.
@StinkySteve – What other uses were you thinking of? I’d love to hear your ideas!
I just finished making mine and it’s awesome! I had a problem with too much friction, but it’s all better now. Now I want to load a GCODE interpreter onto the arduino.
Could you post a picture? I’d love to see it! Do you know of a GCode Arduino interpreter that I could use as a starting point?
No pics yet, busy making. I’ve started modifying this Gcode interpreter to work with servos instead of steppers. I’ll post what I got when I finish.
http://www.marginallyclever.com/blog/2013/08/how-to-build-an-2-axis-arduino-cnc-gcode-interpreter/
Here’s a modified version of the above code to work with servos:
https://dl.dropboxusercontent.com/u/19401902/GcodeCNCDemo2AxisServo.ino
I’ve got a RGB light attached, so you may need to comment out the digitalwrite() calls.
Send a command to it like:
G00 X90 Y90 F10;
@Paul: Ah! Of course! Dan Royer does great work – I’ll definitely need to dig into that…
I have been considering buying an entry-level 3D printer for printing gears, etc. What resolution is needed? Do the gears mesh smoothly? Do you have to touch them up somehow after printing? How small can you make the gear teeth?
@JimBob: I printed all of my parts rather coarsely at 0.36mm thick layers, so I think any modern entry level 3D printer would probably be fine. I didn’t touch up the gears or racks at all – but I did sand some of the parts – like the rails on the large rack – to fit better. The teeth are probably about 4mm tall – I think I could safely take them down to about 2.5-3mm and possibly have better/smoother operation.
This is a FUN robot, but don’t expect super precision and high performance. It’s just a little plastic pen plotter that is insanely cheap to build and fun to play with. :) I wouldn’t worry over much about getting all the settings right and just dive in and make one.
I don’t have a 3d printer, but I do have access to a nice CNC router. I notice it would be pretty easy to cut this design out of sheet material.
But then, what to do with it??
@Swarf: Actually, I don’t think it would be all that easy to cut this design out of a 2D material. Four of the six pieces are necessarily 3D parts. You could reconfigure it to be made out of flat pieces, but that would definitely add to its complexity.
Those look like simple 2.5D, so I don’t think it would be a problem.
@Swarf: You’re right you could mill the parts or layer flat parts for 2.5D construction. However, I’m working on a herringbone rack/pinion at the moment for better accuracy/less backlash. That version would require 4 of the 6 parts to be 3D printed.
For those interested, I’ve designed a new 3-axis version – only 8 printed parts. http://plotterbot.com/2013/12/tiny-cnc-now-a-3-axis-cnc/