A Low-Cost Modular High Altitude Balloon Tracker With Mesh Networked Sensors

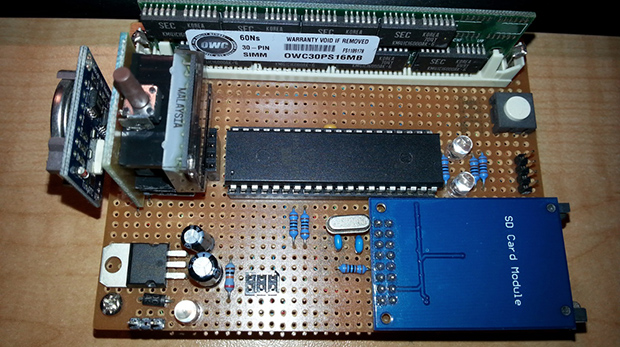
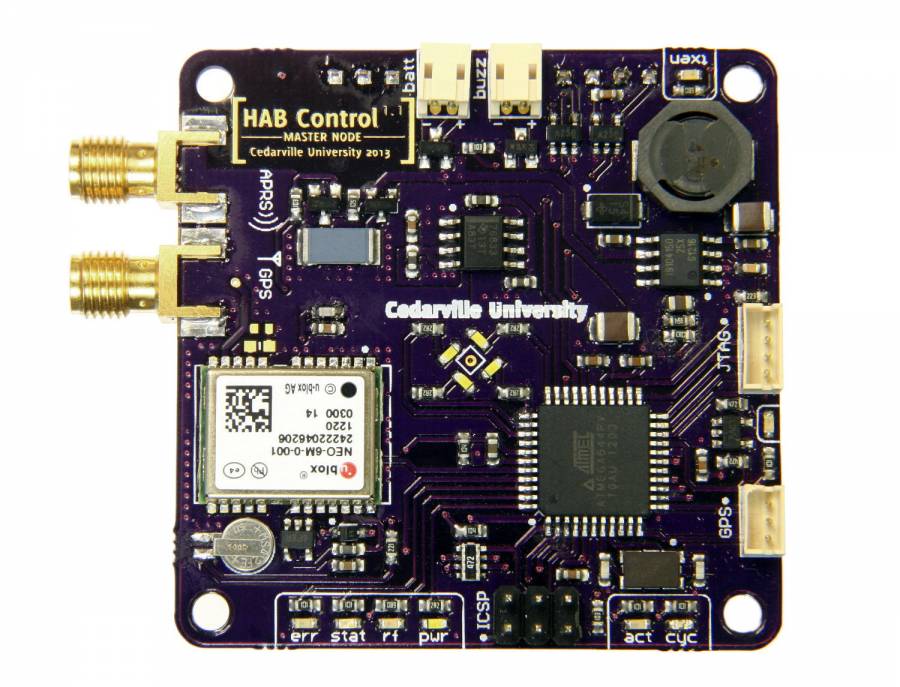
[Ethan] just tipped us about a project he and a few colleagues worked on last year for their senior design project. It’s a low-cost open hardware/software high altitude balloon tracker with sensors that form a mesh network with a master node. The latter (shown above) includes an ATmega644, an onboard GPS module (NEO-6M), a micro SD card slot, a 300mW APRS (144.39MHz) transmitter and finally headers to plug an XBee radio. This platform is therefore in charge of getting wireless data from the slave platforms, storing it in the uSD card while transmitting the balloon position via APRS along with other data. It’s interesting to note that to keep the design low-cost, they chose a relatively cheap analog radio module ($~40) and hacked together AFSK modulation of their output signal with hardware PWM outputs and a sine-wave lookup table.

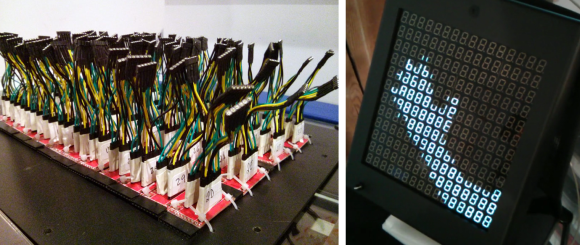
The slave nodes are composed of ‘slave motherboards’ on which can be plugged several daughter-boards: geiger counters, atmospheric sensors, camera control/accelerometer boards. If you want to build your own system, be sure to check out this page which includes all the necessary instructions and resources.

Making The Worst Linux PC Useful

AVR

After seeing [Dimitry] build the most minimal Linux computer ever, [Kyle] decided he needed one for himself. In true hacker fashion, he decided to take this build for the worst Linux PC one step further: he would add I2C to his version, making it somewhat useful, considering the number of I2C peripherals out there.

This build is based on [Dmitry]’s ARM Linux computer emulated on an 8-bit AVR. It’s a full-blown Linux computer with 16 MB of RAM courtesy of a 30-pin SIMM, a lot of storage provided by an SD card, all running on an emulated ARM processor inside a lowly ATMega1284p. [Kyle] built this clone over the course of a few months, but from the outset decided he wanted to implement an I2C protocol on this terribly under specced computer.

After booting his computer, [Kyle] eventually got an I2C module loaded by the kernel. With an I2C module and a few spare GPIO pins, he set out to create something to attach to this terribly slow computer – an ancient LED dot matrix display. With a real-time clock, this display became a clock  with the help of a homebrew program written in C. Considering the speed of the emulated processor, the program takes nearly three seconds to read the RTC and display the current time to the display. We’re thinking it was a wise choice to only implement hours and minutes in this clock.

If having a useful computer running at about 10 kilohertz isn’t enough, [Kyle] also compiled the classic text-based adventure Zork. It actually runs, proving you don’t need Megahertz of power to do something useful and fun.

A Pair Of Toaster Reflow Oven Builds

For some reason or another, the Hackaday tip line sometimes sees a short burst of submissions for the same project. The latest one of these was for toaster oven reflow stations. They’re both great builds and different approaches to making a useful tool out of home appliances.

First up is [Richard]’s build. he ended up with a fairly high-end build using a Rocket Scream Reflow Oven Controller Arduino shield. This shield accepts a normal K-type thermocouple and controls an external solid state relay with the Arduino’s PID library. [Richard]’s build has a few neat additions – a properly dremeled enclosure, computer fan, and a welding blanket for insulation. Now that we think about it, it’s odd we’ve rarely seen any sort of insulation in these reflow oven builds.

Next up is [Ray]’s version of a Black & Decker reflow oven. While not as fancy as [Richard]’s build, this one does have a few features that make it very interesting. Instead of messing around with thermocouples, [Ray] simply took a digital kitchen thermometer – a neat tool that already a thermistor in a compact metal probe – and read the analog value with an Arduino. To control the power, [Ray] is using a cheap 433 MHz radio transmitter to control a few remotely operated power sockets. It’s a very clever and inexpensive replacement for a SSR, especially since [Ray] had these power sockets just lying around.

So there you go. The same tool, built two different ways. A great demonstration of how you can not only build anything, but you can build anything any way you want.

A Six Part CNC Machine

CNC

CNC machines are impressive pieces of kit. We’re all for seeing the big, burly, impressive machines, but there’s something to be said about seeing how small they can get. [Jay] has what is probably the most minimal CNC plotter we’ve ever seen, built from only six 3D printed parts.

[Jay]’s plotter is based on the Piccolo, an exceedingly small-scale CNC platform that can be built for $70 with laser-cut parts. This version, though, uses only six parts that can be downloaded from Thingiverse. Powered by an Arduino and two micro servos, this CNC plotter would be a great introduction to CNC for any robotics club or hackerspace tutorial series.

[Jay] has been doing some awesome work with CNC plotters; we saw his large format Plotterbot earlier this month, and his giant plotted HaD logo with HaD infill poster was a great submission to our Trinket contest.

Video of [Jay]’s plotter in action available after the break.

Continue reading “A Six Part CNC Machine”

Fail Of The Week: Commute-Shortening Electric Scooter

fotw-electric-scooter

Please don’t judge [Alan] on his choice of vests. This project is from 1999 when it was common to see people rockin’ these threads. Anyone who has ever spent time on the University of Minnesota campus in Minneapolis, Minnesota will know that parking is at a premium. [Alan] had a 12-15 minute walk from his parking garage to his office and was considering a cheaper parking location that would balloon that to 20-25 minutes. But engineers don’t see problems, they see project ideas. He started work on a tiny electric scooter that could slim down his commute. Obviously he did find some success, but it was interspersed with failures that make his scooter the Fail of the Week.

Continue reading “Fail Of The Week: Commute-Shortening Electric Scooter”

Beautiful Touch-Sensitive Furniture

lamp

It’s taken over a year, but [tinkering techie] has finally completed his touch sensitive nightstand. At first glance, it looks like any normal piece of furniture. With the addition of an Arduino, some copper clad board, and a few LEDs, he’s turned it into a very elegant, electronic home furnishing.

The nightstand is built out of a few very nice pieces of mahogany. Underneath the top of the nightstand, three Kapton-covered copper clad boards are inset along the front and side edges. These capacitive sensing boards are connected to an Arduino Fio that reads the capacitance of these sensors and turns on a small LED under the drawer or the mains powered lamp.

The electronics are powered by a small USB charger with a battery backup all hidden underneath the top of the nightstand. Inside the drawer, a magnetic reed switch turns on an RGB LED whenever the drawer is opened.

While the nightstand itself is a wonderful piece of woodworking, we need to tip our hat for a remarkably seamless integration of fine furniture and electronics. The electronic furniture modifications we usually see are Ikea cruft, but this wonderful homemade nightstand should last decades or centuries.

Video of [techie] going over his build below

Continue reading “Beautiful Touch-Sensitive Furniture”

7-Segment Display Matrix Visualizes More Than Numbers

digit-7-segment-visualization

You can pretty much tell that this is an outstretched hand shown on a large grid of 7-segment displays. But the only reason you have to look twice is because it is a still photo. When you see the video below it’s more than obvious what you’re looking at… partly because the device is being used as an electronic mirror.

In total there are 192 digits in the display. To make things easier, four-digit modules were used, although we still couldn’t resist showing you the well-organized nightmare that is the wiring scheme. Each module is driven by its own discrete Arduino (driving 28 LEDs as they’re apparently not connecting the decimal point). All 48 Arduino boards receive commands from a Raspberry Pi which is running openFrameworks to generate the animations.

Now of course the project was well under way before [Peter] discovered a similar display from more than a year ago. But we’re glad that didn’t stop them from forging ahead and even building on the idea. They added a camera to the display’s frame which lets it mirror back whatever is in front of it.

What popped into our minds was one of the recent entries for the Trinket contest.

Continue reading “7-Segment Display Matrix Visualizes More Than Numbers”