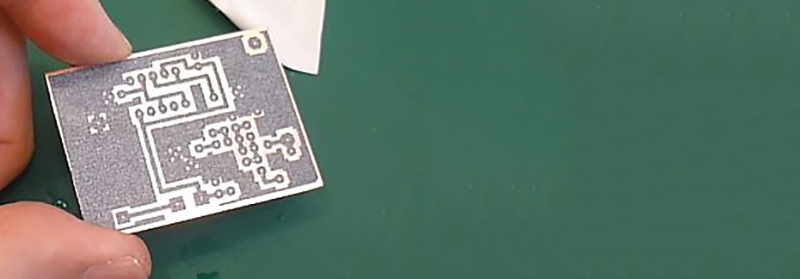
One of the most popular methods of homebrew PCB fabrication is the toner transfer process. Compared to UV-sensitive films and CNC mills, the toner transfer process is fantastically simple and only requires a laser printer. Being simple doesn’t mean it’s easy, though, and successful toner transfer depends on melting the toner to transfer it from a piece of paper to a copper clad board.
This is heatless toner transfer for PCB fabrication. Instead of using a clothes iron or laminator to transfer toner from a paper to board, [simpletronic] is doing it chemically using acetone and alcohol.
Acetone usually dissolves laser printer toner, and while this is useful for transferring a PCB from paper to board, it alone is insufficient. By using a mixture of eight parts alcohol to three parts acetone, [simpletronic] can make the toner on a piece of paper stick, but not enough to dissolve the toner or make it blur.
From there, it’s a simple matter of putting a piece of paper down on copper clad board. After waiting a few minutes, the paper peels off revealing perfectly transferred board art. All the usual etching techniques can be used to remove copper and fabricate a PCB.
This is an entirely novel method of PCB fabrication, but it’s not exactly original. A few days ago, we saw a very similar method of transferring laser printed graphics to cloth, wood, and metal. While these are probably independent discoveries, it is great evidence there are still new techniques and new ways of doing things left to be discovered.
Thanks [fridgefire] for the tip.


Nice article. I’ve never made PCBs myself this way, but I’m tempted.
I wonder if it’s possible to cut out a stencil and then simply apply the resist material (i.e. Sharpie, nail polish, etc.).
Probably. As long as it doesn’t get under the edges too much. Brings up memories of my uncle, who spent years as a rubylith cutter in the early IC industry.
In 1970’s-1990’s one of PCB making methods used in my country was gluing to PCB pieces of cellulose to protect the copper traces and pours. There were strips of varying sizes and round disks for holes. When copper pour was needed, the areas between strips or disks was painted with nitro paint or rosin ink. Then board was etched with ferric chloride. Other method was painting the design with rosin ink and either brush or or needle and syringe. Rosin paint is made by dissolving rosin in strong alcohol…
I think this was common all over the place before laser printers were available. There are sticker sets of traces and pads you can use to do this, some places even sell ‘resist pens’ – which are simply a sharpie!
Back in the last century i used these sheets of premade pads and traces too. However we used them to draw the design on a transparent film first. The premade sheets we had were probably something special as we did the transfer on the film by pressure transfer (rubbing down the back of the sheets we wanted to transfer while holding it in the desired position). There were special white backlit tables in our lab so you could check the design very precisely for any gaps. Once the transparent film was complete we used the normal uv-exposure and etching process to get the pcbs made.
There were two types of these transfers. The ones that you describe were thin and non-flexible. It you wanted to place a bend in a track then you had to use pre-printed arcs. They were intended for making a master image for a photographic process but (I assume) they could be used for direct etch.
The other type were much thicker and more flexible. Track tape was like a very small roll of sticky tape and not on a sheet. This made it easy to bend a track a little but not to far as it would kink. You can spot very old board made with this by the large radius of the arcs. It was more intended for direct etch but (I assume) you could make a photo master with it.
You could always freehand it if you want as long as the spacing isn’t an issue and the pcb isn’t too complex but that’s part of the reason why we try to make the precision portions of making pcbs accurate.
You cant cut all the traces out of a stencil, it would fall apart. So that’s basically a screen printing process. I think this is done for cheap low resolution PCBs
Wow, this sounds a lot quicker than using a laminator to transfer the PCB. Have to try it out. My modified cheap laminator takes at least 30 minutes to heat up to the desired temperature; And then it takes several tries to get a solid transfer. The laminator can only feed thin 1/32″ PCB and not the thicker one.
I have used the toner transfer method with a laminator for years. Although it worked well, it is very dependent on the type of toner I used. Genuine Brother cartridges worked well the generic cartridges did not work at all.
After saw this last week, I decided to give this a try. I had fairly good success with the method exactly as in the video, but had a couple of spots where the toner did not stick to the board. I modified the procedure to include burnishing the paper while the solvent was still keeping the toner soft. This gave very good results even with the generic toner I used.
Details and some pictures on my blog. The finest traces are .016″ and have nice clearance between IC pins.
http://kv4qb.blogspot.com/2016/01/cold-toner-transfer-circuit-baords.html
That’s a worry. I just replaced the toner in my laser with cheep non-genuine toner – maybe I will now need to do 2000 print to get the toner out if it’s doesn’t work as it previously did.
I am using thermal toner transfer still. I use Pulsar (pcbfx.com no association) as the transfer medium and a laminator for thermal transfer. I have made single sided PCBs with track widths down to 5mill with no issues. At the moment the weak link in the process is the thermal regulation of the laminator rollers so do several passes.
I wonder if this non-thermal process can get the same resolution. The transfer media I am using is not suitable for this method because it wont allow the chemicals to ‘dry out’.
I’ve used the heat transfer method and also found that genuine Brother toner was required. This is because the generic toner contains fuser oil which prevents adhesion on metal. I suspect that the adhesion problem would remain an issue even with the acetone/alcohol transfer method.
I’ve heard a couple of different explanations for the fact that Brother toner doesn’t work.
One explanation was that it contained micro-spheres of encapsulated chemicals that help the first fusing process when there crushed into the paper.
I am not using a Brother printer but it would be interesting to know exactly what the issue is.
The printer I am using is a common and cheap color laser – Fuji Xerox CM205fw / CP205fw. I decided on a color so I can use the same process to make front panel prints / decals.
I bought it second hand and it had low toner. If has worked but I don’t get full coverage on minimum etch (filled plain)boards due to low toner density but still works fine.
I am using Pulsar Toner Transfer Paper made from Dextrin (which is water soluble) so I get 100% transfer of the toner on the sheet.
Now that I have new (non-genuine) toner (hoping that it works) I will look in the software for a way to increase toner density.
If your, interested in the result then post a reply and I will get back to you when I have given it a go (another day).
Today is coding but I want to make a ServoDuino board to run 24/32 or more servos – based on a ATmega328 and some serial registers (SIPO) or a ATmega1284 which may be overkill – perhaps a ATmega644 or some other 40 pin DIP.
I have a brother printer, the toner doesn’t work well, but the refill toner does (from INK OWL).
in fact, i have similar experience. heat transfer went well with the original toner, but after I switched to generic toner, it would just spread all over the place under a hot iron. Too bad, but it wont make me buy original toner again.
Was indeed with a Brother printer as well
Can I also ask how you are tinning the boards. That looks perfect. There was once a solution that could be used to tin copper boards but I can’t see to find it now days.
I got it from Amazon MG Chemicals 421 Liquid Tin, 125 ml Bottle about $15.00. I have used the same bottle for over a year now, and seems to tin the copper just as well as when I started with it.
Thanks for your reply – much appreciated. So far I can only find it in 500ml quantities here in my country … should last about 3 generations.
What kind of paper do you use?
Four score and seven years ago, or more accurately at about the end of the last century, when I first heard of toner transfer…. I swear the method then was to soak the back of the print with kerosene. I was trying to get into it then, got a killer deal on a LaserJet III, which I always found space in a moving van for, but a LJ 1320 fell in my lap several years ago… long story short, it’s been back burnered 12 stoves deep… really just picking up toner transfer threads again.
Anyyyywayyyyy… not sure if the kersosene transfer was specific to the OLD laserjet toner or what.
Oh also, back in the day when printers had a card stock straight line pass through, I swear people were managing to print straight to the board.
I left toner-transfer method behind because using photo-sensitive spray and UV lamps gives better results and it’s simple enough. Price is not much higher, one photo spray costs below $20, same thing with UV nail dryer.
However this cold toner-transfer method described in article seems interesting enough, and since I already have ingredients I will surely try it, may come handy sometimes when I need quick prototype board.
Which photo-sensitve spray do you use?
Interesting. I’ve been using heat to transfer toner for years.
Indeed, that is how all my laser printers fixate the design once the power got electrostatically transfered from the drum to the paper.
I tried toner transfer years ago and it was difficult at best. I ended up printing the artwork on a transparency sheet mirrored, then placing that flat on a photo-sensitive board (where light exposed areas would be removed chemically) and exposed the hole thing with a fluorescent desk lamp that had a blacklight tube in it.
The process creates crisp traces and is very straight forward, I don’t understand why people opt for transfer when it is so prone to error.
I use the transfer method because I had so much trouble with the photographic process. I never succeeded with a single board and I never knew why.
Heh, when I saw that other post about transferring images, the first thing that popped into my head was “…I wonder if you could do toner transfer PCBs that way.” glad someone else figured out the answer so I can continue to laze about and procrastinate. :P
So easier way to transfer toner and so sad me living in country when you cannot go to store and buy ethanol (of course it can be replaced with propanol) and acetone (don’t know what to replace it with). It’s because everyone around are alcohol and drug addicts (government think so).
I give up. Spent the last few hours trying to get this to work. Closest I got was an unusable partial transfer using straight acetone. 8:3 alcohol to acetone didn’t dissolve the toner. Using Brother laser and toner. 100% acetone nail polish remover (it hassome additive for meth heads – still claim 100%?). 95% isopropal alcohol. Are any of those show stoppers?
I’ve also tried this method also and did not get good/consistent results. Some of the other methods I’ve tried are:
Toner transfer – I’ve tried with an iron and laminator. Results were hit or miss. I could not get large copper pours to stick. I’ve used different photo papers, regular paper, magazine paper, parchment paper, and wax paper.
Toner transfer with press and peel – gave consistent usable results but still could not get large copper pours to adhere.
Toner transfer with painting the pcb surface with white paint first – inconsistent results, lots of areas where the toner would not stick
photographic resist film applied to pcb – gives consistent results, large copper pours are not a problem. I have used tracing paper and professionally made mask (they are very opaque) and both results are good.
I just attempted DuWayne S. method and have finally gotten some success. Spent a week trying to thermally transfer prints generated by a xerox wc7232 without any success. Very frustrating. This attempt using methanol (99.5%) and prints generated on an HP8000 (old!) in a 5:1 mixture came out well except I couldn’t use the burnishing method as it spread the toner out into huge globs (better results by using my finger and rubbing gently). Used magazine stock for the paper. + for DuWayne.
Further clarification of my above post.
1) The mix I tried was methanol and xylene ie. substituted methanol for ethanol.
What software are y’all using to design these boards?
Acetone nor rubbing alcohol worked as a thinner to my toner in samsung printer but when i tried octane 92 fuel , it worked very well as a good and strong thinner for this toner , it made the glossy paper white again , u can mix with alcohol or even useless acetone to weak it if needed
Been using a Brother Laser printer.
Magazine paper, transfer then taped firmly to very clean board.
Solvent was 63% acetone (37% mystery) brand name Goof Off. I used plenty.
Pressed fairly hard.
Result: Very smudged. Might try once more with 100% acetone. Otherwise, back to heat transfer with a clothes iron