Let’s talk multi-material printing on desktop 3D printers. There are a lot of problems when printing in more than one color. The easiest way to do this is simply to add another extruder and hotend to a printer, but this reduces the build volume, adds more mass to the part of the printer that doesn’t need any more mass, and making sure each nozzle is at the correct Z-height is difficult. The best solution for multi-material printing is some sort of mixing hotend that only squirts plastic from one nozzle, fed by a Bowden system.
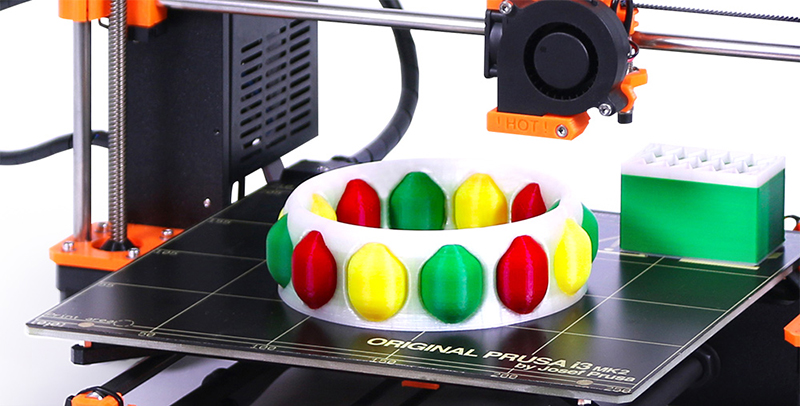
[Prusa], the man, not the printer, has just released a multi-material upgrade for the Prusa i3 mk2. This upgrade allows the i3 mk2 to print in four colors using only one hotend, and does it in a way that allows anyone to turn their printer into a multi-material powerhouse.
The basic idea behind this multi-material upgrade is a four-way Y-shaped filament path. Each color of filament is loaded into a separate extruder, and when the material is changed the currently ‘active’ filament is retracted out of the heater block to just before where the filament paths cross. After the filament is swapped in the hotend, the remainder of the previous color of filament is squirted out onto a small (3x5cm) tower.
Because this is an upgrade to the i3 mk2, Prusa needed a way to add three additional stepper motors to the build without having to replace the printer’s electronics board. He’s doing this with an SSR-based multiplexer that allows one stepper motor output and a few GPIOs to control four motors.
If you have an i3 mk2, a four- material upgrade for your printer will be available for $249 USD in a few months. That means a full color, four-extruder i3 mk 2 costs less than $1000 USD, a price no other multi-material printer can touch.
You can check out [Prusa’s] video of the multi-material upgrade below. The printer and the man will be touring the US for Maker Faire and Open Hardware Summit, and you can bet we’re going to get some video of this multi-material printer in action.


Nice, this is cool.. just a shame it has to do the waste cube to clean.
I wonder how they are coding all this in
wondering how will they code all of this as well
I doubt even a “large” waste cube would add more than 5-10 cents to your average print cost. I guess any waste is bad, but this looks like a huge step up in pro-sumer level printing, so I look forward to seeing if it’s wort hit.
that waste pillar is HUGE and it’s 100% solid. it wastes A LOT of material, probably costing more than the print itself
I suppose the waste could be deposited inside of the print, in a non visible non load bearing location. But the ‘waste block’ assures consistent and reliable output.
Could make an ugly paperweight to give as a gift though! ;)
Be nice if you could specify a small “function over beauty” object to print, that’s gonna end up hidden. Something like a bracket or PCB holding clip, some hardware type part.
Multicolor Benchy boat. :P
Heh, sooner or later someone will have to come up with a use for all those benchy boats, like clogs for underprivileged Dutch squirrels or something.
HaD should give some out as prizes or something.
Right, featured fail of the week gets a 20lb sack or something.
It would be ideal to specify a minimum distance from an external surface. Though it would get tricky when finalizing the print, as there would be no hidden space to put the mixed color plastic and there wouldn’t be a tower at the same level to place it.
This looks really great – amazing how much one person can contribute to the world of 3D printing.
Just trying to tie this to the article series on 3D printing filaments, can this handle filaments that require different temperatures?
The article did link to a blog post that goes into it in more detail: http://prusaprinters.org/original-prusa-i3-mk2-multi-material-upgrade-release/
“Materials with vastly different print temperatures cannot be printed at the same time. But this is theoretical as printing ABS and PLA at the same time isn’t a good idea anyways because of vastly different heatbed temperatures. Small temperature changes can be done during printing the smart tower.”
This is an interesting and worthwhile step forward but there are several use cases this doesn’t help.
Oh, d’oh! I should’ve read the whole thing before blabbing. Thanks for the clarification.
> This is an interesting and worthwhile step forward but there are several use cases this doesn’t help.
The most interesting use cases of multi extrusion is where this fails. Depending on your material choice the Y piece can also jam up due to strings being pulled from the hotend into the Y piece.
The feed rates of each material likely differ, but a multi-nozzle system is far more tricky to handle.
The dual temperature nozzle suffer from jams as the dormant feed line will expand while waiting, and is especially noticeable in a heated build chamber. The feeders will still hold the retracted filament in place, and a rivet like obstruction will from on the hot-end transition zone intake. The sacrificial towers are needed for more than preventing ooze out from spattering the print.
This project appears to have solved many of these issues, but I regret getting a dual-head kit every time we have to pull 4 grub screws to unjam the hot end that stood unused too long. The print job finishing routine must also account for this, and retract both filaments much further than a normal set-up.
If these guys actually solved these issues, than its a relatively trivial task for Slic3r to import several STLs, and assign a specific extruder to the union of models.
Interesting article & thanks for the comments, I’m interested to know if any subscribers or posters here have had much success with HDPE – I’ve been looking at this from a few perspectives with all sorts of (minor) negative reports which as a critical mass aspect means its far less attractive. I would be using it for bulk parts with filament thicknesses of 1mm or greater. So I’m curious as I don’t recall seeing much re HDPE printing on hackaday much ?
I didn’t find a lot of HDPE users, or even suppliers. A couple articles talk about extruding your own from shredded milk jugs. I have little experience with the material but I think it might be tough going. HDPE doesn’t seem to like to stick to anything and it has weird handling characteristics, such as the line from going getting soft to runny being very thin.
I just remembered, eSun cleaning filament is HDPE. Yeah, from my experience handling that, I don’t think it’s going to 3D print well.
HDPE was one of the first plastics to be 3D printed on RepRaps. It’s extremely difficult to print with as it has a high coefficient of thermal expansion and sticks to almost nothing. I’ve seen limited success printing with it.
so something like the octopus shown earlier?
I’m curious why the expansion multiplexer board is needed. Specifically with SSR multiplexing, which I have yet to see mentioned anywhere. Driving these extra steppers should be as simple as connecting a few extra stepper drivers, sharing the DIR / STEP signal, but with different enable pins. Unless of course, Brian actually mistakenly read the link to the predating MarlinKimbra multiplexer board as part of this.
Because four drivers cost money. You can’t buy a stepper motor driver for less than a few SSRs.
here’s something I made for driving multiple motor drivers with the same signal. A connector that costs ten cents more would do exactly what you’re saying. All up, it’s a $40-50 build. I doubt Prusa’s multiplexer costs $10 in quantity.
That’s nice. Your pricing is a little off though, I could build a board that does what I described for a little less than $25USD (based off prices I literally just paid for relevant parts to upgrade my 3D printer and an unrelated project), and have 9 blank boards left over, in bulk it would get a lot cheaper. I’m not including labor in my pricing, since I have no reference for that.
However, you seem to have overlooked my main point, that nowhere in the source article, is SSR multiplexing mentioned.
Here is an image of the board…
http://prusaprinters.org/wp-content/uploads/2016/09/multiplexing.jpg
We also chose the multiplexing so every MK2 user can upgrade to multi material without changing the motherboard :-)
Hay, Josef Prusa. I remember purchasing a hot end from you years ago just to support your efforts. I’ve recently ordered an MK2, and I’m really looking forward to receiving it.
I’ll gladly get this extension kit. Perhaps have two printers. One plain, one multi.
But really, I think you’re headed towards full color extrusion. 4 colors (CYMK). Just figure out the blending ratios, and away you go! Of course that would require a different kind of melt zone, but I’m sure it’s possible.
Hi to all here. Any idea what is the max temp difference of the two printing materials in the MK2 with dual extrusion ? Thanks in advance
Now I really want to see if I could get one of these to do CMYK.
That would require a lot of changes. The controller only runs one extruder motor at a time, changing that requires a totally different controller. The existing hot end can only melt one color at a time. And you’d need to do CMYKW to get anything resembling full color. CMYK assumes you have a white medium to work against.
Instead of wasting the print material in between colour changes, would it not be wise to use this material for internal structure instead? In an area where the colour doesn’t matter? Obviously this only applies if the difference in materials is just aesthetic.
Is it possible to upgrade a homemade prusa i3 to do this? Is the firmware avaliable?
Excuse my ignorance, but do you reckon that this upgrade can be integrated into a diy prusa mk2 derrivative (the toolson mk2 steel, to be exact)?
You could print with white filament and use a printer head to spray CMYK dye directly to the filament. OR You could add a printer head to print the colors around all the edges at each layer before adding another layer. :D