
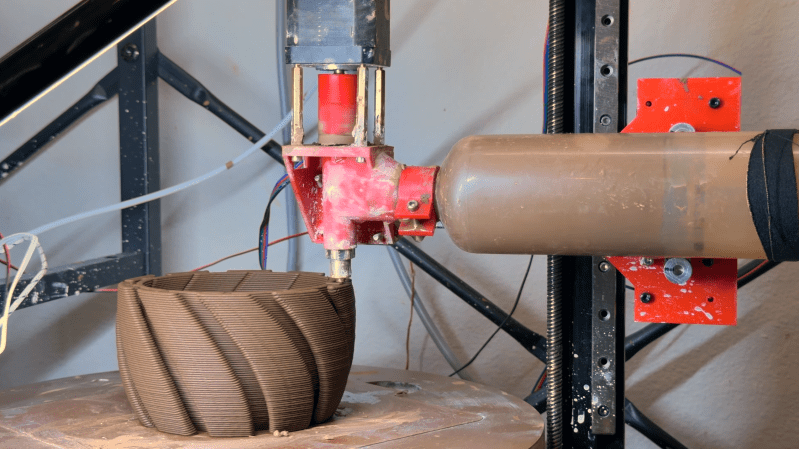
Ceramic 3D printers, despite using the same fundamental mechanism as standard FDM printers, are much harder to find. Part of this comes down to the material properties of fired ceramics versus thermoplastics, but they’re also significantly harder to build; for example, in his ceramic printer build, [Joshua Bird] had to deal with severe material shrinkage, collapsing bridges, and the surprisingly abrasive effects of clay.
The centerpiece of the printer is the clay extruder: an air compressor pushes clay along a tube into the extruder, which uses an auger to squeeze the clay through the nozzle, while a gap at the top lets trapped air escape. The extruder has enough control for successful retractions, but rheology remained a challenge: the clay needed to be soft enough to flow through the nozzle, but stiff enough to form bridges without collapsing. [Joshua] thus pressurized the clay as much as possible, making it possible to use stiffer clay mixtures. The extruder’s greatest challenge was longevity: [Joshua] tried many 3D-printed plastic augers, but the clay abraded them all much too quickly, often in under an hour of use; a 3D-printed stainless steel extruder solved this.
Printing in ceramic isn’t a simple process: for each part, [Joshua] had to mix the clay, load it into the tube, clean the extruder, actually print the object, let it dry, fire it, apply glaze, and fire it again. The clay’s shrinkage during drying and firing destroyed many prints, but [Joshua] was nevertheless able to print a double-walled cup, a decorative climbing-themed cup, and even a chain-mail mesh.
The 3D printer’s motion system is a polar design, an adaptation of his earlier non-planar 3D printer, which might eventually make it easier to print overhangs. We’ve previously seen a similar auger-based clay extruder, an approach reminiscent of direct-granule FDM printing.












The best 3d ceramic printer Ive seen used a Moineau prgressive cavity pump. It uses a single “squiggly” metal shaft (the rotor) that rotates eccentrically inside a flexible, matching spiral sleeve (the stator) to move thick, abrasive materials like clay at a consistent rate without pulsationIts
Thanks for the comment friend. My goal with this project is to develop it further to produce medical-grade ceramic implants (think hip replacements etc.)
3D printing is a breakthrough technology which enabled highly precise, patient-specific manufacturing with complex geometries that would be difficult or impossible to achieve with conventional machining. It also supports efficient prototyping and rapid iteration, helping us refine microstructure and finishing processes to improve biocompatibility, strength, and long-term reliability.
I would be more inclined to 3d print molds and use a castable alumina or zirconia for this application as the uneven internal densities and density gradients introduced to the part by extrusion printing would be far more likely to cause distortion during the two step (cold isostatic/hot isostatic pressing) required to reach a functional state.
I have heard of using 3D printed plastic part encased with sprues in plaster. Then bake it out and pour in molten metal… just like the lost wax process…
Yep LostPLA is the most common form of lost polymer casting, which is pretty much the same thing as lost wax casting with a different pattern material, Its all just Investment casting.
Ceramic part casting doesnt really work the same way due to material properties.
When investment casting metals that require precise fit you must select an investment material whose expansion closely matches the alloy to be cast, or at least calibrate the preheated investment temperature appropriately so that when the molten liquid metal enters the mold, and solidifies, which generally involves a degree of shrink, results in an appropriately sized part.
Casting Zirconia, or alumina is quite different. To create a pourable suspension you must use a carrier/binder. You then need to demold the “green” part before putting it through a thermal or chemical debinding process, and rough condensing the part through Cold Isostatic pressing, finally completing the parts condensing and solidification through Hot Isostatic Pressing. Through these processes the part shrinks considerably.
3d printing the ceramic does not produce the same uniformity of density that a single pour molded part would have. All of those small variable density zones can lead to distortion, microfractures, and other issues during the processing of the part from green to its fully dense state
Pouring a slurry of ceramic into a burned out investment mold, the way you would metal will only result in the fragile green part being trapped in a matrix of material. This would prevent the necessary shrink that happens during the steps described above.
I accidentally deleted a chunk of text between the 4th and 5th section above
When processed using Cold Isostatic Pressing (CIP) followed by sintering or Hot Isostatic Pressing (HIP), alumina and zirconia typically undergoes a linear shrinkage of 15% to 30%, which equates to roughly 35% to 50% volumetric shrinkage. This shrinkage must be considered in the design of any part.
Kudos on the engineering solutions. As for bridging, to me it cries out for a second scaffolding material, acknowledging that this brings its own challenges to the kiln / drying steps.
I wouldn’t mind 3D printing with ceramic. The downside would be having to own a kiln
I wouldn’t mind a service that can 3D print and bake ceramics for me either
[Pottery to the People] made a video about it. There’s kilnshare.com and a few other sites that organize it. However, expect to buy clay from the people operating the kiln, since the firing temperatures are clay-specific.
One of her videos: “Why you (probably) shouldn’t buy a kiln”
https://www.youtube.com/watch?v=1M3adzqKD4A
1,500W “desktop” kilns are not expensive. My city has several community pottery studios. Maybe yours does too.
But those are not recommended to fire large amounts to make this venture economical. As potters know, even when thrown or built perfectly, it’s more art than science, and there’s a reason “we now pray to the kiln gods to make it happen”.
A few 3d printing services used to offer ceramic, but I just checked and alas, all of them seem to have discontinued it.
One of them (shapeways) developed a special castable porcelain mix so they could print a mold rather than printing the object directly. This supposedly gave much better quality, but it was labor intensive and pricey and I guess the economics didn’t work out.
As I understand it the issue shapeways had that led them to discontinue the option was that a significant portion of users submissions had geometry that wasnt compatible with their method of production. File validation/rejection and correspondence/disgruntled customer communication was excessive to the point of making the offering unworthy of continuation.
Wax.
I wonder about piping it to the extruder as a very watery slip, then using something akin to a very rough vacuum drier to remove the bulk of the water, pushing the condensed clay off the filter mesh with an augur as it builds up. You could get rid of the plunger full of clay, reducing the inertial mass significantly, if you can get enough water suction pressure, you’d only need an in feed and a water return pipe.
Perhaps the separation could even be done a bit like a cyclone dust extractor with some sort of tapered hollow augur bit that has an inner wall made of mesh.
Hello sir, I kindly appreciate your feedback. Your idea is clever. Using a watery clay slip and a suction/drying step to reduce plunger mass could make feeding much more responsive, and a cyclone draft separator approach does have parallels with what people do in other particulate handling setups.
That said, running something vacuum-based on a printer can be risky: dust-extractor-style setups often produce noticeable vibrations, and those vibrations can translate into layer artifacts, ringing, or unreliable motion of lightweight printer frames. For that reason, I’d be cautious about mounting the separator/auger assembly near the print system, and I’d prioritize rigid mounting where needed, plus stable suction control.
On the advantages side, Anet 3D printers (when properly tuned) tend to be a good platform for experimental extruder concepts because they’re straightforward to modify, have a convenient baseline for adding custom hardware, and their printers commonly support practical upgrades (stable hotend mounting, better extruder gearing, and improved firmware settings) that help maintain consistent flow even when the feed mechanism is unconventional.
I’m curious, did an AI write that?
I had exactly the same impression, and actually all his comments scream AI
Looks more like AI assisted translation than generative output.
I am smelling this AI flavour too. And it seems to be another Joshua than the German one.
I wouldn’t mind a 3D printing service that would 3D print my parts in ceramic and bake them
If it doesn’t already exist, cheaply for the general public, no doubt it will soon. I guess the real issue then, beyond the usual privacy, will be safe delivery of fragile parts. Couriers here at least are not gentle with packages, if they end up at the correct address in the first place and not a hedge so! where or a similar address on an adjacent road.
Have you checked out digitalfire.com the creator Tony Hansen has some very inventive ideas in 3d printing and ceramics.
IMO it’s a matter of clay chemistry/rheology to get the properties you desire. Additions of more water will reduce strength because of less clay particles per unit volume to densify (sinter bond). You need to experiment with additives like PEG (try a generic miralax) or even a darvan (more expensive and has its own complications). I’ve heard of surfactants being used as well as wax emulsions but never tried either. It may also help to play with mixtures of different types of clay with different particle shapes and sizes (on the micron level) and slightly different chemical properties (e.g. what does a bentonite do vs a ball clay vs a fire clay vs a china clay, calcined vs uncalcined line blend, ect).
Bottom line: think of your clay as a bunch of platelets sliding around in a wet goo and find ways to chemically make them slide easier without significantly reducing the number of plates per unit volume (density go up not down).
(FYI I’m not a seasoned ceramic scientist/engineer yet [I’m a grad student] so if a fellow ceramics nerd with more field experience disagrees with my recs please let us know your suggestions)
deflocculate your slip and keep adding more dry scraps until it gets almost like cake frosting. (see John Britt’s trailing slip video) the choice of clay is crucial – stoneware is right out. but a nice fine porcelain should be less abrasive.
I made a machine about a decade ago that printed in ceramic [1]. Used a lot of AptII hardener in the ceramic slip to make it more rigid during printing.
Used a glue/paste dropper that was air driven to push out. Ideally I wanted to change out to a metered moineau pump but I never got around to going any further. Since I was using air this required running the machine at a constant xy speed. It could turn the air on/off but not control volume on the fly.
It was a good experiment but my results were not perfect. Encountered a lot of issues but also learned quite a bit.
[1] https://youtu.be/XwjnVzfl0wA?si=RnDPuPcayIpzpjpv https://youtu.be/mwJF7NyFN2k?si=8KLecHGIcPFx-4tW
Just use normal 3D printing to make patterns, then plaster of paris to make molds from them for slip casting. Sure you can’t make complex internal structures for your parts, but when would you do that anyways?
Agreed. Molds are the way to go with ceramic. 3d printing is cool, but low tech methods are not “bad”.
Teapots 😁
We made one that uses a hydraulic ram £60 and a linear actuator to pump the ram – the clay kept in a high pressure water pipe and piston fitted on the end of the ram – pvc pipe ( braided nylon ) 22 mm to print head – load cell attached to a small rod in the print head measures head pressure and arduino keeps it all pumping to maintain flow. About 10L of clay. We use paper in the clay and vinegar to make it a bit more printable.
Spent a lot of time on software to make pots print in vase mode. We have tried dual material / support with mashed potatoe and flour – idea is it will burn out in the kiln – no great success with that yet.
Happy to share design / ideas if anyone wants.
We made one that uses a hydraulic ram £60 and a linear actuator to pump the ram – the clay kept in a high pressure water pipe and piston fitted on the end of the ram – pvc pipe ( braided nylon ) 22 mm to print head – load cell attached to a small rod in the print head measures head pressure and arduino keeps it all pumping to maintain flow. About 10L of clay. We use paper in the clay and vinegar to make it a bit more printable.
Spent a lot of time on software to make pots print in vase mode. We have tried dual material / support with mashed potatoe and flour – idea is it will burn out in the kiln – no great success with that yet.
Happy to share design / ideas if anyone wants.
Could you do the opposite of plastic FDM by using hot air to dry the surface of the clay as it is extruded? Then perhaps less viscous clay could be used and/or bridges might turn out better.
Retractions sound kinda risky, it makes me think vase-mode would be better.
drying the clay reduces interlayer adhesion.
Lower viscosity results in slumping distortion.
And if you heat the nozzle, to pre-dry the clay for bridges?
There should be thixotropic (shear-thinning) additives one can add to the clay. Drying would require basically blasting the print with a heat gun all the time, and that gets uneven before you know it.
Without trailing off into a research spree, 3D printed concrete seems to be the field where such problems have needed solving before.
I made a clay slicer that I’d love for anyone with a clay printer to try clayshaper.com
It seems neat, but not worth the trouble. It looks inferior to slip casting into plaster molds, which is an easy, reliable method that can produce an incredible level of detail. I’ve printed PLA objects and made molds of them, and each plaster mold can get yield you dozens, if not hundreds, of the same clay object. That said, I’m super impressed with the determination for sticking it through, and the things learned along the way are surely invaluable.
i have been wanting to work with terracotta clay pot/tubes for a evaporative cooling projects,
printing terracotta media in the form of a air heat/cold exchanger or swamp cooler pad media format sounds wonderful, lets do this!