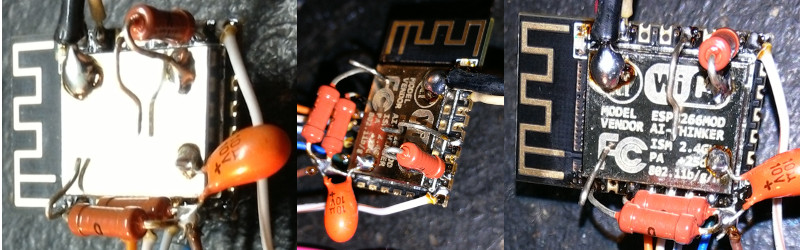
[sorki] had an ESP-12F and wanted to play with nodeMCU, but found they were lacking buttons for reset & flash. We’ve all been there – mucking about with a project on a breadboard, trying to save the time required to solder up a button by shorting pins with wire or bending component legs to touch. This either doesn’t work or ends up bricking the microcontroller when it inevitably goes wrong. [Buger] found a tidier solution to adding buttons to the ESP-12F with the minimum of effort.
It’s the spirit of deadbug applied to buttons. One side of a piece of wire is soldered to the pin needing to be pulled down. Component leg offcuts are ideal for this. The other end of the wire is bent up and left to float over the metal shield of the ESP-12, which is connected to ground. When you want the pin to go low, press the wire into the shield, grounding it. Let it go, and the pin returns high again, assuming your pullup resistors are all in order.
It’s a quick hack that’s much more robust than trying to hold two ends of a piece of hookup wire in place. It’s also still easier than trying to find a tactile switch solder leads to, and you don’t end up having it hanging off the board either.
For deadbug construction taken to an impressive conclusion, check out this clock built out of discrete components.
[Thanks to Richard Marko for the tip!]


That’s a hack!
I like it that. ill keep that in mind
I’ve been meaning to build a jig like this: http://www.instructables.com/id/Detouchable-Converter-Board-for-ESP-07-and-12-With/?ALLSTEPS
1000 Pogo Pins for 99cents
My pogo pins came in today. My base is going to be a nodemcu board that I’ll remove the ESP 8266 from. Gives me a cheap starting point.
Where? I thought $1.50 I paid for 50pcs was good
Has anyone seen something similar, but would pick up the scalloped connectors across the bottom, kind of like on the ESP12? I’m working on some nRF51822 modules with 36 “pins”, and the ones across the bottom are important. You wouldn’t be able to just put pogo pins across the bottom easily because you couldn’t slide the modules into the bottom pins once the side pins were engaged, and you couldn’t tilt to engage the side pins once the bottom pins are engaged.
OMG it’s awesome :O I just got 50 pogo pins lately and been wondering what to do with them, thank you!
Haha, I did the exact same thing!
Has someone somewhere actually bricked an ESP8266? Maybe it can be done, but I am skeptical.
“Bricked” in this case probably meant the OTA code in flash was corrupted
One man’s “bricked” is another mans “no problem”. The ESP8266 seems pretty much unbrickable with the basic bootrom in something like masked rom. But as you say if your concern is with something in flash, the game changes.
If you have some reed switches laying around…
Or just get a NodeMCU für $3,– – with USB, Power, Buttons, Pins, LEDs and Screwholes…
By the way: there are cheap adapter boards for the NodeMCU too, so you have multiple pins for each NodeMCU pin plus a step-down for using a wall-wart as power source.