Repurposing commodity electronics is one of the true forms of hacking, and it’s always the simple little hacks that lead to big ones. [Everett] wanted to use a $20 GoPro clone as a dash cam, so he wired a microcontroller into it to automate some actions and make it practical.
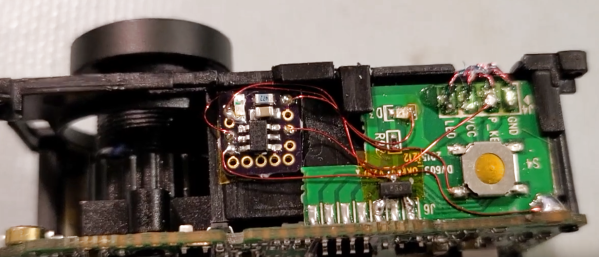
The camera turns on automatically when connected to external power like a car charger, but starting and stopping a recording and power down all had to be done manually. [Everett] wanted to automate these functions, so he opened up the camera and started probing with an oscilloscope. He found the power button, record button, 3.3 V and external 5 V traces conveniently next to each other in the top of the camera.
To automate the required functions, he wired in a PIC10 on a small breakout board, powered by the 3.3 V line. It detects if 5 V is connected to the charging port on start-up via an N-channel FET, then automatically starts a recording. When the 5 V power is switched off with the car, it waits 10 seconds before stopping the recording and switching off the camera. If no external 5 V is not detected on start-up the microcontroller does nothing, which allows the camera to be used as a normal handheld. [Everett] mounted the camera to his rearview mirror with a magnetic bracket made using a combination of a 3D printer and 3D pen.
This is a simple and practical little hack, and the firmware is available on Github. Cheap dashcams are available for similar prices, but you won’t get any hacking satisfaction that way.
The very nature of actions cameras inspire hacking. You can simply add an external battery with the help of a 3D printer, or go all out and build a gimballed helmet cam from scratch


