Blinkbox: addressable LED testing tool

BlinkBox: Debugging Tool For Addressable LEDs

How often do you find yourself having to pause a project to make a test circuit or write some test code to find the source of a problem? Do enough variations of the same test and you’ll eventually make a dedicated test tool. That’s just what [Devon Bray] found himself doing.

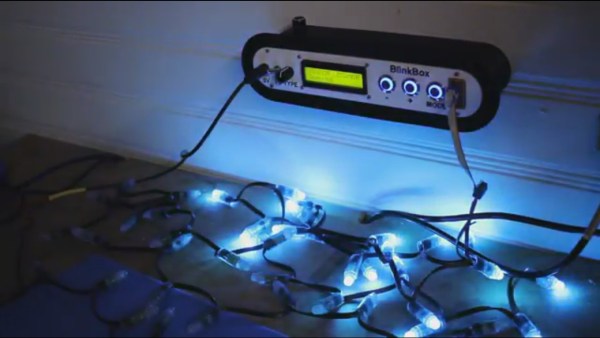
[Devon] does a lot of work with addressable LEDs of different types and after much experience, created the BlinkBox, a dedicated test tool for addressable LEDs. It supports multiple LED chipsets, you can give it a count of the LEDs you want to light up, and you can choose a test animation.  It even writes your settings to an EEPROM so you that don’t have to repeat yourself when you next turn it on.

He’s also done a very nice job packaging it all up, creating a 3D printed case, using backlit buttons for working in the dark, and even added a contrast knob for the LCD screen. Kudos to him for all the effort he’s put making this polished. Everything you need to duplicate it is available on his webpage, along with the schematic for the curious. Watch it in action, or just admire his handiwork in the video below.

Continue reading “BlinkBox: Debugging Tool For Addressable LEDs”

LED Tester Royale

What do you get for the geek who has everything and likes LEDs? A tricked-out LED tester, naturally. [Dave Cook]’s deluxe model sports an LCD screen and two adjustable values: desired current and supply voltage. Dial these in, plug in your LED, and the tiny electronic brain inside figures out the resistor value that you need. How easy is that?

An LED tester can be as easy as a constant-current power supply, and in fact that’s what [Dave]’s first LED tester was, in essence. Set an LM317 circuit up to output 10mA, say, and you can safely test out about any LED. Read off the operating voltage, subtract that from the supply voltage, and then divide by your desired current to figure out the required resistor. It only takes a few seconds, but that’s a few seconds too many!

The new device does the math for you by adding an AVR ATtiny84 into the mix. The microcontroller reads the voltage that the constant current supply requires, does the above-mentioned subtraction and division, and displays the needed resistor. So simple. And as he demonstrates in the video below, it does double-duty as a diode tester.

This is a great beginner’s project, and it introduces a bunch of fundamental ideas: reading the ADC, writing to an LED screen, building a constant current circuit, etc. And at the end, you have a useful tool. This would make a great kit!

Continue reading “LED Tester Royale”