Add Some Blinkenlights To Your Supercon Badge

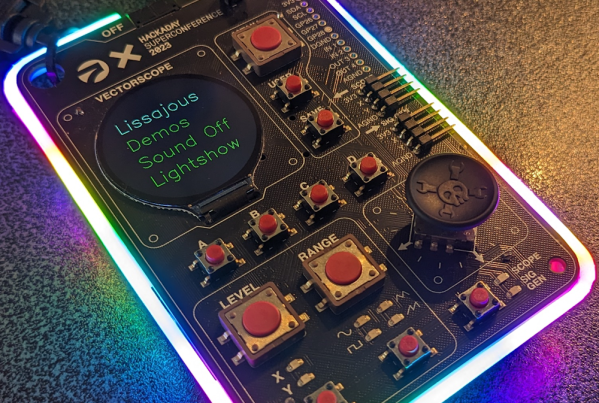
We’re not sure what is more amazing here: the glow of the blinkenlights themselves, the tedium involved in creating it, or the fact that [makeTVee] soldered 280 microscopic WS2812 LEDs while at Supercon.

This hack began before the con when [makeTVee] designed the LED-diffusing frame in Fusion 360 and printed it in clear resin. Rather than solder the LEDs straight, the frame has 280 teeth that support each one at a 55° angle.

Not only does this look cool, it makes the bridging of DOUT to DIN much easier. That leaves GND and VCC to be painstakingly connected with 30 AWG wire. How, you might ask? With a little help from 3.5x magnifying glasses and the smallest soldering iron tip available, of course.

But that’s not all. Since 280 addressable LEDs need a lot of power, [makeTVee] also designed a holder for the LiPo battery pack that fits into the existing AA holders.

Want to see more awesome badge hacks? Check out the compendium.

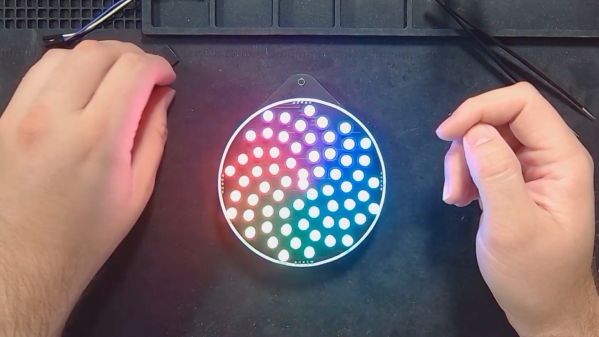
A black work mat holds a circular badge with 64 addressable LEDs in a spiraling shape akin to the center of a sunflower. The LEDs have a rotating rainbow spiraling around the circle with red touching violet on one end. The colors extend in bands from the center to the rim of the circle.

Math You Can Wear: Fibonacci Spiral LED Badge

Fibonacci numbers are seen in the natural structures of various plants, such as the florets in sunflower heads, areoles on cacti stems, and scales in pine cones. [HackerBox] has developed a Fibonacci Spiral LED Badge to bring this natural phenomenon to your electronics.

To position each of the 64 addressable LEDs within the PCB layout, [HackerBox] computed the polar (r,θ) coordinates in a spreadsheet according to the Vogel model and then converted them to rectangular (x,y) coordinates. A little more math translates the points “off origin” into the center of the PCB space and scale them out to keep the first two 5 mm LEDs from overlapping. Finally, the LED coordinates were pasted into the KiCad PCB design file.

An RP2040 microcontroller controls the show, and a switch on the badge selects power between USB and three AA batteries and a DC/DC boost converter. The PCB also features two capacitive touch pads. [HackerBox] has published the KiCad files for the badge, and the CircuitPython firmware is shared with the project. If C/C++ is more your preference, the RP2040 MCU can also be programmed using the Arduino IDE.

For more details on beautiful RGB lights, we’ve previously presented Everything You Might Have Missed About Addressable LEDs, and for more details on why they can be so fun to wear, check out our Hackaday Badgelife Documentary.

(Editor’s note: HackerBox makes and sells kits, is run by Hackaday Contributor [Joseph Long] IRL.)

Continue reading “Math You Can Wear: Fibonacci Spiral LED Badge”

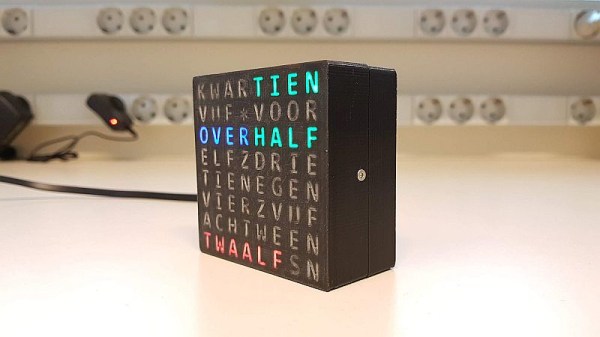
The word clock on a desk, with "tien", "over", "half" and "twaalf" lit

An Impeccably Documented Word Clock In Dutch

[Maarten Pennings] shares a word clock project – but not the regular kind. For a start, this clock is a shining demonstration of hobbyist-available 3D printing technologies, with embedded light guides for the letters printed in transparent filament, thanks to a dual-extruder printer. For a word clock, it’s surprisingly small – in fact, it uses an 8×8 addressable LED matrix, with words shown in different colors. If you’re looking to build a novel word clock, you’re all set here – [Maarten] tells all about this project’s story and provides a treasure trove of insights into designing all of its aspects!

The 8×8 limitation was initially set because he wanted to use a low-cost MAX7219 8×8 LED matrix module as a base for the clock. Thankfully, in Dutch, time can be expressed using shorter words — still, it had to be limited to 5-minute intervals. Extra effort had to be spent designing the layout — [Maarten] mentions his friend writing a solver that found a way to fit some words onto the layout diagonally. At some point, he switched from LEDs to Neopixels, and dug deep into addressable LED technology. For instance, he demonstrates Neopixel power measurements and current consumption calculations. This shows that the calculations indeed match the clock’s real consumption when measured by an external meter.

In the best of hacker traditions, all the source files are on Github — if you fancy yourself a Dutch word clock, you can build [Maarten]’s design easily! He provides extensive instructions on building this clock in the README, including a flashing and configuration tutorial, complete wiring diagrams, and a soldering guide. A manufacturing-grade amount of build information that won’t leave you guessing. He’s also added a fair number of animations, put plenty of effort into clock precision verification, and even investigated some Neopixel protocol minutiae. All in all, our hacker went all in on the capabilities while embracing the constraints. This reminds us of the similarly well-documented haptic word clock we covered just a year ago – check that one out, too!

Continue reading “An Impeccably Documented Word Clock In Dutch”

Throwback: Designing Addressable LEDs From Scratch

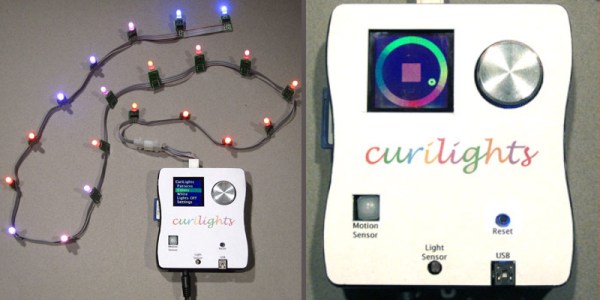
These days, addressable LEDs are all the rage. A little chip paired with each LED receives signals and modulates the light output as needed. [John Peterson] was working on a project along these very lines, designing his Curilights back in 2008!

[John] wasn’t the first to come up with the idea; he designed the Curilights to replicate a string of programmable LEDs he’d seen called Triklits. His design involved each RGB LED being fitted with a Microchip PIC 16F688 microcontroller, which could receive serial data and control the LED channels with PWM. These LEDs could then be strung up to create an addressable chain. It’s fundamentally the same concept as the WS2812, just in a larger format and built by hand. His design also had the benefit of non-volatile memory onboard the PICs, so animations could be stored even after power off. [John] later went on to build a controller for his lights, complete with sensors. It could be triggered by a motion sensor or light sensor, and would run animations on the string without the use of a computer.

While [John]’s design didn’t go on to bigger things or commercial success, it did win first place at the Third Annual Lantronix Wireless Design Contest. It also goes to show that many people will come around to the same idea when it makes good sense!

If you’re interested in the wider world of addressable LEDs, check out our breakdown on some of the products out there. Meanwhile, if you’re brewing up your own flashing, glowing projects, be sure to notify the tipsline!

1200 Addressable LEDs Make For The Perfect First Dance

The first dance of a newly married couple at the wedding reception is both a sentimental and memorable event, so why not make it even more so with something a bit special? Hackaday alumnus [Brett Haddoak] and his wife [Rachelle] certainly achieved that, with 1200 addressable LEDs turning her wedding dress into a real-life reproduction of Princess Aurora’s color changing dress from Disney’s Sleeping Beauty.

Tradition dictates that a groom must not see the dress before the Big Day, thus the LEDs were fixed to a petticoat and bustier that go underneath. The design would need so many LEDs that it crossed the limit that an Arduino can address, thus there were two Arduinos to control the whole. Electronics and batteries were worn in a pair of polo shorts, and after some nail-biting moments involving flaky connections, the whole thing came to life. The result can be seen in the video below the break, and certainly comes with a significant wow factor!

We would like to wish the happy couple all the best for the future, and we hope that this won’t be their last such electronic collaboration. If you’re hungry for more, it’s not the first light-up wedding outfit we’ve brought you.

Continue reading “1200 Addressable LEDs Make For The Perfect First Dance”

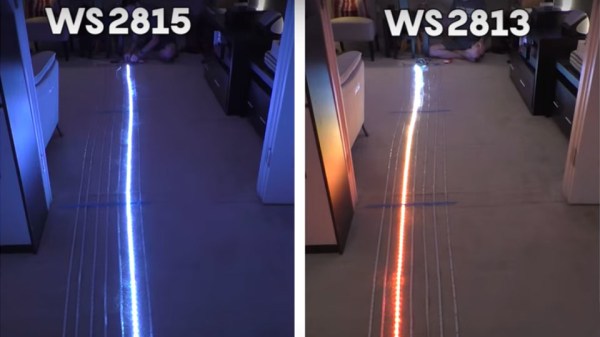
Image showing differences between WS2815 and WS2813 LED strips - the WS2815 strip lighting is more uniform throughout the strip's length.

Teaching You Everything You Might Have Missed About Addressable LEDs

Often, financial motivation results in people writing great educational material for hackers. Such is absolutely the case with this extensive documentation blog post on addressable LEDs by [DeRun]. This article could very be named “Addressable LEDs 101”, and it’s a must-scroll-through for anyone, whether you’re a seasoned hacker, or an artist with hardly any technical background and a desire to put LEDs in your creations.

This blog post is easy to read, painting a complete picture of what you can expect from different addressable LED types, and with apt illustrations to boot. Ever wonder which one of the addressable strips you should get from your retailer of choice, and what are the limitations of any specific type? Or, perhaps, you’d like to know – why is it that a strip with a certain LED controller is suspiciously cheap or expensive? You’re more than welcome to, at least, scroll through and fill into any of your addressable LED knowledge gaps, whether it’s voltage drops, color accuracy differences, data transfer protocol basics or dead LED failsafes.

Addressable LEDs have a special place in our hearts, it’s as if the sun started shining brighter after we’ve discovered them… or, perhaps, it’s all the LEDs we are now able to use. WS2812 is a staple of the addressable LED world, which is why we see them even be targets of both clone manufacturers and patent trolls. However, just like the blog post we highlight today mentions, there’s plenty of other options. Either way do keep coming cover a new addressable LED-related hack, like rewriting their drivers to optimize them, or adding 3.3V compatibility with just a diode.

We thank [Helge] for sharing this with us!

Tutorial Teaches You To Use Neopixels With Micropython

Addressable LEDs are wonderful things, with products like Neopixels making it easy to create all kinds of vibrant, blinking glowables. However, for those without a lot of electronics experience, using these devices can seem a bit daunting. [Bhavesh Kakwani] is here to help, with his tutorial on getting started with Neopixels using the MicroPython environment. 

The tutorial flows on from [Bhavesh’s] Blink example for MicroPython, and is aimed at beginners who are learning for the first time. It explains the theory behind RGB color mixing that allows one to generate all manner of colors with WS2812B-based LED strings, and how to code for the Raspberry Pi Pico to make these LEDs do one’s bidding.

The guide even covers the use of the Wokwi simulation tool. This is a great way for beginners to test their projects before having to play with actual hardware. This is useful for beginners, because it’s a great way to catch mistakes – is there a software problem, or did they push the soldering iron through the microcontroller? It’s also a technique that pays dividends when working on more complicated projects.

Whether you’re entirely new to the embedded world, or just want to learn the intricacies of talking to addressable LEDs and make sense of color mixing theory, this tutorial will serve you well. Before you know it, you’ll be building glowing projects with the best of them!