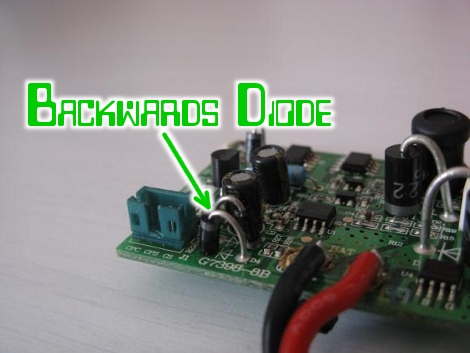
[Chris] was unhappy with the battery performance of his Rovio. It seems that he’s not alone, so he set out to reverse engineer the battery charging circuit to see if there was a fix. Boy is there, what he found is the diode above, apparently installed backwards when compared to the silk screen diode symbol. Now it’s entirely possible that the silk screen is wrong and this was fixed during assembly. We think that’s unlikely because if the closer of the two diodes was supposed to have the same polarity as the one next to it there should have been room to install them both in exactly the same orientation. [Chris] pulled out a soldering iron and changed the diode to match the silk screen. That fixed his problem and he’s now getting better performance than he ever has.


Ha, nice catch. Even knowing what to look for, it still took me a second, since the “long leg” is reversed from the other diode also.
I guess the markings really are useful, eh?
@Mike
that’s why the boards are marked out.
I recently had to replace some caps on an older mainboard… the polarity is marked out on the board so that you can’t really screw up (as long as you know how to read the thing).
I also love just looking at pcb board layouts to see if there is maybe something that isn’t on the board that there is room for. Can’t tell you how many times I’ve added things like extra usb slots to computers because the board was pinned for it but wasn’t put on because it was the lower end model of the same product line.
Epic fail on the manufacturer’s part. Nice catch.
Anyone have a fix for the crappy motors and wheel gears? I have one dragging more than the others so forward is more of a drunken slide to the front left.
Awesome fix! I’ve already dropped $$ for another battery ’cause I thought that was the culprit. Gonna check this out as soon as I get home.
Parts like those are usually hand assembled so probably worker error. If that went to an AC power source then like it was installed it would have delivered half the power it was supposed to. It would have worked as a quarter wave AC – dc conversion instead of half wave.
I wonder if they will issue a recall now?
@ Fartface, weigh down the right side?
Thumbs up for Chris. Thumbs down for Rovio engineers and Q/A.
Well that’s why they were on Woot for $100 a while back. I bet the manufacturer found the problem and sold off the lot as surplus.
nice! too bad I gave up on mine last year and returned it. no $$$ for you wowwee cause you effed up and didn’t fix it!
wow, fail on manufacturers part
Oh Rovio,,, *Price is right failure horn*
Wait a minute …
Look at the silkscreen closer.
Notice the -|<- Symbol.
The line on the diode should be on the line-side of the silkscreen.
Now, it's backwards as shown in the photo.
What they did was installed it correctly as in the polarity, but put the long lead on the wrong bend, so it only appeared to be installed backwards.
The diode correctly installed has the short end on the same side as the line on the diode. Both diodes should have had their leads bent and
cut the same way, but they didn't.
They did install them correctly though, according
to the silkscreen … until he reversed it.
Nevermind my previous post.
I thought the photo was AFTER he reversed it!
The photo as shown must be the diode BEFORE he reversed it. my bad.
Think I can guess where these were manufactured…
hxxp://www.youtube.com/watch?v=hzyRjX_pX5c
Yeah that was a boo-boo alright.
Very cool that it has been found and fixed.
Well done!
@Justin,
Didn’t see the video, but wild guess….China?
I pulled apart my Rovio (purchased from the Woot deal) last night and discovered that the diode is correctly installed in mine.
The battery life has been pretty poor from day one and the Rovio is basically unusable for more than a few minutes today.
I was very hopeful that this post would lead me to a solution, but unfortunately this is not the cure in my case.
hmm odd,,, that diode is missing in my unit ??
Yup, just pulled mine apart and found the diode replaced by a link too. I’m looking at getting a new battery – problem is the ready made packs seem to be only available in the US. I’m wondering about sourcing the cells and building up the pack myself, and recycling the original lead from the battery.
i have just unscrewed my rovio and seem to be missing one also shock horror
where might i find a diode?
d4
thin strip of wire
i payed the 250 pound 4 years ago for a missing diode thanks money making feckers