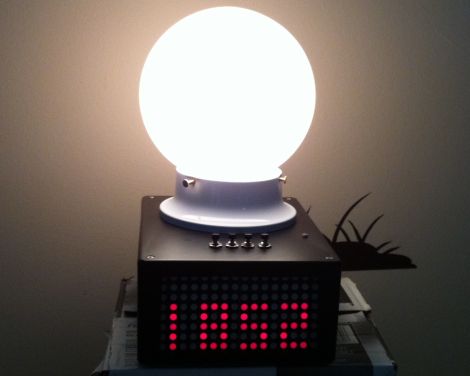
As a project for an embedded systems class, [Alan] recently built himself a sunrise-simulating alarm clock. You are probably familiar with these sorts of timepieces – they gradually light up the room to awaken the sleeping individual rather than jarring them awake with a buzzer or the radio. Since many commercial units with this feature are sold for $70 and up, his goal was to replicate the functionality at a fraction of the cost, using only open source components.
An Arm Cortex M3 processor runs the show, displaying the time via a pair of 8×8 LED matrix panels on the front of the device. The clock is programmed to gently wake up its user by simulating a sunrise over a period of 5, 15, 30, 45, or 60 minutes. If the user has not woken up before the sunrise simulation is complete, the clock resorts to a traditional piezo alarm to rouse the heavy sleeper.
The project is nicely done, and after looking at his bill of materials it seems to be far cheaper than many sunrise alarm clocks you will find in stores.


I don’t want to be negative, but if his goal was to be cheap, Arm Cortex M3 seems like a little overkill. Then again, maybe that was a class requirement, or just what he prefers to use.
It looks nice though.
I’ve heard of alarms with bells that slowly increase in intensity, but I’ve never seen one of these. What a cool idea, and this seems like a nice implementation.
Oh wow, Cortex M3? That’s crazy overkill. Interesting choice indeed.
I have one of those Phillips alarm clocks,
and it’s horrible: it’s all plastic, and too
light to operate the front buttons without
holding onto the back of it, also the buttons
give off a really cheap, hollow “plasticky”
sound. To top it off, the LCD display is WAY
too bright for a nightstand, and it frequently
“forgets” the programmed brightness level.
I’d very much like to build one of these.
What a nuisance, btw, that this edit box
extends past-and-underneath the “Hacks”
sidebar. :-(
An 8×8 LED display can be pretty bright as well. A sleep timer, light-sensing dimmer, or dimmer dial would be nice as well.
Yay! I have been wanting to make one of these for a while but never quite figured out how!
Then again, I wonder if it could simply be done with LEDs and PWM?
A Cortex M3 might seem like overkill, but if you read the project page, he’s using a $10 STM32-Discovery board. Given that he’s using like 23 or so i/o’s, that dev board is probably the cheapest, simplest solution for his needs.
@Jeff It does have a light sensor that dims the display at lower ambient light levels.
Does it make songbird noises?
It’s not like the STM32 part is expensive anyway, the 128K part he used is available in singles for like $2.50/ea, and for this application he could probably get away with using the 32K version at $1.75.
Add the uber cheap dev board into the picture, and this really is cost-driven choice.
“Also if time allowed, a DMA should be used to transfer the display data from memory to GPIO without CPU intervention, which could save a lot of CPU run time. ” -author.
YOU SEE! he was tight with a m3 cortex.
i’m suggesting an upgrade of the project with an intel atom board. But a Xeon platform might be a better choice.
I don’t know how the 60W bulb is enough. I used a 150W halogen projector that falls partially directly on the bed and still find it not powerful enough…
Can’t get any incandescents in Europe anymore, and all the others are shit dimmable.
I dislike my buzzer enough as it is add light and I’d have it flying across my room the first morning.