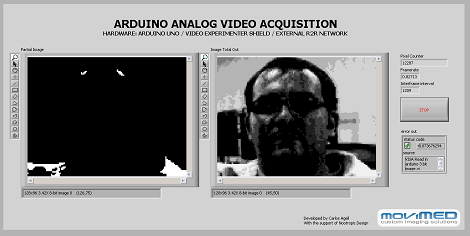
[Carlos Agell] sent in a tip where he captured images from an analog camera with an Arduino.
We’ve seen a few AVR/Arduino hacks that generate video, although overclocking is necessary if you want to do anything beyond a Breakout clone. [Carlos]’ hack bucks that trend and now he can capture video with an Arduino.
The project captures individual frames from NTSC video at a resolution of 128×96. Although the Arduino isn’t powerful enough for real-time capture, [Carlos] managed this by capturing only thresholds and sending them over to a computer running a program coded in LabVIEW. The PC program reassembles the images of the thresholds and produces a tiny image in 3-bit grayscale.
[Carlos] used the Video Experimenter shield which is impressive in it’s own right. The Video Experimenter is able to do object tracking and edge detection, so we’re wondering when we’ll see robots with computer vision running off an Arduino. Check out a demo of the nootropic design video experimenter shield after the break.
UPDATE: Carlos wrote a sketch in Processing that does the same thing as his LabVIEW program.
[youtube=http://www.youtube.com/watch?v=TGy70XxhpMY&w=470]


I wonder if something like the Video Experimenter would be possible with component video
@Rob
It might.
As it happens Sparkfun sells a camera, and JPEG trigger board who’s basically an Arduino wired to simply use that camera to collect stills and store them on a microSD card.
And they practically admit it as such, since that’s how its programmed.
Hey,
The big difference of this solution VS the JPEG solution is that you can process the data on the Arduino when it is not compressed.
There is no way to decode JPEG on the arduino to process the images, whereas the solution proposed is less resolution, monochrome, but let’s you take decisions based on data.
If you want to store data on an SD card then it is better the JPEG solution, if you want to take decision based on the image info, then use the video experimenter shield.
BTW there is no way to decode the color info with the latter solution.
Wow, this is pretty impressive given the fact that an 8-bit MCU is fairly under-powered for such purpose.
@Rob, colour wheel from old DLP projector and use LM1881 + PLL to sync it with the frame rate of the camera.
its a shame that vabview is EXPENSIVE!!
Wow. Arduino bringing back all the shit that ppl had sorted out since 1990 using a regular MC. congrats
@steve, you mean people developing a skill set that requires innovative solutions to deal with low computing power? Yeah efficiency sucks…
As promised in the blog I am now publishing a Processing Sketch matching the Arduino code, to acquire images from the Arduino to the PC using the Video Experimenter board.
Check it out
http://hackingelectronics.blogspot.com/2011/06/update-on-arduino-imaging-processing.html
Im trying to capture video from an flir one 2nd gen. thermal camera on my drone and I need to add GPS coordinates too. its android micro USB