Solar Powered Cellphone A True Hack

The polished quality of this hack isn’t quite there, but we love the ingenuity and exploration exhibited. [Paulie1982] shows us how to make an old cellphone work with the rays of the sun.

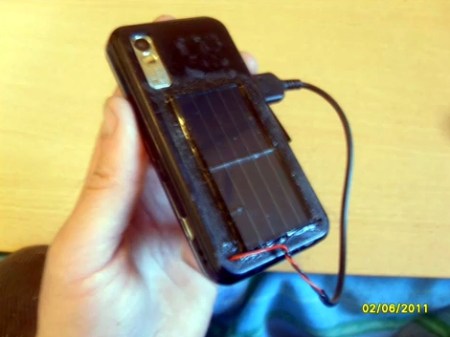
You can see above that he’s added photovoltaic solar cells to the back case of what looks like an old smart phone. He grabbed the cells from two inexpensive solar landscaping lights and inserted them by cutting holes in the case and using black silicone sealant to glue them in place. Each can pump out about 3V and together they get above the 5V threshold that he needs to do some charging. See the build process in the video after the break.

From what we’ve seen there’s zero consideration of current in this hack and that’s what makes us skeptical. Still, we love the idea of trickle charging and we’d love to see some speculation in the comments about how to improve upon this. Surely the additional hardware necessary for proper regulation, etc. could be fit in a custom case cover like the one used for this inductive charger hack.

Continue reading “Solar Powered Cellphone A True Hack”

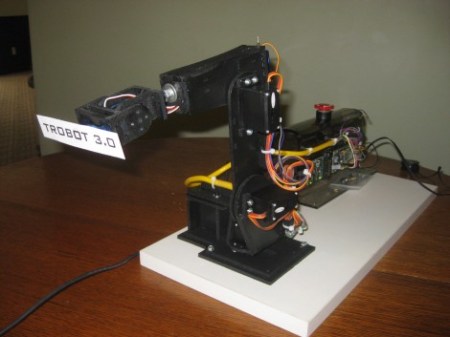
Trobot: Kickstarting The 6-axis Minature Robot Arm

Having already made it to three hardware development versions, [Toby Baumgartner] is looking for some financial backing to make version four of this robot arm possible.

He’s modelling the arm after much larger ABB industrial robots. Like those, it mounts on a stationary base, and features movement along six axes.  The first couple of iterations even used ABB Software’s RobotStudio for control. This is the same software used by the full-sized robots, and features a special design language to integrate the robots into just about any production facility.

We don’t think the need for high-end software used with these small manipulator arms is very great, but we could see the finished product used for small-scale assembly line work some day. In the mean time these might be useful in your own projects. [Toby] has been using an mBed microcontroller board as the hardware driver. It communicates with the computer via an Ethernet connection and he’s even working on an Android interface right now.

Check out a video demonstration of version 2 and 3 embedded after the break.

Continue reading “Trobot: Kickstarting The 6-axis Minature Robot Arm”

Stripping DRM From OverDrive Media Console EBooks

stripping_drm_from_overdrive_media_center_ebooks

[Armin Tamzarian’s] local library recently started lending eBooks via the OverDrive Media Console system. He checked out a couple of books, which got him thinking about how the copy protection scheme was implemented. He wondered what recourse users had if they wanted to view a book they have already checked out on a different, or unsupported piece of hardware.

His research centers around Adobe’s ADEPT digital rights management scheme, which is used to protect the books offered on loan by OverDrive. The topic is broken down into three parts, starting with an introduction to the EPUB file structure, the OverDrive Media Console, as well as the aforementioned ADEPT DRM scheme.

The second part takes a close look at the OverDrive Media Console itself, where he uses the ineptkey and ineptepub utilities written by [I♥CABBAGES] to pull the RSA cipher keys from the EPUB data he uncovered. When he then tries to strip the ADEPT DRM layer from his books however, he discovers that OverDrive is using a non-compliant version of the ADEPT standard, which renders existing tools useless.

The final part of [Armin’s] discussion digs even deeper into the OverDrive Console’s inner workings, where he finds that the OverDrive Media Console stores quite a bit of information in an SQLite database. After a bit of digging, he finds all the data he needs to strip the DRM from his books. [Armin] also took the time to wrap all of his findings up into a neat little tool called OMCStrip, which as you may have guessed, strips the DRM from ADEPT-protected eBooks with ease.

Automatic Espresso Loader For Those Late Night Hack Sessions

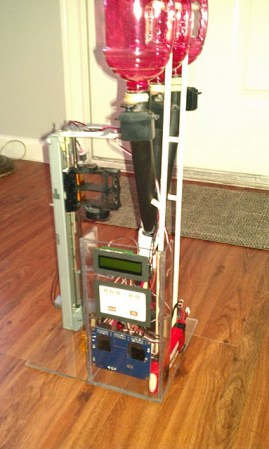
For [Roy’s] graduate electronics class, he decided to make something that many in and out of the hacking world would certainly love, an automatic espresso loader.  One can choose from three flavors available. In order to accomplish this, a Parralax Propeller board is used to control three servos that regulate the amount of coffee dispensed, chosen by a handy LCD HMI (human machine interface).

After the coffee is dispensed, the chute swings out of the way. A modified inkjet cartridge carrier (from a dead printer) is then used to compact the beans. Check out the video of this machine in action after the break. Continue reading “Automatic Espresso Loader For Those Late Night Hack Sessions”

The Kinect Controlled Zombie Skeleton

Although there is no shortage of Kinect hacks out there, this one from Dashhacks seems especially cool.  According to them, the software part of this design uses a “modified OpenNI programming along with GlovePIE to send WiiMote commands to the cyborg such as jaw and torso movement along with MorphVOX to create the voice for the cybernetic monstrosity.” As pointed out in the video, this robotic zombie also has a “pause” feature, and a feature to loop movements like what would be done at an amusement park.

The other great thing about this hack is how well the skeleton is actuated via servo motors. Although it’s difficult to tell how many servos were used for this robot, it certainly has 10 or more degrees of freedom between the head, both arms, and the torso. To control all of this a hacked Wiimote and Nunchuck is used in conjunction with the Kinect. Check out the video after the break.

Continue reading “The Kinect Controlled Zombie Skeleton”

Capturing Video With An Arduino

[Carlos Agell] sent in a tip where he captured images from an analog camera with an Arduino.

We’ve seen a few AVR/Arduino hacks that generate video, although overclocking is necessary if you want to do anything beyond a Breakout clone. [Carlos]’ hack bucks that trend and now he can capture video with an Arduino.

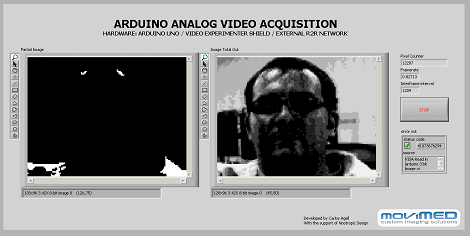
The project captures individual frames from NTSC video at a resolution of 128×96. Although the Arduino isn’t powerful enough for real-time capture, [Carlos] managed this by capturing only thresholds and sending them over to a computer running a program coded in LabVIEW. The PC program reassembles the images of the thresholds and produces a tiny image in 3-bit grayscale.

[Carlos] used the Video Experimenter shield which is impressive in it’s own right. The Video Experimenter is able to do object tracking and edge detection, so we’re wondering when we’ll see robots with computer vision running off an Arduino. Check out a demo of the nootropic design video experimenter shield after the break.

UPDATE: Carlos wrote a sketch in Processing that does the same thing as his LabVIEW program.

Continue reading “Capturing Video With An Arduino”

cleaning_pcbs

Cleaning Flux From PCBs The Easy Way

While we’re all for building circuits on protoboard or constructing a deadbug circuit for a last minute project, it’s always nice to see a proper PCB now and again. We think that leftover flux can sometimes make even the nicest of circuit boards look a bit dingy, and Hackaday reader [RandomTask] wholeheartedly agrees. He wrote in to share a method he found online that he uses to get his PCBs squeaky clean after soldering.

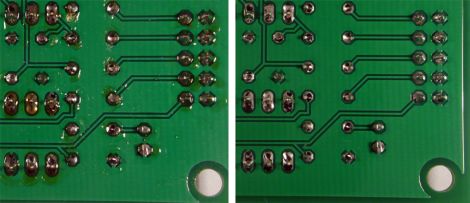
The secret to his clean PCBs is a product called Poly Clens. It’s essentially a paint brush cleaner that does a great job at removing flux without having to resort to using a brush to scrub it off the board. [RandomTask] simply submerges his newly assembled board in a small container filled with Poly Clens, agitating it for about half a minute or so. After the flux has been removed he rinses it with water, pats it dry, then ensures the board is moisture-free with a few passes of his heat gun.

He says that the entire process takes him less than 5 minutes per board, which is far better than the old alcohol and stiff brush method he used in the past.

What tips or tricks do you have for getting your new projects cleaned up? Be sure to share them with us in the comments.