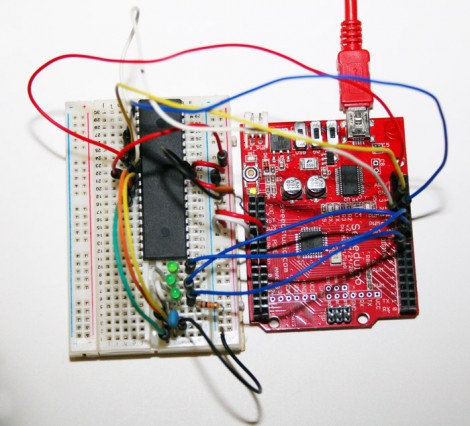
[Charles Gantt] and a few others were having trouble burning the Sanguino bootloader to an ATmega644 chip. With some help from the [Nils Vogil] via the RepRap IRC [Charles] got it worked out and wrote a guide for burning the bootloader using an Arduino as an ISP programmer.
We’re not familiar with the specifics of the Sanguino bootloader, but [Charles] mentioned that he was unable to flash it onto the AVR chip without a resonator. The resonator serves as an external clock source for the chip. We’d bet the programming process changes the fuse settings on the chip to use an external source. Without that source, you won’t be able to communicate with the chip afterwards.
The solution just adds the resonator to the programming circuit. This should be useful when burning any bootloader using an Arduino. But it does make us wonder if there isn’t an alternative method that would let you draw the clock signal from the Arduino itself?


Another option would be setting the fuses after uploading the bootloader hex. I experienced the same problem trying to flash the arduino bootloader from the makefile. reversing flashing and fusebit setting in the makefile solved the problem.
I even reported the bug but is was invalidated …
It’s not a bug, and it’s nothing to do with arduino, or even Atmel, the ‘issue’ is common to most embedded platforms. The fuses are always the last thing you program, especially if you’re changing oscillator options from defaults (I learned this myself the hard way, and had to wait for an oscillator to arrive in the post) and any ATMega/Tiny chip will lock you out if you don’t follow the right programming order.
It’s handy to have a couple of spare oscillators lying around (8,12,16mhz etc and they are not expensive) even if the project that you’re building doesn’t need one, (i.e you’re relying on the inaccurate internal clock – and that’s fine for a lot of applications).
The Arduino bootloader sourcecode comes with a Makefile that sets the fusebits first, then tries to upload the hex file.
IMHO that is a bug.
Now that I didn’t know (I just used the right hex file and an STK500 to burn my arduino chips manually. I will check it out – if you are right then I’d agree this isn’t proper behaviour, and I’ll also file a bug report.
A simple way to run it without an oscillator is to setup a pwm with a 50% duty cycle at 8MHz or higher. I have used this to fix supposedly “oscillator bricked” avr’s without the need of a HVP or a resonator.
Thanks for the post Mike!
Yes there are other methods to getting around this, but this was the easiest way we could come up with. We wanted to be simple and very easy to do so that the new people to RepRap who have no coding experience could just follow the standard Arduino as ISP methods and get their electronics up an running.
We have ran into another problem with some older Arduino Mega bootloaders and I am working on an article to fix those issues as well. The new issue lies in the Monitor. It looks out for ‘!!!’ to tell it you want to use the monitor. Even if you’re in the middle of uploading a program. So if your compiled binary contains ‘!!!’ anywhere… the bootloader dies during the upload, every time. The latest Arduino Mega fixes this bug and the tutorial will cover burning the new bootloader to your Arduino Mega. There will be a file one can upload to test and see if you have the old bootloader or the new one.
Just wanted to mention that Nils name is spelled incorrectly. It should be Nils Vogels. Nils is the owner of XYZ Printers.