When it comes to learning about microcontrollers, everyone has to start somewhere. [Lady Ada] recently posted a tutorial on burning the Arduino bootloader to standalone chips for those just getting started with the micro.
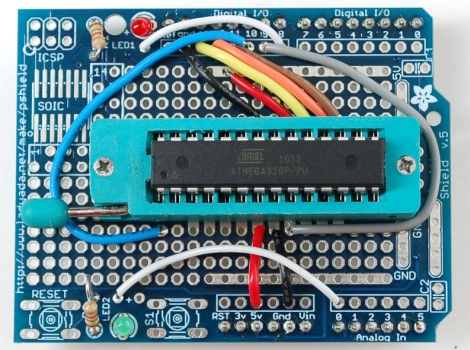
The tutorial cites a common situation, where someone is working on a project using an Arduino chip but they don’t want to sacrifice their dev board when just the micro and a few other components would do just fine. A short list of supplies is required, including an Arduino, a proto shield kit, a ZIF socket, and a blank ATmega chip.
The process is probably pretty straightforward and likely familiar to many of you out there. The ZIF socket is soldered to the board and handful of wires are added for powering and programming the new chip. The protoboard is installed on top of the Arduino like any other shield, and using a sketch that [Lady Ada] has made available, the bootloader burning process is a cinch.
It’s a useful tip for newcomers, and definitely a skill that seasoned Arduino users should have under their belts as well.


This is a great setup I need to share with friends that are too cheap to buy a real Atm programmer.
I wonder if they will add it to the official Duino software package
Brilliant!
I was wondering about this kind of thing just the other day!
Thanks LA!
No need for a custom shield to do it,
As everyone who tinkers with electronics is likely to have a breadboard, just use that.
I do normally use a breadboard, but I think this would be infinitely more handy. Just pop the shield on and go.
I whipped up one on a homemade PCB. No need to pull out my Arduino board to hook up a shield or rig up a breadboard. Just pop the fresh chip into the target socket, hook up to computer, and burn.
Chris, enlighten us, pls!
As per the arduinoISP page, (http://arduino.cc/en/Tutorial/ArduinoISP) the Uno cannot be used for this process, a fact that seems to be missing from the writeup.
the photos are of the supported arduino(s) – but we made it even more clear with this additional note!
“…this tutorial, which is based on the ArduinoISP writeup from Arduino.cc does not work with the newest UNO Arduinos. We’ll try to figure out a workaround. Until then, use only Arduinos with Duemilanove/Diecimila/NG-bootloaders”…
i take it back! we wanted to test to see what happened with an uno, it does indeed work. we put this note on the tutorial…
“According to the the ArduinoISP writeup from Arduino.cc, thus does not work with the newest UNO Arduinos. BUT we got it to work just fine, so not sure if the issue was fixed or its a rare error, or what.”
I had a project where i was using the 3.3v 8Mhz bootloader and had to burn it to about 8 chips, I just set mine up on a breadboard, i used my UNO to program them, In fact when i was done, we took a drawer full of old atmega8’s and burned the NG bootloader to probably 20chips.
I recently had the pleasure of burning an arduino bootloader onto an ATMega328. After many tutorials showing workarounds I found out I can just plug the uC into the arduino and connect the arvisp programmer. I guess the zif socket is good for producing “arduino chips”.
I’ve always programmed my boot loaders using 3 resistors and the parallel port.
It’s always worked fine for me.
Dad, what’s a parallel port? ;) (just messin’ with you)
DOES NOT WORK WITH ARDUINO UNO!
NOTE: Currently, you cannot use an Arduino Uno as an ISP programmer because the optiboot bootloader does not support this sketch. A revision for this is in progress.
I already have the Adafruit Prototype Shield. I’ll use the breadboard on it instead of a ZIF socket. :)
Much appreciated for the article. I wanted to learn how to do this. Thanks.
You can also very easily use a bus pirate and icsp header.
I made a tutorial on how to burn the Bootloader with the AVR MKII ISP, so take a look if you decide to go that route: http://www.youtube.com/watch?v=EsLOMdu50YU&feature=youtu.be