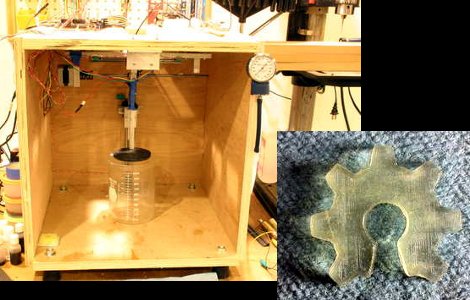
[Andy’s] 3D printer build uses lasers to create objects from goo. The Stereolithographic process uses resin that is cured by UV light to create the finished product. A single laser mounted to a CNC gantry is able to precisely target a point on the surface of the resin to begin the printing process. As the layers are built up, the stage, which is mounted on the Z axis, slowly sinks into the resin vat. So basically you’re printing from the bottom up but the laser never moves up or down. There’s a time-compressed video of an object being printed embedded after the break. It illustrates the process better than we can describe it.
We think [Andy] really went all out with his write-up of the build process. The quality he achieves in his prints is quite excellent, but you must consider the cost versus an extrusion-based 3D printer. One liter of the UV resin he prints from can cost over $200.
If this sounds familiar it’s because we got a sneak peek at it back when we looked in on his Delta robot work.
[youtube=http://www.youtube.com/watch?v=PV0BpoRTv38&w=470]


3D printing is so darn cool.
When can we buy this in a department store?
*Like*
Nice work – can’t see in the writeup what fabrication speed is possible – how does it compare e.g. to a RepRap?
High cost of UV resin is a bummer – is it feasible to concoct that DIY?
No.
Yes.
AFAIK curing times are on the order of minutes? There are multiple types of resins, though, so I can’t be sure; could very well be much faster. You could probably safely bet though that it isn’t as fast as an extruder, though.
Order of milliseconds with the right resin and UV spectra and the right type of photoinitiators and wattage output.
You can make it, but getting the raw materials might be a trick.
See http://mrsec.wisc.edu/Edetc/nanolab/3D_print/index.html
There’s a project I saw somewhere that’s basically doing the same thing with a DLP projector and should be able to get rather impressive build speeds (it’s not done yet).
http://www.tuwien.ac.at/en/news/news_detail/article/7009/
You’re thinking of the Junior Veloso project. It’s still going.
a demo and the soft for dlp printing : http://stl-print.blogspot.com/
soft command a stepper motor via an arduino…
the same thing here:
http://3dhomemade.blogspot.com/
It can actually cure almost instantly under strong UV light. Thin layers can cure in seconds under even a normal blacklight. A UV-cured ceramic is used for dental filling nowadays – it doesn’t have to just be soft plastic.
It is also both relatively fast and very accurate – more so than proper extrusion printers and way better than RepRap. Also, material can get as low as about $150 a gallon for some stuff, but damn pricey for others.
There are two basic ways to do it, this way, and printing it in thin layers using drum printing or spraying of the layers rather like inkjet printing. The second way is faster but more complicated.
Either way this is one of the types of 3D printing that appears to hold a great deal more promise than extrusion-based RP once developed further.
If developed further, this will blow RepRaps out of the water. Better speed, quality. Comparable cost if sourced in quantity.
And by this, I mean DLP based UV printing. SLA is far too slow by design.
I would agree, but keep the comments about RepRap out of this. At least not here in church. The priests tend to get snippy about RepRap blasphemy, even more than mention of the other ‘false 3D gods’ competing with them.
$224.68 per liter vs $35 per kilo of raw materials. About 6 times as expensive, if you use expensive options (buying bulk is cheaper, making it more like $26 per kilo and $192.39 per liter)
One of the aim points of the current personal 3D printers is cheap materials.
The extruder based printers are not the holy grail, but they are nice fun machines for personal use.
1. i think you can get loctite witch makes a ub curable glue (if you have seen the history channel documentary on glue they used a uv pen to make aloctite stick by curing the glue as they squirted it from the bottle).
2. churches would have some legit use for this they do have maintenance uses like lets say they broke the knob on one of the valves in the church’s boiler room just get a 3d model of a valve knob and make a new one.
ok lets say one little piece of stained glass broke from one of their windows and the artist died and there is not a stained glass shop for miles around they could make a new piece from the piecing back together the broken piece.
i say this because churches are kind of tight wad penny pinchers (look at the church from sister act).
1. Too expensive. 2. Err boiler knobs are metal. Who makes the 3D file. You can’t print stained glass.
This is pure awesome! Finally one that isn’t a lame extruder.
Hmm…
Spray the goo thinly on a blank copper-clad board and use the laser to draw a circuit layout, rinse the excess off and throw the board in some ferric chloride. Could be a nice way of rapid prototyping PCBs at home.
Here is the 3d printer using a DLP projector http://3dhomemade.blogspot.com/
@Wardy good idea.
Come to think of it, what about making the whole circuit board out of the same material?
Lay down circuit pathways using silver ink mixed with copper nanoparticles in a modified inkjet head (use ceramic speakers opposed + HV850 as driver) and then dip board back in resin to “print” the next layer.
I think this may work, someone needs to try it.
Its also feasible to lay down relatively low conductivity paths and then electroplate directly onto them.
The resin is AFAIK insulating so this could work by printing your circuit paths as indents in the flat surface then rinsing in a solvent such as IPA and allowing board to dry before laying down and air drying, while also laying down EL paint and other goodies such as resistors and capacitors with screen printed BaTiO3.
I know these resins are proprietry but even a lower resolution version which needs preheating to 60C to work would be fine.
One of my chemistry buddies on ‘teh interwebs’ seems to think that normal off the shelf resin used for boat fibreglass might work with a bit of chemistry hacking.
The hardener can be mixed with a UV inhibitor which “covers up” the molecules with an inert compound that only breaks down in the presence of UV.
Suggest a good starting point would be PEG (aka polyethylene glycol) as this is used a lot to functionally modify biomolecules such as interferon.