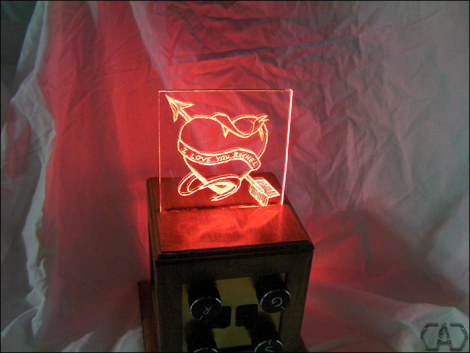
[Will] didn’t pick up a card, rose, and bottle of wine for Valentine’s Day like most guys. Nope, he planned way ahead and built this color-selectable glowing Valentine. When we first saw it, we figured he threw some LEDs together with a microcontroller and edge-lit a piece of acrylic. While that is technically what happened, there was a lot more design and craftsmanship at play here than you might think.
First off, the controller board is a beautifully designed two-sided PCB which he etched rather than throwing a mess of wires and hot glue into an enclosure. Speaking of enclosures, he grabbed a wooden picture box from the big box store and used a piece of brass plate stock to serve as the control panel. The enclosure was finished with tinted polyurethane after having a slit added to the top for the acrylic. The message itself was milled using an engraving bit and a Dremel tool. This was done by hand and we think achieves a finished look that is comparable to the CNC milled ornaments we’ve seen in the past.
Get a good look at the device and a demonstration of its features in the clip after the jump.
[youtube=http://www.youtube.com/watch?v=G8bdi8ok_N4&w=470]


Nice job. I like it.
Just one thing that bugs me though… Why advertise a web site on the pcb if this is going to the girlfriend?
Well the website is mine so I like to show it off :) Plus all the files are available for download so it’s another form of free advertising :)
Glad you like it and thanks HaD for posting!
Very cool idea man! I was thinking about making some laser cut wine holders myself.
ril3y
Perhaps because you can download and print it yourself… perhaps
Hi, any one may teach me how to put the image on the acrylic?
I know the microprocessor part but not the acrylic part..ha ha
any way, a nice gift !!
marcus
The engraving is easy – a Dremel, engraving bit, patience and a steady hand :)
Looks nice :) I’ve done similar things in the past myself:
http://hackaday.com/2011/03/16/pwm-controlled-led-display-is-truly-a-gift-from-the-heart/
One thing I do wonder about though is the 4 RGB LEDs connected directly to the uC with no current limiting resistors. There are 3 pins from the uC connected to 4 LEDs each meaning ‘all on’ the uC is powering 12 LEDs with no protection for the chip. Probably not doing the LEDs or the uC any favours even if the PWM is used to limit output in software.
Thanks Simon! I was worried about the lack of resistors but I had it setup this way in my breadboard and ran it for a couple weeks that way with no issues. I figured if I can keep the board simple than why not? :)
The peak current in the LED is only limited by the internal resistance of the 9 volt battery. You could definitely hack some resistors in there though. :)
That’s a great idea, but you really should have used a label maker or some rub-on letters for the labels and knobs.
When engraving metal with a Dremel, I found that using a sharpie to make a rough draft helps a lot. I have been engraving my own brass christmas ornaments for years. I start with the sharpie and write it out how I want it. Next, I use a very pointed diamond bit and remove all the sharpie. A magnifying glass helps for the fine stuff. Last, I use a very small engraving bit, or a round tipped diamond bit to do the most material removal.
If you cant write it neatly with a normal sharpie, you know that the dremel part is going to be exciting.
Well I had used a sharpie to make the initial marks on the knobs but my dremel engraving skills are still lacking though lol. But seeing how it’s a gift for my wife that hand-made touch is all that much better :)