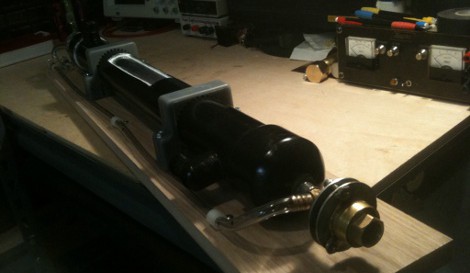
[LokisMischief] wrote in to the tip line to let us know about this incredible home made CO2 laser. This thing is a complete DIY beauty, from the PVC cooling jacket to the toolbox based controller. The whole thing is essentially built from DIY parts, hand blown glass for the laser tube, plumbing store mirror mounts, a PVC cooling jacket with a caulked glass viewing window, and a neon sign transformer with a variac to control output. Even the optics are completely DIY, a hand drilled gold mirror and a NaCL window made from a polished chunk of icecream salt! [ThunderSqueak] says the control box only cost 60 bucks, and the rest of the parts don’t look too terribly expensive.
We could only find one video of the setup in the variac section of the site, and it was just a test the amp meter in the controller (no lasing anything at all). [ThunderSqueak] does make a note on the to do list about doing a good laser-y demonstration video, which we are looking forward to.
If you want more DIY CO2 laser action check out this other one or some plans for one.


O.O
Now I have to be sure to get that laser in action video up
Thanks :D
POST IT POST IT POST IT POST IT!
I will as soon as I get a chance :) I currently run an IT shop, so I do this sort of thing in my off time. This is the second CO2 laser I have built. The first used commercial parts in the construction and ZnSe optics and there was a lot less beam dispersal.
Eventually I hope to get old projects up onto the website, 15 years of documented builds :)
Oh, and here is a picture of the plasma in the tube during the first test fire, the purple glow indicates a gas leak in the system that I had to track down.
http://i1260.photobucket.com/albums/ii565/ThunderSqueak/projects/CO2%20Laser/bda4e3c7.jpg
The PVC housing does get warm to the touch if I do not have the water cooling system flowing.
ZnSe output coupler is not really that expensive ($50 – $70 ebay) although the optics on my laser were the most expensive parts in my build, its worth it since you have come this far. Problem with salt is that it loves moisture and my laser is in a damp basement..
Alaska, where I am at has a very low humidity, in fact we are considered a cold desert. The issue I have with the salt is that you get some beam dispersal due to small internal flaws. I already have ZnSe optics for it and yes, they are about 60 dollars. The output using those optics was night and day in comparison to the salt. I imagine that is why they don’t use salt windows in actual industrial application ;)
It was a fun build! :D
I would really be interested in the power output, real vs calculated.
My way of measuring power:
I took an alluminum block just large enough so that you can bolt a power resistor (25watts in my case) to one side with heat sink compound. Also drill a hole in the top so you can insert a temp probe snugly. The other side of the aluminum block should be covered in lamp black by holding it over a candle until its coated well. Insert your temp probe and hook it up to a power supply to put exactly 20 watts through it and start a 5 minute timer. When the timer times out record your temp difference(delta T). Now you have a reference. Let the block cool, disconnect the resistor, and place the lampblack side facing the laser beam. Turn on the laser and start your timer. After 5 minutes record the delta T and divide it by the reference and multiply it by the power you put through the resistor(i.e. 20 watts). Make sure the thermal conditions are the same for both the reference phase and the test phase (i.e no fans or cooling of the block. insulate it if you want) And that is it. It should give you a rough estimate of power..
What would you guess the wattage to be? Been looking at building a CNC laser and would love to DIY vs just buying it.
This is exactly the sort of thing I love hackaday for.
Very nice! Be good to see it working. I built a similar CO2 laser when I was at Uni about 20 years ago (not as part of my course – I used to hang out behind the particle accelerator and bother the technicians). It only ever ran for about 10 seconds but it did work. My mistake was using a gold sputter coated concave reflecting mirror (the only way I knew how to make one at the time). The engineering school electron mircoscope guys coated it for me. The laser fired up, I got a tiny spot on some thermal FAX paper then the gold evaporated off the mirror! That was the end of that.
Anyway, my laser was very similar so here are some of the things I did. For the mirror mounts I used two brass plates with three adjusting screws as in this laser. For the vacuum tight coupling between them I used some copper bellows about 1 inch in diameter. These I got out of old thermostats (the air conditioning kind). They are probably used in other kinds of pressure/temperature sensing devices. I was able to solder them directly to the two plates for a nice gas tight seal.
My output mirror was a lump of polished copper with a 1/8 inch hole through it. For the output mirror I also used a salt crystal but I obtained mine from the chemistry department. They used them in some machine that had a NaCl output window. These were frequently broken so I was able to get hold of the bits. They were the right size and already polished.
Apart from those few seconds of running I never got it working again. I still have it, stored at my parents house somewhere. The basic plans I followed were the ones in Scientific American. It’s a beautiful device to build since it is easy to make it with what you have on hand as is shown here. The basic principles of it are very straight forward.
How did you seal the salt window into the 1/8th inch hole of the polished-lump-of-copper output mirror?
(Maybe I misunderstand the output mirror).
Only CO2 laser I ever got to play with was a 150W job. It was an RF excited laser.
I had to replace the lasing tube because the guy working in our graphic shop forgot to turn on the cooling unit before he fired up the laser.
And of course I had to return the old one damn it.
You can probably buy a press to make salt windows from chemical suppliers like fisher or sigma-aldrich. KBr is used as a window/sample carrier for FTIR instruments.
They’re pretty simple mechanisms, just a couple threaded rods with dressed faces and a block to put them in. Fill in the salt, tighten the rod, let it sit a few minutes, remove your salt window. I imagine someone with a lathe could churn one out pretty quick. Or use some round metal stock and appropriately sized steel plumbing to create a containter. Then use your car and a jack to press it together.
If this ACTUALLY works then…. impressive build.
And an “estimated” cost would be???? You did say low cost, so I don’t think I’m out of line to wonder about an approximate total.
The laser head itself is actually extremely cheap, about 40 dollars. You need PVC tubing, end caps for said tubing, 2 shark bite fittings, jb weld, glass tubing, 4 washers, and if you want the optics mounting a couple garden hose ends and some sort of retaining nut that fits into the garden hose end. You will also need 2 grommets to form the seals and 6 nuts and bolts.
Optics for this setup were another 20 for the gold mirrors. If you want to use a proper ZnSe output coupler those run about 60 dollars alone.
The thing that costs a lot more is the support equipment. If you don’t have it, you will need a good vacuum pump and at the very least a neon sign transformer, and a lot of time and patience.
You can get things like helium from the Walmart balloon section for 20 dollars or less.
Is this extremely low cost in the end? Sure, if you hunt around a bit and take your time. The things I learned from the experiment and build alone are priceless. This was the point of it.
Is the power output cost effective for the time and money involved if you were to try to use this in something like a CNC cutter? No. You can buy a 40 watt co2 laser with power supply online for 300 dollars or so these days if you look around a bit.
As for the question someone else posted earlier, yes it does function. Took some time to get the alignment right and the gas ratios correct, but it does work.
Thanks :)
Thanks for the reply. I expected the gold mirrors to be very expensive so I wondered if the interpretation of cheap was much higher than my expectation.
Excellent job btw, and thanks for sharing!
I saw you can use harddrive platters cut into disks for mirrors. We need to resurect this thread. A diy 40 watt cnc laser tube would be a game changer!
All these guys doing lasers should know that you can buy bottles of 75% N2 25% CO2 as beer gas. It’s usually used for charging beers like Guinness but is reasonably cheap from bottled gas suppliers.
However you need helium for cooling or you power and efficiency will suffer. My mix is %80 helium and it is responsible mainly to transfer heat to the walls of the tube.
Helium has little to so with cooling of the tube, especially in a flow through design. Helium quenches the charge from the ionized CO2 gas.
@maccona: From sam’s laser FAQ:
“The helium in the mixture serves 2 purposes: (1) He atoms collide with CO2 molecules at level 2, helping them relax to the ground state; (2) it improves the thermal conductivity of the gas mixture. This is important because if the CO2 gets hot, the natural population in level 2 increases, negating the population inversion. “
Couldn’t the power be pulsed to allow for the electrons to settle down…no he needed? Don’t cnc lasers pulse the beam anyway? (thinking of cnc lasers)
We just need a way to seal the tube for extended periods of time.
Is there any working link nowdays for:
http://home.gci.net/~thundersqueak/CO2_Laser.html ?
Yep. I moved to a new home and put most if the old site up at. http://retrogamegirl.wordpress.com/projects/co2-laser-project/