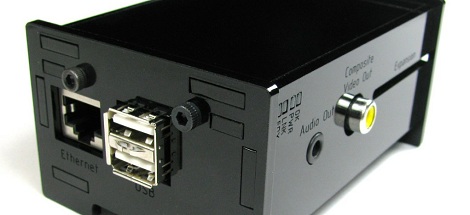
While you’re still waiting for your Raspberry Pi to be delivered, why not build an enclosure for it? This build comes from the fruitful workshop of [builttospec], and gives the Raspi a very nice case well-suited for being placed on your desktop.
Like most of [builttospec]’s case builds, this enclosure was made on a laser cutter out of acrylic and features everything you would expect in a good Raspi enclosure. All the hardware ports are available, and there’s also a slot for a GPIO ribbon cable, perfect for connecting an enclosed Raspi to whatever hardware project you’re working on.
One thing we’re loving about [builttospec]’s enclosure is the tasteful use of light pipes that funnel the light from the LED indicators on the Raspi to the surface of the case. Sure, they’re just a few bits of laser-cut polycarbonate, but its little touches like this that transform a good case build into a great one.
Files available on Thingiverse.


Damn, that is one nice looking case! Too bad i’m in the UK. Shipping costs alone are more expensive than the parts :/
Me too. I would be buying several of them right now if shipping was a little lower.
Any idea if cooling would be an issue in one of these?
Nah the Raspberry Pi chips just get rather warm to touch.
It’s barely noticeable through the our case for example:
http://www.youtube.com/watch?v=pjlLJIj9PHc&feature=plcp
Out of interest I see other people’s designs and I wonder how much notice people take of the fact that Acrylic sheet varies by quite a bit. I’ve been keeping tabs of the 200 or more sheets we’ve had come through over the last 3-4 weeks and it’s easily +/-10% if you don’t take this into your design you’ll find that some cases fit others break and yet others just fall apart.
Very nice! The one from adafruit is never in stock.
Beautiful :)
wow, that is perdy. anyone got a laser cutter?
I have access to a water-jet. ;)
If you guys get a little group buy together I can do a run on the parts. Gonna have to throw my buddy a few bucks for material and time though.
Yep. :) I may cut one and fill in the lettering with white crayon to make the text stand out more.
Correction fluid works very well for that use also.
All designs are open source, just send the files to pololu (just as example). I like to cut them myself, there are labs called Fablabs where everyone can use a laser cutter for free.
Here in the Netherlands we have one in every major city. There is one 5 km from my home.
I’ve cut the Adafruit Pi box. http://www.protospace.nl/fabmoments/raspberry-pi-case-schaakstukken-etc
translated: http://translate.google.nl/translate?sl=auto&tl=en&js=n&prev=_t&hl=en&ie=UTF-8&layout=2&eotf=1&u=http%3A%2F%2Fwww.protospace.nl%2Ffabmoments%2Fraspberry-pi-case-schaakstukken-etc
bought a purple one ;)
I bought the black one. Great design and seems to be very functional. Finally something to put my pi into better than the cheapo plastic thing I have it in now.
That’s gorgeous!
An enclosure designed for intermittent use?
Based on HaD’s previous temperature posts, I’m pretty certain this was designed to be an expensive miniature oven.
Slick looking oven though.
3.5W isn’t too hard to dissipate. I’d be surprised if it caused any problems.
You can always add some ventilation holes with a drill. Better yet, add them to the design file if you’re having it cut yourself.
Definitely a sexy enclosure.
https://www.google.com/search?q=raspberry+pi+papercraft
Built-to-spec works out of a local hackerspace, and I picked up the translucent purple case last night, and put it together. It’s a sweet bit of kit! What’s not clear from the picture is that the ports are all etched with their respective names, including the light pipes.
Very nice job with the light pipes.. however I think I’m going to get the case from adafruit: http://www.adafruit.com/products/859
this case looked great when it first came in the mail, but after a few days the brittleness of the material started to shine through. first a crack appeared on a bottom corner where a foot lives and it cameclean off, next a top corner on the opposite side came loose. i disassembled it to mke use of my superglue arsenal when a thin bit inside that holds a fastening nut showed a hairline crack in the light. a soft touch made that bit jump free and a choice was made to super glue this entire thing together as much as possible while still allowing me to remove the board.
its a shame this good looking case is now covered in ugly superglue smudges…..