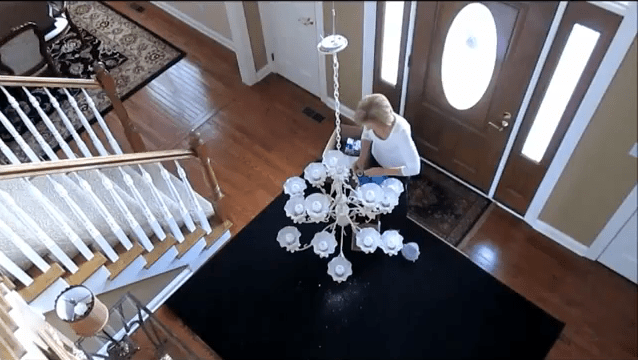
We’ve seen a lot of hacks from [Lou] and his latest continues the tradition of excellence. The entryway of his home is a couple of stories high and features a chandelier. Unfortunately he doesn’t have a ladder tall enough to use when changing light bulbs. Even if he did have a way to get up there it would be nice if the light fixture could come to him instead. This hack makes that happen by adding an electric winch to lower the light fixture.
Watching the installation process makes us think that [Lou] might be a little reckless. He’s up in the attic mounting a winch to the rafters before he cuts the board holding the fifty-pound chandelier’s junction box in place. He mentions foregoing the recommended cable fastener in lieu of some baling wire. But he does manage the task without dropping the ball so to speak — perhaps we shouldn’t be so critical of his methods. After altering the chandelier mounting bracket to work with a winch [Lou] wires an outlet in the attic and adds a plug to the cord on the light. This means he needs to go into the attic to unplug the light before lowering the fixture on the winch. But he’s not done yet. After the break you can watch the second part of the project with improves upon this by adding a wall switch to control the winch and extension cord management to route the power.
[Lou] really loves his automated home gadgets. Check out the gaming table which drops from the ceiling.


I am sorely in need of *some* solution for a bulb change on a similar located chandelier but I think lowering the entire thing is a bit overly-deisgned. It would have been much easier to deal with individual bulbs except in the cases in which the bulbs are in awkward sockets other than the more common E26 or E12
Also, some code copliance issues may arise from an electrical mounting box design that needs to accommodate the movement of the power cable to the chandelier. I would not be surprized if Lou will have issues if and inspector comes out and sees the custom box.
Or you could try using a remote controlled quadcopter…
Well you could always build yourself a scissor lift.
If you’re gonna have a building inspector come out, you hide that stuff, man. Hacking 101.
O M G.
THIS IS INSANE. talk about multiple violations of building code, OSHA safety codes, electrical codes….what a joke
Or… just install LEDs and never think about it again.
Considering those are incandescent bulbs in there, I’m guessing he doesn’t like the slightly artificial look of LEDs or CFLs; at least not for a guest entry area meant to impress. I’ve noticed they can make stained wood look odd in particular, and plenty of it in that area.
That comment about leds might have been true 5 years ago but it’s not anymore.
2700K (cablelight) “filament” dimmable leds are available and colour rendering indexes on the high quality white ones are better than tungsten. You can also get ones that “flicker” with a moving light source to emulate candles. (if you’ve ever seen a chandelier illuminated by candles you’ll realise how fantastic they are compared to the sterility of static electric lighting.)
If you have ever installed LED’s in your home lighting, you would know this to not be true.
My wife is very sensitive to color. She, for example, can buy matching paint at the store, without bringing a sample. Anyway, she hates LED lighting. I personally, am fine with it, but I am just saying, it is not for everyone.
You should find out if she has any male relatives that are red-green colorblind, she could have an extra color receptor in the eye.
http://www.post-gazette.com/stories/news/health/some-women-may-see-100-million-colors-thanks-to-their-genes-450179/
http://en.wikipedia.org/wiki/Tetrachromacy#Possibility_of_human_tetrachromats
cool! Thanks for sharing!
LOL, LED bulbs last much less than any other type of light sources available these days. Guessing that conversion from 110V to 3.6V needed for white LEDs is not a very easy task and many (most?) manufacturers have yet to perfect it. LEDs are pretty tricky in high current / high intensity situations. Have great promise, I give you that, but we’ll have to see better products first.
It’s not voltage conversion that’s the problem, it’s the heat. If your LED is warm (warm, not even hot) to the touch it’s too hot and you are loosing lifetime. And it’s hard to make nice looking bulb with ability to provide enough power dissipation.
I would have to disagree there. There is always room for improvement, but the DC-DC converters I’ve seen used in LED lighting are perfectly fine. Besides, they usually wire all the LEDs in series (like in LED-backlit LCD TVs), so in a typical 4W bulb with 4LEDs you would have around 14V with current limited to 300 mA (not 3,5V @ 1,2A). No problem here as long as there is enough heat dissipation (that’s why they are usually encased in aluminium).
In my opinion there are only two issues to overcome, the first is the cost, high quality LEDs are very expensive when compared to similar light output CFLs . The second, like Chris C. commented above, some LEDs have very poor color reproduction, making things like wood look greenish or overall unnatural (like some CFLs). There are several high quality LEDs that don’t have this problem, but they are usually very expensive).
I’ve replaced some incandescents and CFL’s with LEDs (both no-name and Philips). Regarding durability, the LEDs are wiping the floor with the CFLs and incandescents, especially in locations where they are subjected to multiple daily starts (some CFLs would die there in less than 4 months). There is also no apparent drop in light intensity.
A few problems with your statement. One, no modern LEDs run off of 3.6v at their rated current. Second, why in the world would a led light bulb manufacturer run their lights off of the low end voltage for an led. Most new white leds run at 3.3v or under for a single die. Most commercial lights use multi-die leds or several leds in series, so often you are looking at about 12v or so.
Well, exactly! Running them in series to avoid having to drop the voltage to the level required for one LED makes the entire series fail if one LED fails. That effectively lowers your MTTF ’cause you now need to multiply your FR my the number of LEDs in series. Plus the dismal FR of the commonly used [crappy] capacitor power supplies.
It does indeed, but I’ve never seen that happen in either LED bulbs or LED-backlit LCD TVs (the LED LCDs I’ve seen had strips with dozens of LEDs in series). I’m sure it does happen, but the failure rate isn’t probably that bad.
I always thought they mostly failed open too, but I actually found mixed information. These guys claim they mostly fail closed, but they don’t have proper numbers or references, though: http://www.astrodyne.com/pdf/Astrodyne%20LED%20Driver%20Configurations.pdf [LED Driver Configurations]
Quote: “For reference, the most common failure mode for LEDs is to fail short.”
An interesting App. Note from Cree:
http://www.cree.com/~/media/Files/Cree/LED%20Components%20and%20Modules/XLamp/XLamp%20Application%20Notes/XLampPulsedCurrent.pdf [Pulsed Over-Current Driving of Cree® XLamp® LEDs: Information and Cautions]
These don’t have numbers but describe the most common failure modes and some possible solutions to avoid them (nice short article):
http://www.emsnow.com/cnt/files/White%20Papers/DFRLEDFailures.pdf [LED Failure Modes and Mechanisms]
These guys do have numbers for several kinds of diodes, but not for LEDs:
http://src.alionscience.com/pdf/PartFailureModeDistributions.pdf [Part Failure Mode Distributions ]
It may be anecdotal, but from reports I’ve seen from people who build DIY LED lights for aquariums, high power LEDs almost *always* fail closed.
Which is rarely an issue for them, as these fixtures typically have individual current limiting for each series chain. It’s also common practice for them to drive LEDs well below limits to help ensure long life, so even if the current does increase as the result of a shorted LED, it won’t cause any serious damage until it’s found and fixed. Given the time investment to build such fixtures and the possibility of assembly errors, most feel it’s worth it in the long run to spend a little more up front to make it robust.
Manufacturers on the other hand have to be cost-competitive, driving everything at or near limits (sometimes beyond), and otherwise cutting corners that should not have been cut. The old rule of “you get what you pay for” isn’t even a guarantee anymore, as manufacturers know they can easily extract large sums from followers of that rule; by catering to them with separate lines of premium products, with premium price tags that seem to offer the promise of far better quality. But in reality, for each $10 extra you spend, you may get only $1 of actual, better quality components.
For now, when it comes to LED lighting, I trust only what myself or another DIY’er builds. And until LED lighting becomes so inexpensive that it’s disposable well prior to the claimed lifetime, that is the rule I will follow. I’ve already commented elsewhere on here regarding the drastic decline in CFL reliability and quality since they were first introduced. But those were never particularly expensive to make in the first place, so it took some years for the corner-cutting to occur. LEDs are more expensive, and so in order to encourage early adoption, corner-cutting occurred from the start, and will always occur.
Maybe not LEDs, but I generally get at least 3-5 years out of CFLs. The one over the kitchen sink is a personal best at 12 years of nearly constant use before it ate itself.
(Yeah I know, mercury blah blah blah can’t throw it away. They get recycled with the regular fluorescent tubes.)
Please show me where I can buy LED bulbs that dont fail because even the $60.00 each ones burn out in 2-4 years. Some within 18 months.
It is worth noting that when chandeliers were lit with candles this was the standard way they were used. The fixed chandelier is a relatively recent development by comparison.
1001 uses for bailing wire!
It smells like Luigi’s Mansion.
Who cares about a lit ball drop on new year’s eve when you can drop one in your own house?
This is a nice solution making cleaning and changing bulbs easier. For those who are worried about electrical code, there are commercially available light lifts. So for those who want something made for this purpose there is a solution, however it cost several times what his cost.
I would imagine those wouldn’t be held together with bailing wire and don’t use the entire cable as a house ground.
before attempting this you need to make sure you own the house i.e. you are not renting.
i am sure the land jesus is not going to like that done to their property.
Ob. Steven Wright joke:
I sold my house the other day. Boy, was my landlord angry.
When I rented, I modified the place to suit my needs. Dimmers replaced switches, cheap ceiling fixtures were traded for stuff that was actually useful; baseboards were removed and reinstalled with Cat5 going through the dry wall underneath, etc.
When I moved out, I reverse the operation not because I thought my landlord would be upset if I hadn’t, but because I am stingy and I didn’t want to buy new dimmers and fixtures again.
YMMV. We’ve got no (zero) residential building code here, including electrical. It is implicit here that one does one’s own electrical work if they know how.
Great idea, but don’t retractable extension cords have a warning on them that they must be pulled out to prevent the coil overheating?
I believe this device could be made more safe by replacing the steel cable with a length of non-conducting Kevlar, Vectran or even plain nylon braid so there’s no chance of the power cable and the lifting cable shorting together if accidentally damaged.
Good point. Overheating depends on amps vs. wire gauge. For us who know about such things, it’s worth checking into. I ran a large window AC unit on a 50 foot extension cord once, having none others handy without far tinier wires. Worked fine until I naively decided to wind the excess length (most of it) on a cord spool. Soon after, I was alerted by a hot plastic smell that something was wrong, and found the cord had fused into a solid mass. Won’t make that mistake again! And also learned as a result that even if I didn’t know the amps/gauges, I could tell if a cord is marginal and/or should not be coiled by checking it uncoiled with an IR thermometer – it should not be measurably higher than ambient temp.
Of course, most people don’t know about amps and wire gauges. So if there’s a warning, it won’t make that distinction; and the manufacturer will have covered its arse against all possibilities by basically telling you not to use the retractable cord as a retractable cord. ;)
Yep. Coiled cord == heater. A little warm is OK, though: FFS, I’ll bet your fancy-pants thermometer can read at least a few degrees difference on the cord from your vacuum cleaner after you’re done using it and the whole kit is still UL approved.
I learned about this during an extended power outage. After a few days of living with a generator outside and a snake-pit of extension cords, I said fuck it: It wasn’t safe because it was a trip hazard, if nothing else, and it was hot. 100 degrees, no wind, 100% humidity sort of hot. So I decided to plug the house in and get rid of the snake-pit.
I wound up with a pair of 14-guage extension cords feeding my dryer socket and rearranging the panel to better balance the two legs of 110. With a few window air conditioners and a fridge and some lights and computers, I was pulling a fair bit of juice.
In my mad rush to get it done, I left the extra length of wire on the floor of the utility room in a pile. It got warm enough to be a concern, so I stretched out the excess and left it outside. :)
After that, the only problem was the crappy molded plugs that came with the cords: The wires were warm near the end. Cut those off and put some real (though cheap) plugs on, and it was happy.
(Disclaimer: Do not ever do any of this. Do not plug a generator into a dryer outlet with a suicide cord. Do not have excess slack. If you do have excess slack, do not coil it up or leave it in a pile. Use bigger wire. In my case, 12-guage would have been ok, and 10 preferable.)
Wow!!
First off, I love how the first 20 posts are ppl arguing over the effectiveness of LED bulbs vs. others. Take that chatter to a home DIY forum and stop cluttering HaD space, geeze..
I give props to the guy who did this, but need to point out that it’s not uncommon at all. There are numerous home manufacturers who include this as a standard feature in homes, seen it since at least mid 90’s, I’m sure it was done before that. Again though, doing it in a home that was not designed for it is certainly a feat and tough to pull off!
Make that system centuries old… when they where holding candles the whole chuptzah was hung behind ropes or chains to be serviced at ground level. Only lighting/shutting the candles was made with an extended pole.
I would use a thimble to connect the carabiner to the cable in order to reduce stress. Wire cables aren’t made to handle small bend radii. Also, it would be wise to mount the winch on a solid block running between two rafters instead of just one. I certainly wouldn’t trust bailing wire to secure the cable either. If the cable is nylon coated, the bailing wire is really only holding onto the coating.
*always* strip the nylon coating off of wire rope at the point of attachment.
** SAFETY SPOILER **
Aahhh… generally a really nice tutorial – specifically highlighting several safety details and retaining the safety ground connection to the fixture.
BUT – how about extending the earth connection down to the *metal* escutcheon wrapped around the rocker & key-switch?
I’d be more concerned about the (always live) key-switch failing internally, than accidentally touching the chandelier.
Wrapping the ground (or ‘any’) wire for a connection is not a valid ‘bonded’ connection and should also be regarded as a very ‘temporary’ fix.
I don’t want to be seen as a complainer (I like the build) – but if you have a fire, or electrocute someone accidentally – your insurance company won’t be seen within a mile of your policy for the whole house…
(I’d also drop some epoxy, or nylok nuts on those hanger bolts to be sure they don’t vibrate loose over time — and they’re not bonded ground connections either !)
– sorry for bringing the tone down – but sometimes it’s better to live longer than faster!
Well not everyone lives in a house with metal grounded floors. I can safely hand onto a live 110V lead without any problems at all mostly because I am not touching a ground and my floors are carpet and wood.
If your home is all stainless steel? Yes! be sure to add grounding!
Completely agree – we live in 230-240 territory, so your life is much easier. But I’d still prefer to live longer than faster!
I didn’t watch it the whole way through, mostly jumped around in the second part, but I like the idea.
A couple of things I would mention:
He says you can sister on 3′ of lumber and then cut the joist. Don’t do this unless you really understand the loads in your roof.
Also in colder climates it’s important to stop air leakage into the attic putting a big hole the will let moist air into the attic in the winter is not a good idea.
Before the invention of the electric light high mounted chandeliers were routinely hung by pulleys and rope to allow for lighting and extinguishing the candles.
Use a long hook (I used a broom stick and clothes hanger) to gently pull the chandelier to the 2nd story balcony. Attach a bungee cord to hold to railing. Replace bulbs. Gently release cord and set back in place with hook
Rather than using an extension cord, you could use a couple of coils to provide current to the chandelier through induction? You would still need the chandelier to seat properly which you already have that setup. A cord with an induction coil could be used when the chandelier is lowered and you need to replace a blown bulb.
One more thing. If you want to add a solenoid locking mechanism, just connect solenoid to the winch down mode for disengaging, and design it to automatically engage when the chandelier moves into position.
Hanging lights from a winch is extremely common in live productions. Go to concert, you see all those big fixtures with the laser lights, etc? If they’re up high in the air, they are probably hanging from a winch, either directly or via a truss. I’d recommend looking at the way they handle power, but otherwise a cool hack.
Actually it is a climbing chain hoist, but same idea. As to how the power gets up there, typically one end you will see a large bundle of cable hanging down to the floor. For truss not directly over the stage you will see additional motors used to carry the mid points in the cables, but ultimately they all fall to the floor somewhere backstage.
This application has the problem that the power is supplied from above rather than below. There would need to be a means to loosly collect the cable as the light retracted, and leave a loose set of loops once fully retracted, rather than the tight roll on the coiler.
Just don’t turn the light on. Problem solved!
The Nebraska State Capitol was built with winches holding up the chandeliers for the same reason. Looks like they beat you to the punch by about 130 years.
Page 5: http://capitol.org/files/sower/2009-06-Sower.pdf
http://www.aladdinlightlift.com/ is a commercial version of this; ready built and to code