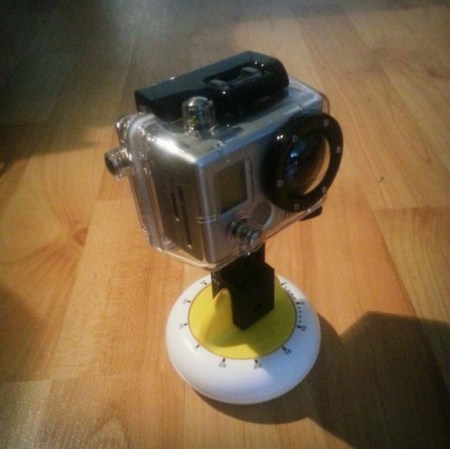
[Sebastian Schuster’s] weekend project was to turn his GoPro camera into a panning time-lapse rig. You’ll notice it’s in a waterproof case as his demo for the hack was an outdoor session and the weather’s not the best right now. He put this together quickly, easily, and on-the-cheap thanks to the Ikea egg timer and a 3D printed camera mount.
An egg timer is a popular choice for panning hacks. Any type that includes a dial that spins on the horizontal axis will do. The Ikea Stam egg timer has that raised handle which is easily gripped by the 3D printed part. You can get a hold of the design files through a web service which is new to us. [Sebastian] used Tinkercad for the design, and shared it in his project post linked above.
This is just one more tool in his collection of camera hacks. A couple years back we looked at a motorized pan and tilt platform he built.


“…He put this together quickly… …and a 3D printed camera mount.”
a trip to the dollar store would have been quicker.
lasershark, please share your build from the dollar store ….. never mind you don’t have one. You are just attempting another one of those “expert” comments with out actually building or hacking anything.
http://www.diygopro.com/diy-gopro-timelapse-egg-timer/
Dollar store and hardware supply store.
@kommune – No, that page clearly says “Mechanical kitchen timers from Ebay ≈ $3”.
This makes me smile.
Says the man with no brain.
$1 store egg timer and STICK ON THE GOPRO MOUNT. I am certain you have never seen a go pro before in your life and therefore you dont know that they come with several adhesive mounts.
But that is ok, we wont make fun of your lack of education or IQ.
I believe this site is called hackaday. Which would imply no one cares how to use sticky crap that came with the product.
nah – let’s rip… my point, which apparently wasn’t made clearly enough, was to highlight the 3d printing aspect of this ‘hack’ – cos we all have one of those in our ‘workshops’ right? and 3d printing is well known for it’s rapid turn around time, right? and it’s, like, the only obvious solution to this problem right? oh, wait – maybe i need to throw in an arduino too? sorry – i meant raspberry pi.
kudos to the maker – a cool project. glue would work also.
Actually for a camera without a native time lapse feature an Arduino would probably be a decent idea. Funny you should mention the Raspberry Pi, as I was actually thinking about adapting this to it…. since some of us can’t afford GoPros :P
@lasershark… I have 2 series 1 printers in my office…. You Mad Bro? Your original comment sounds like a biased, butt hurt quip than sound advice. BTW, My dollar store doesnt sell nuts and bolts, nor vices, nor drills, nor drill bits.
I thought this was hack a day, not “rich douchebags who are lazy have their computer’s print their hacks out for them a day.”
The commenters point was that this could be done more easily and more cheaply with off the shelf parts. It makes no sense to spend more money and use overtly convoluted solutions when you don’t have to.
Throwing money at a problem is NOT the way of a true hacker
It’s a nice hack, but it’s been done before without the over-build of using a 3d printer to make a widget that fits on top of the egg timer. .
Elegant!
You mean, Eleggant? :]
+1
Eggs-hack-ly!
Mike, you can publish your idea on http://www.ikeahackers.net too….
You mean Eleggant? :]
Pretty cool!
http://www.youtube.com/watch?v=FwECLh94l10
i had one of those ikea timers, didnt survive the old childish “tune and ring SetzeDepotBeantragbarkeiten” game
stupid ctrl c ctrl v i meant repeatedly
So… now that my curiosity is piqued…
what does “SetzeDepotBeantragbarkeiten” mean?
Super awesome hack because of the simplicity, 3-d printer or not.
Totally agree. Awesome simple hack, no matter how the camera is attached to the egg timer. I will be using something simlar soon.
Don’t you mean “around the vertical axis”, or “on the XZ plane”, rather than “on the horizontal axis”, as in the article?
Anyone noticed the slightley overzied chimney on the neighbor’s house? Are they making steel in thers basements?
Great result. Love the way the clouds sail by.
The 3d printer part works great for this timer, but there’s always an easier way. I bought a round (ladybug shaped) timer from Bed Bath and Beyond and just epoxied a 1/4″ screw to top of it. Used that setup to shoot a wedding time lapse. Problem solved. I should of thought it through a little better and glued a 1/4″ nut to the bottom and made it tripod mountable, but since it was indoors that wasn’t an issue.
http://youtu.be/4YwU_TfHcGc?t=10s
vertical axis, of course !
horizontal plane !