Yes, we’ve seen our share of tutorials for making solder paste stencils, but [Felix] hit it out of the park with this one. It’s the definitive guide to making solder stencils at home, with quality as good as you would find in any professionally made stencil.
The material for the stencils comes from the same source as so many other DIY solder stencils – aluminium cans. The interior plastic coating and the exterior paint job are both removed with heat, acetone, and patience. After laying out the cream layer of his board in a PDF file, [Felix] used a fairly interesting transfer medium to get the toner onto the aluminum; cheap vinyl shelving paper attached to a piece of paper apparently makes for an ideal surface to transfer toner.
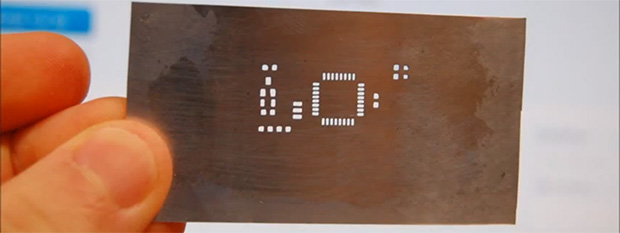
After transfer, the board is etched with HCl and peroxide. [Felix] is getting some very good results with his method, including a few very fine pitch IC footprints. It’s just as good as a professionally made, laser cut stainless stencil, and you probably already have all the necessary ingredients lying around your house. That’s a win anytime.


That’s an interesting idea with the adhesive vinyl for toner transfer. I’ve been using photo paper for etching PCBs but it’s not the best.
Is it the same stuff as used for covering paperback book covers? http://www.ryman.co.uk/1301045180/Tenza-Book-Covering-Roll-500mm-x-1m/Product
As long as it’s vinyl it should work fine (you can simply tell by the fact that the toner will print perfectly to it). What is more important is the material the can is made of, I’ve had cans that are very crappy when it comes to toner transfer, then good ones that *always* transfer perfectly. Just need to experiment and find the right one…
Awesome!
Very Nice! I may have to try this.
Why not have viewmate print to the vinyl instead of going through the PNG file?
You can try but it will do a poor job, and also it’s nice to be able to trim and flip the image horizontally otherwise you will end up with the outside (painted side) on top which is really annoying when you apply the paste.
I used a DXF output from my EDA package, then manipulated that in AutoCAD. No need for any specialized program. Of course I already had AutoCAD, so if you didn’t, I guess that would be a specialized program…
The material you use is critical to the transfer quality. I used genuine Contact paper and the transfers didn’t work at all. I finally located the offbrand version that I believe is exactly the product the author has (it was carried at Wal-Mart), and it works fantastically. Something about the material and the surface finish.
Contrary to what is illustrated in the clip, I find Sharpies are not sufficient as a solder resist. After a couple of minutes of agitation in the acid, the Sharpie breaks up and I end up with extra holes in my stencil. I started using nail polish to seal the unetched areas where possible to use such an imprecise applicator, and that works much better.
My biggest problem with this method is that you seemingly can’t make very small pads. I needed one with webs of less than ten mils and in another area pads of 12milx26mil… the width to depth ratio of the former meant the webs started breaking before the full profile of the pad was etched through, and the latter had enough variation in pad size that some pads had just started etching when some pads were so enlarged that they started to etch together.
Part of the problem is of course transfer quality. My transfers were very good, but with such small pads even a small error leads to big problems. Ultimately I went back to applying the paste with a toothpick. Maybe this works for parts down to TQFP and 0603 (MAAAAYBE 0402 depending on transfer quality), but QFN and smaller? The difficulty goes up exponentially.
Er, Sharpies don’t work as an ACID resist, not solder resist.
Yes they do :)
Maybe my agitation was removing it. However it happened, inevitably wherever I filled in with Sharpie I eventually got pinholes.
I ran into this same issue while etching some boards recently. Turns out black Gundam paint markers work GREAT for covering toner holes and fixing bad transfers. I will definitely have to look into the vinyl method next time.
The major reason why they do is because the solvent in the marker makes the toner around the pinhole flow and fill the hole. The ink in the marker itself does nothing, as it is dissolved immediately in the acid.
You could try dabbing the pinhole with acetone for the same effect.
Not sure what Sharpie and what acid you’re using but I use sharpie all the time to avoid pinholes where the printer missed a spot, and I have no issues, I cover it 2-3 times to make sure there’s enough ink and then let it dry while I apply the tape and finally dip in the acid.
Interior isn’t plastic coated, it’s BPA based epoxy.
Etched stencils < laser cut stencils < electroformed stencils:
http://www.photostencil.com/pdf/the_evolution_of_stencil_technology.pdf
So these are definitely not as good as any professionally made stencil (and, credit where it's due, the excellent blog post accompanying the video also points this out)…
Flip your artwork in viewmate before printing.
I’ve been using vinyl for toner transfer PC boards since somebody put me onto it a few months ago and had been getting near perfect results until a couple weeks ago. It started getting harder and harder to get the toner to stick to the copper. The other day, I couldn’t get it to work for nothing. What changed? Perhaps time to cry and buy a bunch of UV leds? Oh! My Canon “104” toner cartridge had run out and I put in a Staples compatible! Ran back to Staples and got a real Canon, and I’m back to near perfection. To be fair to Staples, their cartridge works beautifully for printing on paper. Perhaps with different vinyl the Staples cartridge would work better than the Canon?
Hmm. My “100%” acetone won’t touch the red and white paint on the outside of a Coke can.
A few things – I print to a PNG first because I find it much easier and more flexible to print. But that’s just me …
And yes, on some cans it’s almost impossible to remove the outside paint, but more important is to remove the interior epoxy coating.