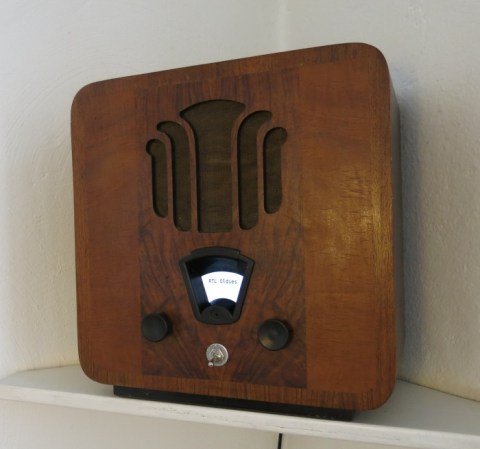
 At first glance you might not even notice that this 1934 radio has been altered. But close study of the tuning dial will tip you off that changes have been made. It still scrolls through stations just like the original. But it’s not a wheel with some numbers on it. The rotary motion is an effect produced by an LCD screen.
This is the second time we’ve seen one of [Florian Amrhein’s] Internet radio projects. The first used guts from a Laptop paired with an Arduino to pull everything together. This time he’s chosen to wield a Raspberry Pi board. It feeds a USB sound card for a bit better quality. A small amplifier board us used to power one large speaker behind the original grill of the radio.
Check out the demo video to see that radio dial in action. It’s delightful that he went to the trouble to emulate a rotating disc to keep with the theme of the project.


Why do people always discard the old radio electronics: you can easily get those to work as your amp…
Read the link, quoted here:
“All its electronics had been removed decades ago, it was just decor in the kitchen.”
This unit didn’t have the guts left in it. Why did someone sometime in the past discard the innards? They probably got taken out when it became a hassle to get replacement tubes. Besides, the power supply was probably one of those vibrator circuits. Matching impedance and levels from a modern pre-amp to some point in the tube-based output would be tricky if the parts existed, which they didn’t.
So he turned a radio _cabinet_ — not a radio — into an audio player.
I instantly saw straight text on the curved window with not the slightest hint of yellow mellow, just cold white. Text should be kerned to the curve.
Gutted:(=
What is the difference between wimpy streams when they come out of USB vs. built in audio devices in mono?
Hi. I am not sure what the original colour of the display way. The yellow colour you can see on photos comes from a foil that sits in front of the disc. It might be that the foil just changed its colour over the decades and was fully transparent originally.
What a waste.
What a waste of what? Of an empty case?
Yes. There are plenty of antique radio enthusiasts out there who may have a chassis and no cabinet to put it in. Been there myself.
Good example of dementia. I don’t know reason why someone with knowledge should ever destroy vintage radio and spend 70+ USD to build internet dependent mono radio.
If you read the article the electronics had been removed decades ago
I thought about doing the same thing. I keep finding nice old radio cabinets at thrift stores that have been gutted.
And You will buy RasPi to play mono radio? Isn’t it waste of money?
Hi. Do you know something cheaper than a Raspberry Pi that would allow this? You need at least a bit of processing power for the UI, a way to connect a LCD, USB for connecting WiFi, and so on. Other boards like a Beaglebone black are more expensive, while cheaper solutions like a micro controller wouldn’t be powerful enough for the job. If it plays mono or stereo doesn’t make much difference.
Should be doable with an esp32 plus an i2s DAC, but the pi is much less effort.
Not sure why people are shitting on this quote so much. They’re welcome to spend their money as they wish. I’m somewhat tempted to copy this as a spotify box, for the asthetic. I’ve done a couple of 60s plastic radios in a similar way before.
Hi. It was more around $200. Its dependency on the Internet is not an issue, my parents have a stable broadband connection. ;-)
Aesthetically I think he should have gone with a knob and not a switch for power and refinished the cabinet but making an empty case back into a working (internet) radio, nice job.
it seems like almost every post on here has been nothing but negative. I made an internet radio and housed it in a Philco cabinet. And it had been gutted by me because
the capacitors had shorted, you know OLD paper capacitors and it would have to be completely rewired and the chassis was rusted, not worth the time or money. But, the cabinet was in excellent shape. And i’m happy with it and to me, that’s all that matters!
Some people get sentimental about obsolete mass produced consumer electronics.
Looks real nice. I’ve actually been looking at doing a similar project for awhile, originally with a small industrial pc but now with my Pi. One of the sticking points for me was the software and how to control the stations. I had been looking at GStreamer and a python interface, but i’ll have to look at your code to see if this is a better way (I’m not very familiar with python).
It is very helpful to just let MPD (“music player deamon”) handle all the audio stuff. You just tell it the URL, and it will take care of it. There is a simple interface that allows you to look up if the stream is actually playing, what the title of the current track is, and so on.
I tried to set up MPD to do this a while ago, but failed miserably. I also don’t know of any URLs to connect to. Do you have any recommendations for references I could look at to try to do this on my own?
Beautiful! I see the potentiometer rotation corresponds well with the rotation on the screen: nice detail! One question though: why didn’t you use a rotary encoder? It would allow endless turning, hence more radio stations without losing the detail mentioned above.
Thank you!
A rotary encoder only has a resolution of like 20 steps per rotation. So, either you would have to turn it quite a lot to get to the next radio station, or the UI would make large jumps when you turn the button. The potentiometer makes the UI very smooth.
With the current setup you should be able to fit about 20 radio stations in. If you want more, there are other solutions: Like potentiometers that have more than 270 degrees, or add something that allows you to switch between different sets of stations (something like a switch for the different radio bands).
Cool! Now I see why you chose the potentiometer with ADC instead… Very fond of the result!
Well, I have encoders with 256 to 1024 steps per revolution, so that won’t be a problem. If you want to “DIY” the encoder, take the optical pickup from a recent inkjet printer, and print your own encoder-disk on a piece of transparency, and hey presto, your own encoder with the steps per rev. that suits you :-)
Just….”cool”.
Awesome!!! I really like the display. I am looking for one for my next radio. Can you tell me which one you used? How did you connect it via HDMI? I only found some displays on Adafruit only for DVI, but you have written on your HP that “the DSI port is still not accessible”.
I used one of those cheap displays meant for cars, which display the picture of a rear view camera. They are quite cheap on ebay (I payed about 15BPP = about $25). The resolution is horrible (320×240), but enough for my needs. They use the composite port of the raspberry pi.
Thanks, you are right! I just found one for 13,99 €.