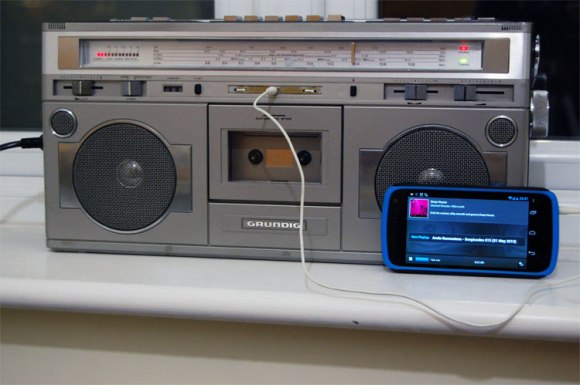
[Michael] just sent us this nice example of some good ol’ fashioned radio hacking.
He originally received the radio from his grandmother, and while he doesn’t listen to the radio much, he felt he couldn’t just let it go to waste. So like any good hacker he cracked open the case and took a look inside.
The beauty with radios from the 80’s is the simplicity of it all. They typically have single layer PCBs and nice big components which makes it so much easier to tinker with.
He used a bench power supply to bypass the main transformer for safety’s sake, and began probing the various points. The cassettes audio output was the easiest to find, but unfortunately it required the play button to be activated. Not wanting to lose functionality (or have an annoying rattling cassette mechanism), he continued probing and eventually found similar wires coming from the radio part of the PCB. Upon further probing he discovered he could trick the radio band button so that the radio would be off, but the output could still be used. After that it was just a matter of wiring, soldering, and adding an auxiliary plug to the case.
We’ve covered lots of auxiliary port hacks in the past, but this one is a great example of saving old technology from the dump.
[Thanks Michael!]


Saving old boom boxes from the dump? Shiiiiiit… they go for like $100 on eBay. A vintage ghetto blaster in its original box fetches a couple grand.
I wasn’t exactly saving it from the dump, but saving it from not being used and left in a cupboard. The thing definitely has sentimental value to me, so I wasn’t quite thinking of selling it, let alone dumping it.
I figured I was confident enough about my hacking skills to implement this without ruining it, so I just went for it.
I miss those old-school ghetto-blasters… there just isn’t anything comparable made today… although I have seen one that’s pretty much an immense iPod dock… but it’s not the same.
Gotta have that mechanical feel of the cassette player buttons. I’m really a fan of the sound of cassette players, I even made a high quality audio recording of operating one (the one in this very hack): http://instaud.io/el
Who buys these? In Europe they are 1$ at flea markets and probably free with another purchase because they take up space.
The belts might have rotten away but replacements can still be found.
On another note, I find the prices of the i-thing docks incredibly expensive. For the same amount of money (inflation adjusted) you could have bought a proper mechanical boombox in the days. Now it’s just some speakers, battery and a machine-assembled SMT circuit. And the same circuit boards are being recycled across a complete range of products.
Probably these docks are the cash cows for the big names (think Bose).
This hack was not realy needed ;)
On the third picture you can see the DIN-plug where he could have attached an adapter for his cable.
I actually tried hooking up my audio signal to those pins, but nothing came through. I suspect that is solely for recording external audio to cassette. Maybe I’ll pick up one of those adapters and see what it can do for me though. :)
I had a Panasonic Boombox (bought in 1981) that had RCA line in jacks. That were also active only during record. I added a small switch to cut off the motor (pressing pause muted the audio, so that wasn’t an option). I used it for several years with a turntable that way, until I finally bought an Amp.
This the pinout for that DIN connector?
http://www.electronics2000.co.uk/pin-out/dincon.php
I had a boombox (not even a very old one) that lacked an aux in. My solution, however, was to rip the entire thing apart and Frankenstein it together with a set of computer speakers, and pack the entire thing into a shoebox.
I always thought the ghetto blasters sounded weak… no bass of course. Plus who wanted to walk around with that big, ugly-ass thing on your shoulder?
Mo Fo’s in the Ghetto! That’s who!
An interesting follow on to this would be replacing the aux in with a bluetooth headphone built in for wireless operation.
I’ve been wondering if you could fit such a thing inside a casette…
They sell them already.
Built several for my wife now. We started with a modern one that went bad. Added line in to that (watch to make sure you get signal in before newer digital amp controls or signal stays the same. On older ones like this it is as simple as a jailhouse amp style patch in.and the actual solid state stuff helps make it a good bit easier. A big bonus that might not seem so obvious to the builder:older systems have waaaay more room inside to install.
Congrats on the build :)
I may submit my soft-open cassette nano touch as it was the pinnacle of my home tinkering design, with the ability to flip out the deck and then up the nano into place. It was all a little simple and mechanical for here so I never submitted it. Also I never take pics of projects, so gonna have to work something out lol.
Keep tinkering and way to go finding new life for a relegated object :)
It was pretty obvious to me I had a lot of room to work with. Single layer, through-hole PCBs also made my life quite a bit easier.
Another hobby of mine is photography (in fact, I put something together on a breadboard that’s photography-related recently; it uses an Arduino so HaD might be all over it, I digress) so I tend to just take pictures as I go. Helps that I think these old electronic guts look fascinating.
I’ll definitely keep tinkering away whenever I find the time, cheers. :)
Lol I am sorry I meant to the ‘attempted’ builder, my friend, not you that has been in the trenches already :) You definitely have me beat on tinkering in the cameras. I definitely cannot get in those tiny little spaces and would need a breakout box. While I got ya here though, any tips on capacitor discharge for a “shoot from the hip kinda tinkerer”? Those things definitely make me antsy…
Thanks again for an interesting write up and sorry about the confusion on the tone of my comment. Glad ya got something useful out of the box. As for the alternate input header- I think it is as you suggested and is for tape to tape dubbing (I miss those days lol). It would probably require the first deck to be put in play/pause to activate it (to ready deck two). You may have tried that though as all the magic of the tapedeck is indeed in the play/record functions :) Hope it helps and Cheers :)
While not much of a hack I always thought those old boom boxes would make interesting remote speakers for a house. Just add an FM transmitter to your aux out and tune the the radios to that channel.
I’m using Rocketfish wireless links for precisely that. RF receiver outs to boombox aux ins. Works like a champ!
You could probably find a cassette adaptor at a second hand store or on the net for like $1… you know – the thing that looks like a cassette tape but has cable a 3.5mm plug on the end and another tape head where the tape should be to act as a tranducer. you might have to make a very small notch at the top of the tape door for the cable, but thats about it.
I had one of those; it royally sucked. Maybe the one I had was just bad, but the signal that came through was just incredibly weak. That aside, it also requires hitting play on the cassette deck, and as mentioned, it’s quite a rattly one.
While more involved, I think this is a better solution.
I had one that worked really well as a hack for some PC speakers. I guess either quality varies, or yours was a bit broken.
Well I went to Walmart and bought a 5 dollar in line cable with a headphone jack and it’s the best hack ever it’s like an RCA cord that’s 6 foot long
mmende321@gmail. com i like to try doing it myself. but is there a link where it shows how to do this step by step so even someone like me can understand how to do it?
It’s amazing to do that. Do you charge to do the same?