Aux-in On A 30 Year Old Boombox

finished

[Michael] just sent us this nice example of some good ol’ fashioned radio hacking.

He originally received the radio from his grandmother, and while he doesn’t listen to the radio much, he felt he couldn’t just let it go to waste. So like any good hacker he cracked open the case and took a look inside.

The beauty with radios from the 80’s is the simplicity of it all. They typically have single layer PCBs and nice big components which makes it so much easier to tinker with.

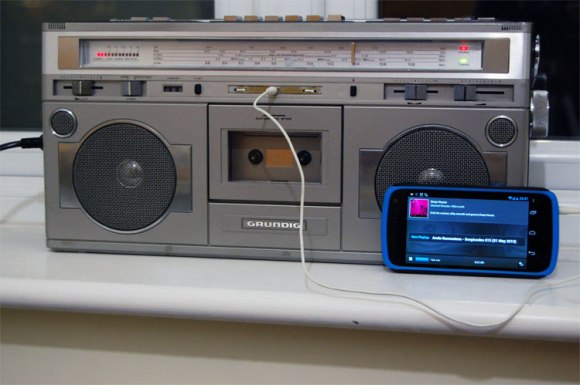
He used a bench power supply to bypass the main transformer for safety’s sake, and began probing the various points. The cassettes audio output was the easiest to find, but unfortunately it required the play button to be activated. Not wanting to lose functionality (or have an annoying rattling cassette mechanism), he continued probing and eventually found similar wires coming from the radio part of the PCB. Upon further probing he discovered he could trick the radio band button so that the radio would be off, but the output could still be used. After that it was just a matter of wiring, soldering, and adding an auxiliary plug to the case.

We’ve covered lots of auxiliary port hacks in the past, but this one is a great example of saving old technology from the dump.

[Thanks Michael!]

An Open Source Hardware Modchip

OSHW XenoGC Clone

Many Hackaday readers might remember the days of buying modchips from somewhat questionable sources. These little devices connect to a gaming system to circumvent security measures, allowing you to run homebrew games (and pirated games, but lets not focus on that). [Guillermo] built an open source hardware Gamecube modchip based on the XenoGC.

The XenoGC was a popular modchip back in the Gamecube days, and its source was released in a forum post. A Wiki page explains how to build a clone of the device based on an ATtiny2313.  Most modchips were closed source, but this project lets you look at how they work. You can browse the XenoGC source on Google Code to learn more about the exploit itself. You’ll find the AVR code, which manipulates the DVD drive over a serial interface, in the XenoAT folder.

[Guillermo]’s hardware is available from OSHPark, so you can easily order boards. He’s also hosted the design files on Github. With one in hand, you can start building homebrew for the Gamecube, which can probably be picked up for around $25 nowadays.

Explaining The Low Level Stuff You Don’t Know About ARM Programming

Most of us don’t realize how spoiled we are with the different development environments available on the internet. If someone wants to start a blank project on a new [ARM/DSP/…] platform, he usually fires up the dedicated Integrated Development Environment (IDE) and starts coding a C/C++ program. However, there are many initialization routines and scripts required with your program before it can run correctly. In his great article, [Andrew] explains to us what these are by starting a blank project without using any IDE.

As you can see in the above picture, [Andrew]’s project is made around an Atmel SAM4E microcontroller. The chosen toolchain is the arm-none-eabi-gcc from GNU Tools for ARM Embedded Processors. The first part of the article starts with a simplified explanation on how/why your code and variables are split into different memory sections (.bss, .data, .rodata, .text), then [Andrew] details how the linker script will put these sections at different physical addresses depending on your microcontroller’s memory layout. He also shows us how to take care of the stack placement, vector table, variable (non)initialization, and C Runtime. For information, the latter is executed when your processor starts, it is in charge of setting up the stack pointer, initializing the RAM, setting up the standard library and calling the main().

A very nice introduction on the very low level routines running on most processors out there.

Automatic Tool Changing On A 3D Printer

tool

[Luis] has a pretty interesting project on his hands. He’s using a delta 3D printer to plate a few edibles – yogurt, chocolate, and other thick liquids. Because he intends to use actual plates as the build surface, calibration is key. One solution to this problem would be to use identical, pre-measured plates for everything this printer makes. [Luis]’ solution is much more ingenious than that, however. He’s programmed his printer to automatically swap out two tools – one for probing the build surface, and another to extrude liquids.

The two tools are suspended from the body of the printer, and with a little bit of software it’s possible for them to be picked up by the head of the printer and held in place with a few magnets. After auto leveling the build surface in software, a G Code command switches the tools over to a paste extruder for all those delicious edibles.

If an automated tool changer isn’t enough, [Luis] has also completed a very nice 3D printed peristaltic pump to squirt out foodstuffs. You can check out a video of this printer in action below.

Continue reading “Automatic Tool Changing On A 3D Printer”

Retrotechtacular: Linotype Machines, Mechanical Marvels

For this week’s Retrotechtacular we’re looking at Linotype Machines; mechanical marvels that brought about the mass production of printed media.

It was a cold dreary day in 1876, when a German inventor living in America named [Ottmar Mergenthaler] was approached by [James O. Clephane], who required a faster way of producing legal briefs. Various patents existed for newspaper typewriters but they did not work very well, so [Mergenthaler] set to work on a new design. Traditionally type sets were cast on one machine, and stamped on another to create the text. On a train [Mergenthaler] thought, why not just combine the machines? And with that the idea for a revolutionary machine was born.

The Linotype Machine has a library of matrices, which are character molds that create the slug — the name for a cast line-of-type. The operator uses a keyboard to input the line of text, which then releases the matrices of the corresponding letters. These are then transferred to the casting station, where type metal is cast into the matrices in a process called hot metal typesetting. The matrices are then returned to the library, and the cast lines of text are cooled, removed, and used for stamping in the mass production of printed media. It sounds simple enough, but now realize the entire machine is mechanically automated; as long as you keep filling it with type metal, you can continue producing slugs simply by typing on the keyboard.

The machines were used from the late 19th century all the way up to the 60’s and 70’s until they were replaced by more efficient offset lithography and computer typesetting.

After the break, check out the fascinating documentary from the 1960’s, you will marvel at the mechanical workings of the machine. If you don’t have 35 minutes to blow, at least check out 1:30 to 6:45 for the basic overview. But you probably won’t be able to stop watching.

Continue reading “Retrotechtacular: Linotype Machines, Mechanical Marvels”

Stealth Peephole Camera Watches Your Front Door

In this week’s links post we mentioned an over-powered DSLR peephole that purportedly cost $4000. So when we saw this tip regarding a relatively inexpensive digital peephole, we thought some of you might be a bit more interested.

The hardware is quite simple; a decent webcam, a Raspberry Pi, and a powered USB hub. The camera gets stripped down to its PCB and hidden inside the door itself. Even if you see this from the inside it’s just a suspicious-looking wire which wouldn’t make most people think a camera was in use.

On the software side of things, [Alex] set up his Raspberry Pi as a 24/7 webcam server to stream the video online. Unlike using a cheap wireless CCTV camera, his video signals are secure. He then runs Motion, a free software motion detector to allow the camera to trigger events when someone comes sneaking by. It can be setup to send you a text, call you, play an alarm, take a picture, record a video… the list goes on. His blog has a full DIY guide if you want to replicate this system. We just hope you have a stronger door!

We covered a similar project back in 2011, but it had made use of real server instead of an inexpensive Raspberry Pi.

[Thanks Alex!]

High Pressure Air Compressor Using A Pair Of Refrigeration Compressors

[Ed] from Ed’s Systems, aka [Aussie50] took some time to demo his high pressure Frankenstein air compressor he stitched together from two refrigeration compressors. The two Danfoss SC15 compressors can produce upwards of 400psi and can run all day at the 300 psi range without overheating. The dual units may get up to pressure quickly considering the small accumulator “tank”, but high CFM isn’t the goal with this build. [Ed] uses the system to massacre some LCD panels with lead, ball bearings, and other high speed projectiles shot from a modified sandblasting gun. Just a bit of air at 400 psi is all you need for this terminator toy.

Don’t think the destruction is wasteful either; [Ed] strives to repair, rebuild, reuse, repurpose and a few other R’s before carefully separating and sorting all the bits for recycling. This modification included lots of salvaged hardware from older teardowns such as high pressure hoses, connectors, accumulator and pressure cutoff switches.

At first it seems strange to see something engineered for R22 refrigerant working so well compressing air. Morphing refrigeration systems into air compressor service is something [Ed] has been doing for a long time. In older videos, “fail and succeed”,  [Ed] shows the ins and outs of building silent air compressors using higher capacity storage tanks. Being no stranger to all variations of domestic and commercial refrigeration systems, [Ed] keeps home built air compressors running safe and problem free for years.

Don’t think this is the only afterlife for old refrigeration compressors, we’ve seen them suck too. You’ll get a few more tidbits, and can watch [Ed’s] video overview of his home built compressor after the break.

Continue reading “High Pressure Air Compressor Using A Pair Of Refrigeration Compressors”