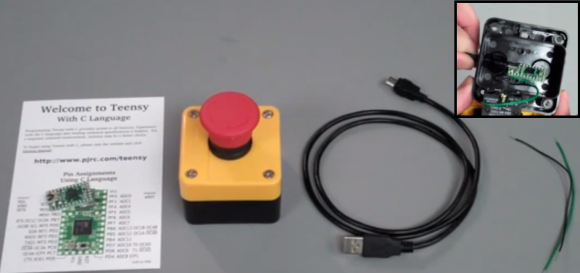
When you’re writing code for your next big creation, chances are that you build/debug the project 100’s of times a day. Sure, the keyboard hotkey gets the job done, but is it really that satisfying? [Victor] sends in this quick project on turning an Emergency Stop Push button into a ‘Build’ button.
From the looks of it, this project uses a Teensy 2.0, which sports an ATMEGA32U4. Since this part features a USB controller, it is a piece of cake to get it to mimic a keyboard. The circuit is also very simple; the pushbutton contacts are wired from ground to a digital input. On detection of a ‘press’, the Teensy will send out the keyboard combination to build your project: Ctrl-B, F7, etc… If you prefer working within the Arduino IDE, this could upload sketches as well (Ctrl-U).
Adding a little fun to ‘building’ your projects does come at a cost though. Besides forfeiting a Teensy, you also have to give up a precious USB port. [Victor] does mention Bluetooth, but that could break your budget for this sort of project. A possible alternative to the Teensy could be to implement Virtual USB on a low-cost standalone Arduino.


I so want this!!! So much cooler than pressing F7 key in the keyboard.
Code(code code code)
{
code code code;
}
and then?
http://www.youtube.com/watch?v=k4SUl69RFJ8
+1 for Ghostbusters
It would make more sense to use a momentary push-button though, the e-stop models lock into place when pressed.
He actually spends 90 seconds modifying the switch to remove the locking action, turning it into a momentary switch.
http://www.adafruit.com/products/1535 would be an easy way to connect this to Bluetooth.
another alternative: use a vusbmicro, can be built on stripboard for about 5$ https://metalab.at/wiki/Vusbmicro
I did the same thing, only I used an antique telegraph key mounted on a wood box I found. The Teensy is located in the box.
http://pic100.picturetrail.com/VOL1095/4098112/23517451/408576051.jpg
Yours is much cooler.
Agreed!
The concept is very cool and I NEED one at work. I would have already used it a dozen times this morning! There would be a certain satisfaction from smashing a button to start a compile.
Couldn’t something similar be executed with a hacked up USB mouse and some software (either existing or purpose-written) that emulates a key-press/key-combination?
You could do it by hacking a keyboard. You just need to find out which two wires are shorted by pressing F7.
Here’s a starting point http://www.jbprojects.net/projects/mame/mame2.php
I was thinking the exact same thing.
Me 3. If you wanted to hold Ctrl down, or whatever, use a double-pole pushbutton. They make them. Or mechanically arrange 2 buttons together. Or, possibly least-good solution, reed relays connected to the key matrix, with a magnet on the button.
Taking apart an existing keyboard must be cheaper and simpler, especially if you’ve got a broken keyboard that still has working electronics.
I tend to disagree. You’d spend more time figuring out what to join together on the keyboard than it would do to cwrite a few lines of code on a micro.
Maybe, maybe not. Between getting everything wired up and together one way or the other, I don’t think programming a micro would be obviously quicker. Figuring out the matrix is easier if you still have the keyboard mat, and if three pins in a row give A S D then you can pretty well predict that F G is coming next. You can figure out which are rows and which are columns by looking at where the connections from the mat come in.
And a keyboard PCB is something you might have hanging around the place for free.
Stealing an idea from the continuous integration world, you could add a red/yellow/green stack light ( http://en.wikipedia.org/wiki/Stack_light ) to show the status of the build. Or use a lighted mushroom switch and blink the LED 50% duty cycle blinking when building, 10% duty cycle when successful, and solid red when a build fails.
This would also be a good application for an old router running OpenWRT.
it needs a solenoid to fling itself off the desk when the build fails!
A little thermal receipt printer with compiler errors would be too awesome! Pointless yes. But awesome. Awesomer would be implementing a compiler in a box like this. Upload your code to the box through a USB mass-storage interface, wait for the “ping!” from an actual small bell, then download the object code, or read the errors from the printer.
Can the GNU compilers that run on ARM generate x86 code? Cos I just think it’d be awesome to have a compiler you could pick up and rest on your desk. Maybe with a key switch and a big emergency button too.
True, I guess for me, I have a tub of attiny85’s and a programmer right there too. Gutting a keyboard would be more painful for me. Each to their own. There are a million ways to skin a cat, and if someone has done it the other way with a keyboard I’d love to read about it.
Reprogramming one of those throwaway promotional webkeys would be a neat way to accomplish this as well.
This is going on my “to build” list! If the USB port is a concern, how about having it ping a web service to trigger a build? That way you could also get feeback for things like status lights, plus you wouldn’t need to worry about whether or not the correct window has focus.
Why not a knife switch? :)
Cos that’s mounted to the case already, in place of the power button.
I had something rigged up like that with a spare Arduino once. I took the roundabout way of emulating a keyboard by having it write button press events to the serial console and running an application on the host computer that emulated a keypress.
I eventually gave it up because of how unreliable the Windows drivers for Arduino are… :(
I would have thought wiring the button to the F5 (or whatever) key on one of those cheap, small, smartphone bluetooth keyboards would be a good/easy solution while still fitting in the housing.
If you build one of these, PLEASE don’t have it anywhere near any kind of heavy machinery. When someone gets stuck in the machine and presses your button and nothing happens, you will have a lot to explain to the police and the relatives of the guy who was just killed.
Alternatively, repaint it so it’s not yellow+red.
very good points. then again I doubt one would find much in the way of heavy machinery in a cube farm.
“Precious USB ports”? Apple may value “sleek lines” over practicality, but all my home built Lin-tel desktops and store-bought win-tel laptops have plenty of usb ports…
Every pound shop (“dollar store”) I’ve ever seen has 4x USB multipliers for sale. Not very good ones, but good enough for 1 button.
Also good for memory card readers and CAT5 cable. Possibly crappy CAT5 cable.
I came here to say dude, it’s called a number 2 Phillips. You’ll do far less damage to your screws and screwdriver that way.
Now to add “Step Into” and “Step Over” as arcade buttons.
Great idea. Two large buttons.
Well, I have 3 of those buttons left over from a “Jeopardy” project I never completed, so now I have another project (to not use them in B^)!
It’s weird seeing this here as I’ve got the same kind of emergency stop button on my desk at work, set up to lock my PC when I press it. I need to get around to documenting it on my website (the article is written I just need to take some better pictures!) I used a PIC 18f14k50 and slightly modified Microchips HID example code (I couldn’t get my head around writing it myself) to send the windows key + L key combination when pressed. I made it because I’d always wanted to have a big red button for something, and because I used to forget if I’d locked my workstation, but I always do now as everyone loves hitting one of these buttons!