
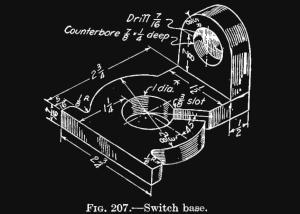
Brian has graciously allowed me to hop on the 3D Printering bandwagon to write a brief intro to the wonderful world of Solidworks. We’ll be making the same ‘thing’ as done in the previous ‘Making a Thing’ tutorials:
- OpenSCAD
- AutoCAD Part I
- AutoCAD Part II
- Blender Part I
- Blender Part II
- SketchUp
- Autodesk 123D
- FreeCAD Part I
- FreeCAD Part II
Admittedly, most Hackaday readers probably don’t have Solidworks as it is a very expensive program. The main reason we are posting this tutorial is so that you can understand the work flow and compare it to some of the free/open packages out there.
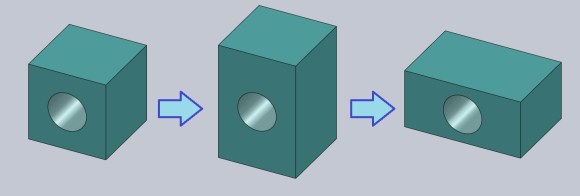
As Brian has touched on in his FreeCAD post, the part features of parametric models can be modified at any time. For example, let’s say I made a solid block, then added a specific size hole in the center of one face. Later, if I wanted to change the size or shape of the block, the hole would stay the same size and stay in the center of that face no matter the other changes to the object. See the graphic below, all that was changed was the size of the block, the hole stayed the same size and position (center of the face). This is different than if you were to ‘scale’ the entire object as the hole would also become stretched along with the block.
Getting Started
Between school and work, I’ve had the opportunity to use several professional parametric modeling softwares, including ProE (now called Creo), NX (was Unigraphics) and, of course, Solidworks. They are all similar in work flow. If you remember these 4 steps, you’ll do ok: Plane, Sketch, Dimension, Extrude.
There are 2 main tabs we’ll be using in this example, the Feature and Sketch Tabs. They have all the tools we’ll need to make the sample part.
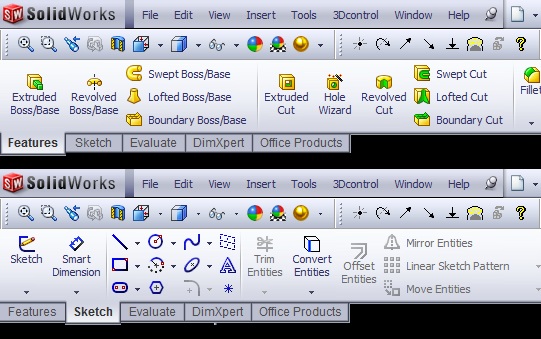
Let’s create a new part, File then New. A window will pop up asking what file type to make. We are just making a single part so we’ll pick ‘Part’.

Plane
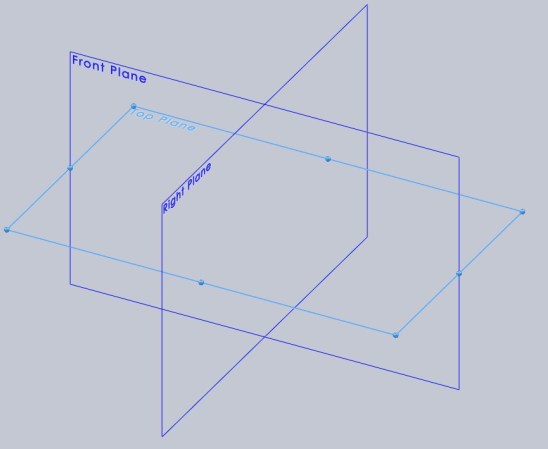
You’ll start with a screen showing empty space, this is where the object will be created. There are 3 planes, in the graphic below I have clicked on the Top Plane to select it. Why? Because ‘Plane’ is our first of 4 steps! We are selecting the plane (or surface) that the sketch will be drawn on.
Sketch
With the Plane still selected, click on the Sketch Tab and then select Sketch. The view will move to be perpendicular with the Top Plane. We are now in Sketch Mode and will be able to make a sketch of a portion of the part. I have decided to sketch the bottom portion of the part first, the one with the hole and slot. It is just as easy to start with the back portion of the part.
The best part about sketching in a parametric program is that you can just sketch it without worrying about size or proportion. We will dimension the sketch after it is complete. To show you what I mean, I am going to intentionally make a really out-of-proportion sketch.
All of the tools we need for the sketch are on the sketch tab. For this sketch I’ll be using the line, centerline, circle, trim and fillet commands. Sketching at this point is very similar to any 2D CAD software with the exception that you don’t have to worry about the dimensions at this time. Just make it look close.
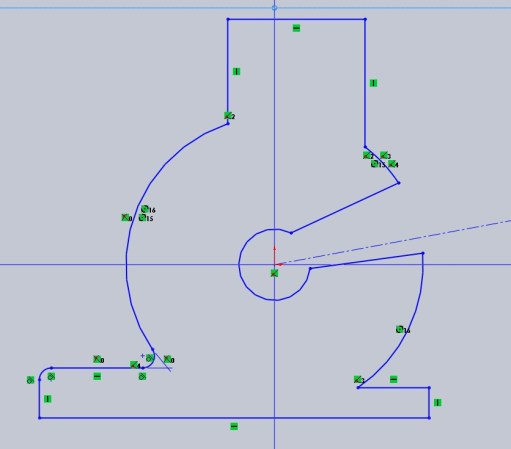
Well, isn’t that one ugly part! Ugly but totally acceptable. Notice that I intentionally left the inside and outside fillets off the bottom right leg of the part. I did this so we can add them after the part is extruded into a solid, just to show another way of doing something. Also notice that I made the circular features concentric with the intersection of the Front and Right Planes. This is a personal preference but I think it makes dimensioning a little easier as I can dimension features in relation to both of those planes, which also happens to be to the center of the circles. The dashed line coming from the center of the hole is a centerline and will define the angle of the slot. The centerline won’t become a feature of the part, it is just a reference. Later, I will make the slot edges parallel to this centerline, a certain distance away.
You can see a bunch of little green boxes all over the sketch. These are the relations of each feature. Each symbol means something. The vertical lines mean that the adjacent feature will always be vertical. The circle with a line means the arc is tangent to the line and will always be. Two lines and a red dot means that the two adjacent lines share an end or mid-point.
Dimension
Our sketch now needs dimensions. On the Sketch Tab there is a tool called Smart Dimension. Select this to start dimensioning the part features. Here’s how you do it:
- To specify a distance between 2 parallel lines, click on one line, then the other line. A dimension will appear, move the mouse to where you want the dimension label and click to place it. Enter the distance in the dialog box that pops up and the lines will move to satisfy the new dimensional requirement.
- To specify a radius of an arc or diameter of a circle, click on the curve and place the dimension. Then type the value.
- To specify and angle between two non-parallel lines, click on one line, then the other. Place the dimension and enter the desired angle value.
- To add a relation, like specifying the slot edges to be parallel with the centerline, select one of the slot edges, then select the centerline while holding SHIFT. The Add Relations option will show up on the left of the screen. Select Parallel. You can see all of the available relation options. Notice after completing the command that the two lines are now parallel as well as two green parallel relation indicator boxes showed up. FYI, you can not be in the Smart Dimension function when adding relations.
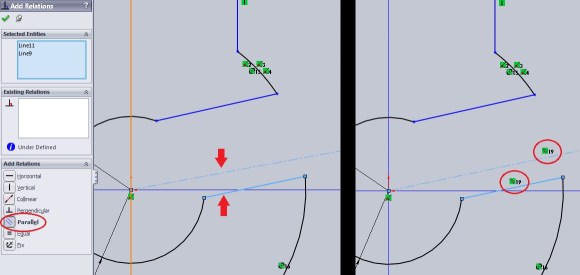
Keep going with the dimensioning and you’ll end up with something like the below graphic. Notice that some of the sketch lines were blue but are now black. A black line means that it is fully defined regarding its location and size. This is a good thing and prevents unexpected and inadvertent geometry changes in the future. A completely black sketch can be referred to as ‘fully constrained’.
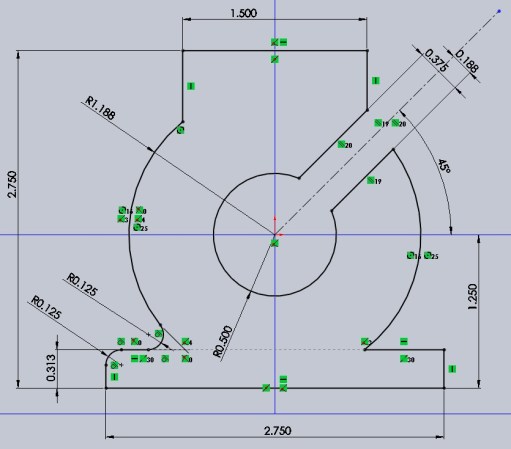
The sketch is done. Click Exit Sketch on the Sketch Tab.
Extrude
This is the fun part. You can now see the sketch on the top plane and a new line item in the Model Tree on the left called Sketch1. If we need to change anything on this sketch (even after the model is created) we can do that by going back and editing Sketch1.
Click on Sketch1 in the Model Tree to select the sketch. Then on the Feature Tab, select Extruded Boss/Base. A dialog box will pop up asking how much to extrude the sketch. Enter the desired amount and click the green check mark.
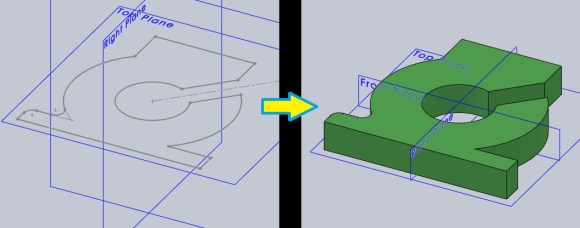
Done Deal! ….for this portion at least. In Part 2 (not yet published) we’ll get going on the rest.
If you would like to waste 4 minutes of your life, here’s a video:
3D Printering is a weekly column that digs deep into all things related to 3D Printing. If you have questions or ideas for future installments please sending us your thoughts.








Step one. Get 7000 USD.
Step two. Give 7000 USD to a Solidworks Licensed Distributor.
Step 3: Do it again next year.
Step one and two. “Obtain” Solidworks.
Step three. Install HSMWorks – Free edition.
Step four. CNC BLISS
I didn’t know or had heard about HSMWorks. It is a CAM add on package for solidworks with visual tool path simulation and gcode output.
The HSMExpress version is free for simple 2.5d milling. The pro version supports all the way up to 6 axis machining and lathe work.
I’m going to have to give it a try and see how well their machine post processors work.
The student / educator edition is only 150 USD, but it must be renewed every year.
As a student at an Engineering College, we have a site license and it’s $5 for a DVD at the bookstore.
and you must be in school…
L2Torrent fuckthepolice.
I wonder how many trained-for-free professionals they lost to other CAD offerings just because they charge US$ 7,000 unless you are in school.
a few will torrent, the others will use saner alternatives that may or may not be as good.
But when it come the time for those people to set up shop, had they be using the a free version for personal use, the company would now have an instant $7000 in their pocket.
people who torrent software for personal use also torrent for professional use. So they are losing 100% of the honest client base.
$7000 is peanuts in the engineering world, and while I may torrent for personal use, it isn’t worth the risk in a business situation. where employees bill out at $100-$200/hour.
What kind id engineering job nets you $100-$200 per hour?
…And are there any openings left for me?
I bill my time out at $135/hr, after hours or a rush job gets a $50/hr premium on top of that.
Jeeeh, 40 weeks of that would be great…
I use Solidworks and Solidcam on a daily basis. For me nothing else I’ve tried even comes close.
Same here. I was lucky enough to have access to it in high school for our robotics and drafting work and haven’t been able to find anything else that even uses the same design techniques.
I don’t care if it does all the simulation, sheet metal, complex/simple versions and other complicated stuff, I just want a 3D editor where I can go back and change a base dimension and have everything re-calculated and have something similar to the “assembly” mode where things can move.
Funny part about that is that the 123D beta was almost getting there but then they nerfed it all when going out of it. made me mad because the beta was a better product than they released/
ah yes, the microsoft intervention on autodesk. once you go microsoft money, you don’t go quality software.
I’m not familiar with this story. What did Microsoft do?
Faster, easier and more intuitive than dicking around in blender or sketchup.
While what you have shown is a good introduction, it is very bad modeling practice. Pro-tools such as solidworks are feature based so that it is easy to modify individual elements easily. Putting all of the features inside a single sketch really hurts this ability, once you get beyond single feature parts. What you should have done is start with the circle with a rectangular base in a single sketch, do the fillets and the cut notch in separate features.
I second what robogreg said. Creating the model in this fashion makes it very cumbersome to edit should the design change.
I’ve been using SolidWorks 18 years, and I fully agree with this statement.
I’ve been using solidworks for slightly over 8 years (starting in my Mechanical Engineering education) and I sincerely DON’T agree with this statement. As long as a single sketch can be easily read, reducing the number of features keeps the eventual assembly much easier to put together and much faster for the system to actually solve all the constraints.
IMHO there is no practical advantage to making the flange and slot in a separate feature. The feature tree allows you to just as easily go back to editing a sketch as it does going back to edit a feature. All base “parts” that are on a single plane can be sketched out in a single sketch.
Although I will add that adding fillets and chamfers should be the very last features you add and should never be made in a sketch!
I’ve been using Solid Modellers for 17 years, and I agree with justduch. If you’ve constructed, constrained and parameterised your sketch properly, edits are often much easier if it’s done in a single sketch than in a bunch of separate features. If you don’t or can’t do your sketch properly, I can see how doing it in separate features seems better and easier. It isn’t.
Keep in mind that when you start a part for 3D printing, you’ll want to use the Front plane as the print bed (or at least a plane parallel to Front). When you export to STL and import to print (at least in Repetier Host), it automatically inserts the part in that direction. You can rotate it while importing, but sometimes it’s just easier getting the orientation from the start.
step one, learn how to spell.
There is NO such word as “Printering”.
Before trying to teach people how to do make stuff, start off by learning the english language, and the use of autocorrection.
Muppets.
When is someone going to do an example in DesignSpark Mechanical?
Mainly because I still can’t figure it out.
you do realize that it is a word that they made up, to specify the act of using a 3d printer. People make up words all the time. You must be Cray Cray to think they can’t have any editorial liberty.
invent a word. free SEO, bitches.
typed submit too soon…
… in other circles, it is called branding.
I really hate to feed the troll, but YouAreMuppets they actually asked for a better name: http://hackaday.com/2013/08/07/3d-printering-remote-control-of-3d-printers/ “. Great wordsmiths we are, we’re calling this column ’3D Printering.’ If you have a better name (or a title pic) send it in and we’ll probably use it.” If you have a better name, submit it.
Step One: Learn how to capitalize before criticizing others. It’s “English,” not “english.”
You could try this one it’s like solidworks but the elements version is free for hobbyists. I found it pretty much does everything you want.. http://www.ptc.com/product/creo-elements-direct/modeling
Seriously? Pro-Engineer/Creo is the biggest 3D modelling crap I have seen, no wonder that they are giving it for free – too few people want to use it. I had to use it in school and it is most user-unfriendly application I can imagine (no comments in command line on what am I expected to do for particular function, help also sucks; that app is total nightmare to learn it even for a person with 3D modelling background), Inventor and Solidworks are usable, my preferrence is SolidEdge.
“my preference is SolidEdge”. Mine too. It always surprises me how under the radar it is vs Solidworks and Inventor. It’s just so much quicker and modelling is more robust.
Has no-one heard of Rhino3d? Its amazing. Does everything that Solidworks does, has a fine scripting engine built in, and imports/exports into just about any format you can think of. Full retail is $995 while student is $195. The eval version will let you learn for as long as you want as long as you don’t save more than 30 times. I had it on a machine for years, doodling and learning how to use advanced feature before plunking down the money… The only software I have ever bought from my own pocket.
Pro/E may be more difficult to work with, but it will give you choices (unlike Solidworks, where it took 20 years to invent some of the most basic functions and mirror components is still broken after 5 years)
@Rhino: as far as i know Rhino is /not/ parametric, so it is far from being a CAD system, but has amazing surface tools
Rhino is parametric. Grasshopper is the parametric interface for Rhino.
Grasshopper+Rhino may be parametric in the absolute sense, and they’re very clever too. But they are virtually useless in the workflow for designing and making everyday machines and products. They are still far from being a CAD system.
I second the Rhino request and Designspark Mechanical
While Rhino is very good software and reasonably priced, if you think it “does everything that Solidworks does”, you don’t know what Solidworks and other solid modellers actually do and are useful for. Rhino is great for visualisations, but it’s as useful as a chocolate teapot for designing parts and devices that actually do anything useful.
Could you do a couple of posts about making this same part with Alibre/Geomagic Design? I feel that is a more viable alternative for most of us than Solidworks. I know it even uses the same parametric engine.
SolidWorks, SolidEdge and Alibre is very similar in the workflow and user interface. You shouldn’t have any problems doing the same thing in Alibre.
Hi what about Inventor it is the best mechanical software and I also work in 3dmax. There is nothing that beats it.
Regards
Nick