
3D Printers are only good for printing trinkets and doodads, right? Not really. Although, I do print the occasional useless object, most of my prints are used for projects I’m working on or to meet a need that I have. These needs are the project’s design requirements and I’d like to share the process and techniques I use when creating a functional 3D object.
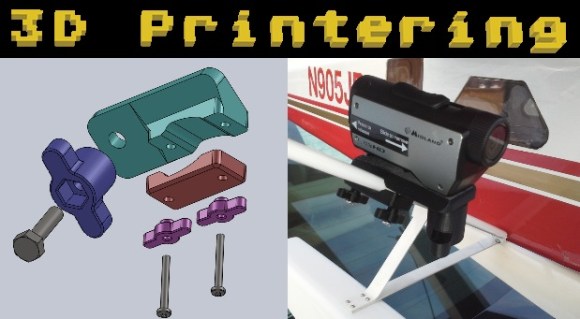
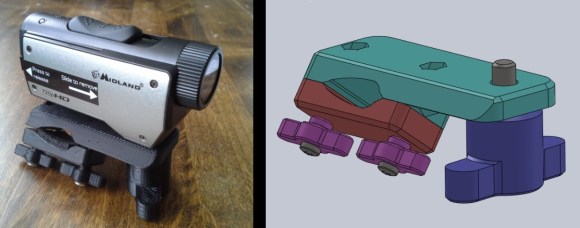
My pal [Toshi] has RC Airplanes and flies often. I have an Action Camera that I never use. Why not combine the two and have some fun? The only thing standing in our way was a method to mount the camera to the airplane. 3D printing makes it easy. If you have a popular vehicle or application, there may be something already available on a 3D model repository like Thingiverse. Our situation was fairly unique I decided to design and print my own mount.
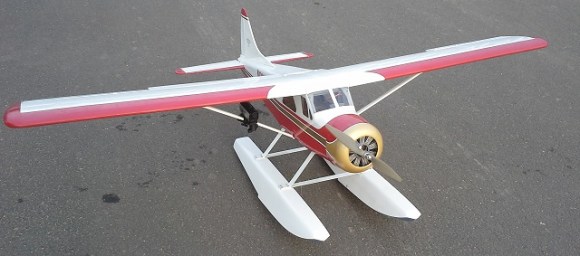
Let’s start with the camera placement. Looking at the plane, there are two pretty obvious spots that would be good places to mount the camera; on the wing strut or the cross-bar between the pontoons. Certainly mounting the camera to the rectangular pontoon cross-bar would have been far easier than on the angled airfoil-shaped wing strut, but after giving it some thought, mounting on the strut would give a better view of the aircraft. I wanted part of the plane in the field of view.
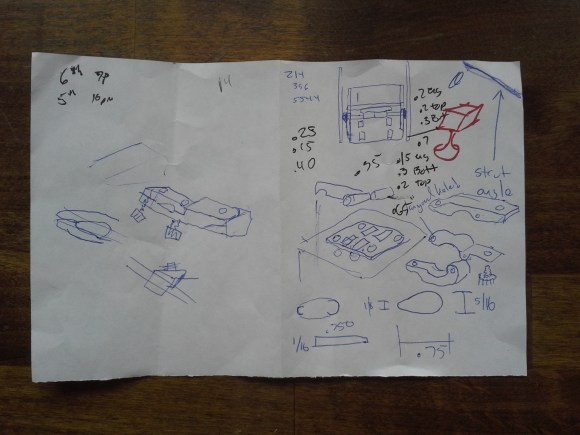
Now we have an idea of where this thing is going to mount we have to take some measurements and make some notes. As you can see below my notes are super crude (and may have some extra doodles on there) but have the necessary information I need to design the camera mount. If you look hard you can even see I have a couple of brainstormed mount ideas, including a hinged design I determined would be unnecessarily complicated.
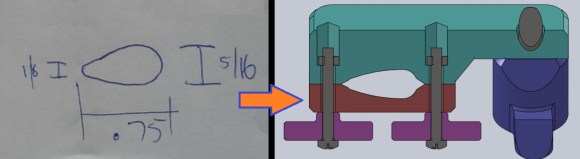
The wing strut is soft foam-filled plastic and is in the shape of a teardrop. To prevent damage to the strut when the camera is mounted, the shape of the mating portion of the clamp should be similar in shape. To do this, I just measured the length of the strut profile and both the thickness of the leading and trailing edges. These dimensions were used when creating the profile of the cutout in the clamp. Notice, I also added some chamfers at the leading and trailing sides of the cutout to prevent any potential pinching.
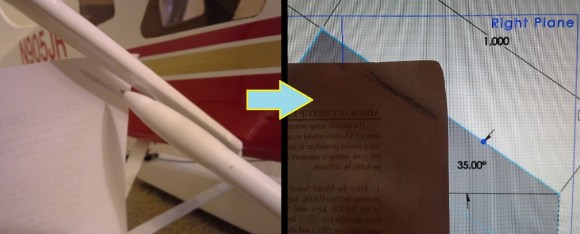
Keep It Simple, Stupid. Sometimes low-tech is the best way to go. The wing strut is at some angle, an angle I don’t know. I want the camera to be square to the ground, not angled like the strut. I used a method similar to a storey pole to record the struts angle and emulate it in my modelling software. With the plane on the floor a piece of paper was held with one edge also square to the floor. The angle of the strut was traced on the paper. At this point it is possible to measure the angle with a protractor but I just held it up to my computer screen and adjusted the angle of the mount until it matched my trace. Low-tech but effective.
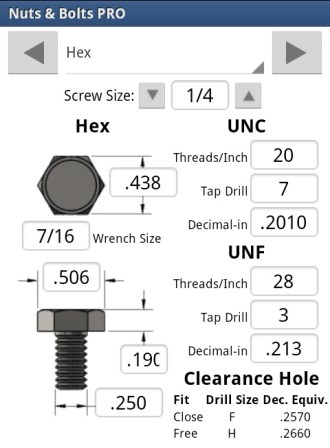 It is pretty standard for cameras to have a 1/4″-20 female thread on the bottom for mounting to a stand. My camera was no different. The main mount is going to have a through-hole in it for the attachment screw to pass. Having a 1/4″ hole and a 1/4″ screw is going to cause some assembly difficulty, specifically the screw not easily going through the hole, able to turn freely or causing misalignment. There are industry standards for this exact situation, Google “clearances hole sizes” to find out what is appropriate for your screw size, there are a lot of charts available out there. The projects I work on require me to reference this type of information quite often so I downloaded a great app called ‘Nuts & Bolts‘. Notice on the bottom right of the screen it shows the clearance hole sizes. I’ll be using the free fitting recommendation, 0.2660 inch diameter.
I could have just had a hole in the main camera mount and screwed a bolt in to secure it but a design requirement was that no tools would be required for installation or removal. A 3D printed knob would do just fine. I had some 1 inch long 1/4″-20 bolts kicking around so that is what I decided to use. Since the bolt was so long, it would bottom out in the camera before it secured the camera to the mount. That extra length will have to be compensated for when designing the knob.
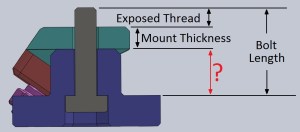
The depth of the female threaded hole on the bottom of the camera measured to be 0.200 inches. Since the intent is to NOT bottom out the screw before the camera was secure I backed off this measurement to 0.150 inches for use in the calculation:
BoltLength - ExposedThread - MountThickness = KnobThickness
 1.0 - 0.150 - 0.300 = 0.550 inches
0.550 inches is how long the spacer portion of the knob will be.
There are two knobs and 3mm x 25mm screws that are used to secure the camera mount to the strut. I made knobs for the screws the same way I did for the main camera screw. The main difference is that these screws didn’t have a hex head to transmit torque and prevent the knobs from spinning on the screws. The holes in the knobs were made to have no clearance at 3mm in diameter and the screws were glued into the knobs for a permanent installation.
These 3mm screws engage captive nuts in the main clamp body. I used ‘Nuts & Bolts’ again to find out both the clearance hole size for the 3mm screws and the hex size of the 3mm nuts. The main clamp body has hexagonal recesses a little larger than the nuts, the nuts of which are glued in place.
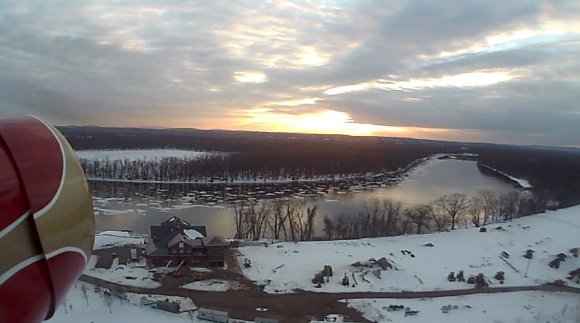
Overall, I’m extremely happy with the final result. Installation to the aircraft takes only a few moments and is very secure. The mount location turned out to be in the perfect spot showing just a touch of the engine cowl. And the best part is it didn’t drop the camera! Check out the video of the maiden joy-ride below.
3D Printering is a weekly column that digs deep into all things related to 3D Printing. If you have questions or ideas for future installments please sending us your thoughts.


Like a 3d model repository like thingiverse or Repables.com ;D
I really really like the tracing the strut on paper and then holding it up to the monitor technique. It’s the perfect mix of ghetto and actually works. Haha.
Ha, yep. A while back while working on some UI stuff for the application I develop, I kept having things get out of alignment when the form maximized. I ended up taping a damn ruler to my monitor.
Very nice article. Thanks.
Should you consider securing the knobs against loosening?
For reference: http://sesam.doena-soft.de/Schraubensicherung2.gif