For how often the Raspberry Pi is used as a media server, and how easy it is to connect a bunch of LEDs to the GPIO pins on the Pi, we’re surprised we haven’t seen something like Hyperion before. It uses the extremely common WS2812b individually controllable RGB LEDs to surround the wall behind your TV with the colors on the edges of the screen.
One of the big features of Hyperion is the huge number of LEDs it’s able to control; a 50 LED strip only eats up about 1.5% of the Pi’s CPU. It does this with a “Mini UART” implemented on the Pi running at 2MHz.
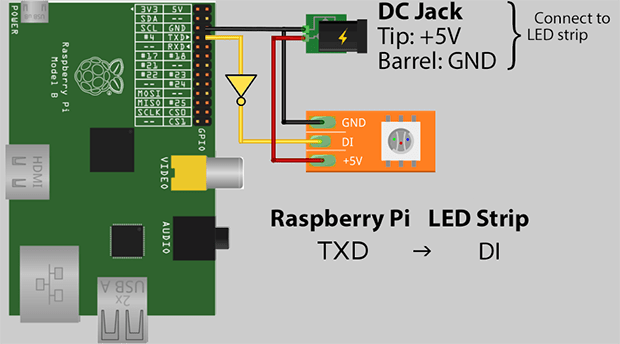
There’s only one additional component needed to run a gigantic strip of RGB LEDs with a Pi – an inverter of some sort made with an HCT-series logic chip. After that, you’ll only need to connect the power and enjoy a blinding display behind your TV or monitor.
Thanks [emuboy] for sending this one in.


It’s not new (search for BOBLIGHT for example), BUT it seems, that this time they use the Rasp to analyze the image – making it a true Ambilight-clone. Or it’s just better code… :-)
I for one suspect that the recent revealing of the DSP’s source is the base for this.
Good thing that I still have a roll of LPD8806 LEDs here :-)
Pretty sure we have seen stuff quite a lot like this before, even using the Raspi to analyse the image. I recall stuff featured here that was at least very similar. Still, a new way of doing it’s always welcome.
Not sure where you get the 2MHz rate from, is that just the CPU’s clock frequency multiplied by the 1.5% usage? Or does it mean something else?
They’re abusing the UART to convert 2Mbit 8N1 to look like the goofy 400kbit signal the WS2812 uses.
I bet they’re sending either the bytes 0x08, 0x0E, 0xE8, 0xEE, which will be two bits of the WS2812’s format, 20% or 60% duty cycle.
Braino. I meant 0xC[8E] instead of 0xE[8E]
Ah!
Yeah they’ve it’s been around nearly as long as when xmbc was ported, had some sitting around for a while might be time to finish it
“an inverter of some sort made with an HCT-series logic chip”
Unless I missed something, a signal transistor and a couple of resistors should do the trick.
Once I was going for “a single transistor” I think I’d just use a 74’1g04.
Why? Harder to get and more expensive than a cheap transistor (eg. BC549) and a couple of resistors.
Plus if you’re buying a stock of them, a transistor is definately useful in a wider number of applications than a single inverter IC.
More compact, either sharper transitions or less dependent on exact hFE of the BJT, lower power consumption, same cost when the resistors are factored in (at least, whenever I look for quotes of equal quantity)
For a small DIY job I’d call the compactness a disadvantage – harder to work with.
“either sharper transitions or less dependent on exact hFE of the BJT”
True to an extent, but I don’t think it’s a major concern in this design (not that I’ve used addressable LEDs)
“lower power consumption”
When you’re powering tens of LEDs, I don’t think a milliamp or two here or there in the inverter circuit really counts as significant.
“same cost when the resistors are factored in (at least, whenever I look for quotes of equal quantity)”
None of the electronics stores Iuse stock these Inverter ICs, so I’m just going by Element 14’s price which is $0.10 cheaper in single quantities than a single transistor and two resistors from my usual electronics store. I’m sure you could find both options cheaper, but I don’t get the point when a transistor and two resistors is so much more versatile (so you can buy in bulk more hapilly anyway).
Plus a BC549 can give you 100mA output current compared to 32mA, and a far wider operating voltage range.
Umm, make that $0.10 more expensive for the IC. $0.44 compared to $0.34
I’v never had a problem running WS2811 direct from ~2.0V mCU GPIO. Their internal buffers appear to be pretty sensitive so no external logic level conversion needed – at all.
Or use this: http://www.electrobob.com/ws2812-level-translator/
Is there any reason you couldn’t just tap off the 5V pin on the RasPi to power the LEDs? Too much current draw?
Yeah, current is the issue.
Keep in mind the raspberry Pi is designed to powered from a 1amp 5volt smartphone charger and as such it isn’t designed to conduct much current on the 5volt trace.
What about the other way around – powering the Pi from the same PSU that runs the LEDs?
that should be perfectly valid, just keep in mind that the 5v gpio pin bypasses the fuse input
I power my pi from a scavenged PC power supply which also powers whatever else is going on. I cut a usb charger cable and wired it the power supply’s 5v and ground so that it plugs into the pi without bypassing the fuse.
It isn’t just the ws2812b, it can use a number of LED Strips, also it uses the dispmanx in the Raspberry Pi firmware (thought you might want to mention this) with XBMC. Also has a JSON interface, can use V4L Devices, Compatible with boblight, has android app and a web interface to change static colours and load effects. With a little research you could of made a good article about it.
yes we have seen similar as recent as August 2013. There was an ARM based unit too a little earlier. Just use the site search for Ambilight.
http://hackaday.com/2013/08/05/no-computer-ambilight-clone-uses-a-computer/
I can’t see much difference between this and a bunch of other projects that I’ve seen, although they may not have been covered on this site yet. The only distinguishing factor that I see is that it uses WS2812b instead of the WS2801 LEDs that most people choose. PiBob springs to mind: http://pibob.nadnerb.co.uk/parts.html
Ih you have a device with processing power to spare, then the WS2812b is vastly superior since the only extra component needed is a decoupling capacitor across VCC and ground.
And even then it isn’t always needed..
And the WS2801 isn’t available embedded inside a 5050 packaged RGB IC, it’ll need a separate RGB LED since the WS2801 is a controller for RGB LED’s and not a all-in-one package.
It will work until/unless some other interrrupt comes in and blocks the next UART character from going out. It might be fixed with the next burst, but it won’t be 100%.
it is very great ,i will build my own project ,but use apa102 apa104 led strip to replace ws2812b
Hi it is work with apa 104?
And what are the differenz between 102 and 104?
I am a beginner, set up everything like you mentioned. But only the first LED glows some random color and stays that way. The entire remaining strip does not. What could I be doing wrong. My LED WS2812B strip came with two cables like this –> http://imgur.com/J6CYiAe How do I connect it to the RPi B ?
Could you teach how to use lattice ice40UP(FPGA) control ws2812B?
If I want to use development board how to jump control ws2812B?
Beginning student