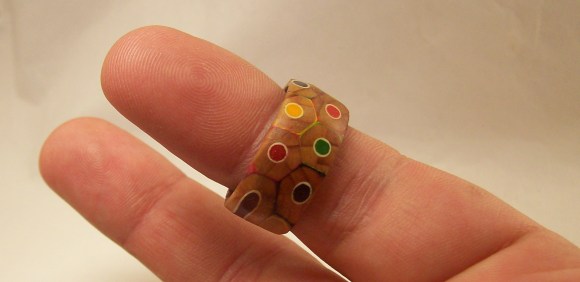
[Peter] proved he has equal parts prowess, patience, and perseverance with this colored pencil ring (imgur link). The ring is made from a cross-section of several colored pencils. The idea seems simple. The build process IS simple. As always though, the devil is in the details.
[Peter] started with a cheap pack of colored pencils. They have to be hexagonal pencils, as round ones won’t work well for this build. [Peter] used two nails to align the pencils, and medium thickness Cyanoacrylate glue to bond them together. Cyanoacrylate (aka super glue) is a very strong but inflexible bond. We’re curious if a different adhesive might have worked better for this task.
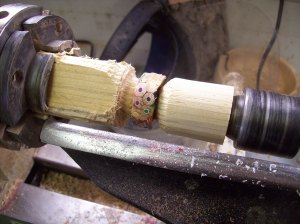
Once the block of glued pencils was dry, [Peter] drilled a hole approximately his ring size. He used a band saw to cut a rough ring blank around the hole, then headed to the wood lathe. He mounted the ring with a jam chuck, which is a piece of wood turned to an interference fit with the workpiece. The problem was that the jam chuck cracked the ring as it was being installed. [Peter] was able to glue the ring back together, and turn it down on his lathe.
Click past the break for more on [Peter’s] ring.
 After turning, [Peter] used the lathe to sand down his ring, then hand sanded it the rest of the way. A piece of his first ring actually cracked off and was lost during this process. [Peter] didn’t despair though – he made a second ring which was much thinner than the first. While the second ring had some cracking issues as well, he was able to complete it. A final coating seals the ring, and ensures that the wearer doesn’t end up with a rainbow on their fingers.
You can find out more about [Peter’s] build by reading his Reddit post on the topic.


mind blown! Wow, just wow
As a certified woodturner, I’d say that super glue is the best. Any flex would cause problems. Usually its the wood that fails to hold together, not the glue. Really cool. Love it! I will have to make one sometime :)
Yeah, but cyanoacrylate is a really crappy glue because it doesn’t really stick to anything except itself, and your fingers. It’s strong in its own right, but it peels off from surfaces because it hardly forms a chemical bond and relies more on surface irregularities.
It was originally designed to close wounds. It’s good for something that needs to set quickly so you can take your hands off of it, but epoxies or even regular dissolved plastic glue would give you a much stronger join.
If you have only ever used drugstore CA glue you should really try a quality grade sometime. There really is quite a bit of difference. And as with all glues, material type and surface prep are critical.
That said, if I were to do this, I really wouldn’t consider CA for this project. The first glue I would try is Epoxy — that’s going to give you gap filling at the rounded corners.
However, I suspect the *real* problem is the adhesion of the paint to the wood and not the glue.
It was originally designed to close wounds.
[Citation Needed]
It was originally designed to create wounds. [1]
1: http://en.wikipedia.org/wiki/Cyanoacrylate
The original cyanoacrylates (the chemical name for the glue) were discovered in 1942 in a search for materials to make clear plastic gun sights during World War II, when a team of scientists headed by Harry Coover Jr. stumbled upon a formulation that stuck to everything that it came in contact with;[2]
That’s certainly a different way to make a ring.
Bundling a section of the pencils together then immersing in urethane resin under pressure, or vacuum (vacuum might work better to get the resin deep into the wood) would make a solid block that wouldn’t break. Cutting sections of pencils not much longer than the width of the finished ring would work best for resin penetration of the wood.
That’s the way knife makers stableize horn, bone and wood for high quality knife handles nowadays. Slow curing cyanoacrylic bath (or some other resin) and a vacuum.
We’re curious if a different adhesive might have worked better for this task.
Woodglue?
Epoxy?
“Gorilla Glue”?
I think it makes little difference since the weakest link is probably the paint holding on to the wood. Epoxy would give a bit more time to put the second layer on and clamp everything together before it sets, but spending more time is not always the main objective.
Urushiol lacquer.
From Lacquer Tree, (Toxicodendron vernicifluum). or Poison Ivy (Toxicodendron radicans)
Heh heh. Just kidding… well mostly.
Minwax Wood hardner?
Score the paint with a razor blade on the sides glued together to let the cyanoacrylic into the wood.
Drilling some small holes and doweling them together at intervals before gluing probably would increase the strength. Also like in my above post, impregnating the cyanoacrylic under a vacuum works pretty good for the knifemakers and penmakers, even for some punky wood.
Well, the epoxy could make a nasty mismatch with the wood characteristics, milling away much less easily in those fillets than the (cheap or not) pencil wood (where the hex was rounded) but there are 300,000 epoxies esp. if you throw in some fillers. Perhaps you’ve seen the artists who tile burl discs and ebony dust (hello vacuum component mixer!) in an epoxy matrix to make bowls an urns and whatnot? They have some notes out… Gorilla glue (urethane) reacts with water and UV, so for a sporty-looking ring it adds a bit of fragility; fixup formulations exist though. Wood glue sounds fine, but dries opaque; you might like the effect of that better than that of adding opalescent dyes to the epoxy!
As mentioned above the main adhesive problem is surly that between the outer color coating of the pencils.
1st solution: use some without color coating (not that nice to look at)
2nd solution: before gluing carefully select the section from which you cut the future ring and only remove the painting in the section not visible on the finished ring (very difficult to make, though)
3rd solution: drill the hole for the finger just a bit bigger than needed and apply a layer of glass fibers on the inside of the ring. After that the ring should be strong enough to withstand the future treatment.
(I have some experience making carbon fiber rings at OHM2013)
Hi,
I came across this design a while ago and now decided to make one as a birthday present. As i dont have a band saw and/ or turnmill or whatever around i had to do it all by hand. Therefore i decided to make it by tiny pieces of the pencil, resulting in a radial design with the pencil dots all around.
Still credit to this post though as it really is a funny and cool looking item!
I suspect the cracking problem is the effect of heat due to friction at the sanding/polishing stage acting on the resin, not the glue. Flood coolant might be a bit extreme, but sanding under a stream of water (not on the lathe!) might help.