 For years now, people have been trying to develop an affordable, RepRap-derived 3D printer that will create objects in metal. There has been a lot of work with crazy devices like high-powered lasers, and electron beams, but so far no one has yet developed a machine that can print metal objects easily, cheaply and safely. For The Hackaday Prize, [Sagar] is taking a different tack for his metal 3D printer: he’s extruding low temperature alloys just like a normal 3D printer would extrude plastic.
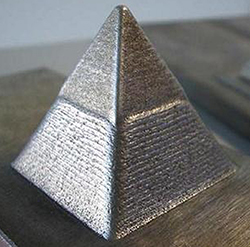
[Sagar]’s printer is pretty much a carbon copy of one of the many ‘plastic-only’ 3D printers out there, the only change being in the extruder and hot end. As a material, he’s using an alloy of 95.8% tin, 4% copper, and 0.2% silver in a 3mm diameter spool. This alloy melts at 235° C, about the same temperature as the ABS plastic these printers normally use.
The only real problems with this build are the extruder and nozzle. [Sagar] is milling his own nozzle and hot end out of stainless steel; a challenging bit of machining, but still within the realm of a hobbyist. He has some doubts about the RepRap derived plastic geared extruder being able to handle metal, so he’s also looking at designing a new version and milling that out of stainless as well.
It’s an awesome project, and we hope we’ll be seeing some updates to the project shortly. While a 3D printer that produces objects out of a low temperature alloy won’t be building rocket engines any time soon, it could be a great way to fabricate some reasonably high-strength parts at home.
![]() The project featured in this post is an entry in The Hackaday Prize. Build something awesome and win a trip to space or hundreds of other prizes.
The project featured in this post is an entry in The Hackaday Prize. Build something awesome and win a trip to space or hundreds of other prizes.


Just how strong is this metal anyway?
Not much. Think pewter. These low-temp alloys already work pretty close to their melting point (think the ratio of melting point vs the operating temperature, in kelvins) and when you get roughly above 2/3 things start getting soft. (Rough rule of thumb, very rough and I am not sure if I remember it 100% correctly.)
Why not using the lead-tin alloy? Same performance, slightly lower melting point, slightly softer, much cheaper. Pure tin is expensive as is, and the silver alloying makes it much worse. The added toxicity of metallic lead is not worth a concern, just don’t eat it. (Cadmium bearing alloys are way worse. Avoid flame-brazing with them.)
What about coextruding flux with the molten solder? Or operating in flux bath, or under protective atmosphere (argon, or maybe nitrogen, or maybe dissociated ammonia – anything nonreactive should do, anything reductive (hydrogen, carbon monoxide…) is even better)? See the shield gases used for furnace brazing for some inspiration.
What about yet higher temperature and using brazing alloys? The copper-phosphorus one does not need flux. Brasses and some bronzes also work. Aluminium and zinc could work as well, some aluminium-silicon brazes even melt fairly low. Protective atmosphere will probably be a must here, or a generous amount of flux. (Consider printing into bath of a molten salt?)
http://en.wikipedia.org/wiki/List_of_brazing_alloys
http://en.wikipedia.org/wiki/Brazing#Atmosphere
The flux bath can heat the workpiece and hold it just a bit below the melting point, to facilitate easier merging of the layers. Like if printing underwater. (Random thought: could we print plastic on the surface of water, which would work as a support for overhangs?)
The shielding gas can be applied either as a flow, like during MIG/TIG welding, or the entire setup can be in a hermetic enclosure filled with the gas. This will be an important component for 3d printing techniques that involve hot-working of metals. Double so as some metal powders (magnesium, I am looking at YOU!) are more than willing to ignite and then annoyingly burn.
Also consider the techniques of metal deposition that are used in welding (microplasma, laser, arc…). There are quite many techniques in the field, some likely to be adaptable for printing.
A rudimentary version of welding-based “3d-printing” is manual deposition of several layers of metal, in repairs of e.g. broken-off cogs on cogwheels, or of worn surfaces. A conventional welding electrode is used, and material is built up layer by layer. Then a grinder is used to finely shape the result. It is used so routinely that we are likely to miss this possibility as we don’t consider it “printing”.
Printing under molten salt might also work for printing more normally melting alloys.
“Pure tin is expensive as is”
Lead-Free Pewter Alloy
Melts at 525°F, (274 °C) 92% Tin; 7% Antimony; 0.3% Copper 2 Lbs = $32.21 or $16.11 per pound, retail. Sheesh. That’s in ingot form, not extruded into “filament”.
A rudimentary version of welding-based “3d-printing” is manual deposition of several layers of metal, in repairs of e.g. broken-off cogs on cogwheels, or of worn surfaces. A conventional welding electrode is used, and material is built up layer by layer. Then a grinder is used to finely shape the result. It is used so routinely that we are likely to miss this possibility as we don’t consider it “printing”.
So…. like this?
http://www.youtube.com/watch?v=s9IdZ2pI5dA
I was just thinking of the exact same thing..
You just need to modify the build process normally associated with EDM additive manufacturing:
start with a metal plate surface (for the circuit pathway). Tack down one corner, where you will build the object off of.
Next lay down an insulation layer of high enough temp and electrical resistance to prevent the remainder of the object being welded to the work surface. A thin layer of wood would work. Cover all of the surface except the tack/s.
Now start “building” the object from the tacked corner out, such that it maintains the electrical path.
It would have to be done with gas shield naturally, in order to have a clean mostly smooth object which only needs surface shaping.
When finished, just knock/grind the tack/s and lift the insulation layer to remove from the work surface.
Trouble is, you would have make sure you have enough “meat” on the part to carry all the current without melting the part…
What about electrochemical deposition? Localized electroplating with moving electrode?
holy shit thats impressive
It really is….
Wow, that is something else. And that’s all stainless steel.
Highly impressive, indeed! The best of both the additive and subtractive worlds.
With more types of deposition nozzles, it should be even possible to make composite parts. E.g. use cheaper material for bulk, and corrosion-resistant for surfaces, or deposit ceramic coatings where wear resistance or hardness is crucial.
“Why not using the lead-tin alloy? Same performance, slightly lower melting point, slightly softer, much cheaper.” – because lead, obviously.
sounds like a similar metal to solder, but with added copper strength, I’m curious how copper melts at 235C.
Reading the article (hey, it was bound to happen), it *is* solder, although I think he may have the Cu and Ag percentages swapped. He’s also using flux for each layer.
It’s mostly tin, with a little copper and silver added, so basically a silver bronze. For more information, check a phase diagram (like this one: http://goo.gl/O24cnV) of copper and tin, since the amount silver is miniscule.
I dont want to print in metal, I need to find a way to print in wax so I can do lost wax casting. It would be epic to be able to print and simply dip in the ceramics, sand, ceramic, sand, ceramic, then bake to harden and get the wax out. Then cast an awesome item out of one of the many metals I can melt in my patio Crucible. Imagine the epic rings or jewelery, or better yet, real metal pieces instead of low durability PLA plastic.
I want to print in gold, because then I’ll be rich.
epic
Have you looked into lost-PLA casting? It works pretty much just like lost wax casting. I’ve seen some poorly done lost PLA casting, but here is a link to a guy with a really nice, high detail setup.
https://pay.reddit.com/r/3Dprinting/comments/27m4mn/random_lostpla_castings_i_have_been_working_on/
The lost-PLA casting be cool for rustic looking items, but looks pretty rough on the detail for things like jewelry. I wonder how much of that is the pour/vacuum and how much showed on the original print that could be cleaned up. Thanks for sharing.
I don’t think the PLA burns out as cleanly as wax, even if you put it in a kiln. That’s probably the source of the contamination / roughness.
ABS, maybe? Make the layer size really thin, smooth it with some acetone vapour, make the cast in plaster, then melt it out with acetone?
Has anyone tried lost-PLA casting with water soluble PLA? I wonder if it would burn out cleaner.
PLA is probably more shock or crack resistant than metal cast with lost wax process.
There’s a reason medieval things swords are smithed and not cast.
So basically a DIY version of this machine? http://www.3dsystems.com/materials/visijet-prowax
Is the alloy magnetic, being made out of tin Too?
Sounds awesome even with its limitations.
Next step maybe a dual head plastic/metal printer?
—
I cant help but think in the back of my head though still about 3d printed guns though, one day someone will come up with a printer that can print them decently and cheaply. We cant keep deflecting the issue as printers keep improving (and so they should). I dont want 3d printers banned. I dont want the web censored. But I also dont want drunks,nuts and children to be able to just Ctrl+P a gun :-/
Darkflame Why is 3D printing any different than any other tool in this regard? Look up the Lutty… a full sub-machine gun built from hardware store parts using a drill and a file.
The at-home low-cost CNC machines are also proliferating, and they do not raise this level of ruckus related to guns – despite the materials they can handle is much more capable and the CAD drawings are on the Net too. So I would not worry much.
The tech is too much out there, and too homemade-able, to be effectively ban-able, anyway. The Adversary can try to artificially limit the printer capabilities (and then take advantage of the law-enforced limitations to feed us overpriced branded materials), and the people (motivated by the overpriced materials) will break off the locks en-masse. So even if things get that far, no big problem.
(I suggest a conspiracy theory(?) that the whole noise is fed by toy companies, who have the most to lose from a crappy plastic parts production rig in every home. Who would buy an overpriced dollhouse furniture?)
Printing guns is only one part of the equation. To get things really interesting, and zombie-apocalypse prepared (or other scenario where we can’t just pop in a shop and get what we want), try printing ammo. Including casings and propellants. (And consider the easier alternative, e.g. crossbows. They are also silent and have no muzzle flash.)
Yes, the latter is possible; not directly, though. Print a chemical apparatus, a shrunk-down partial knockoff of Birkeland-Eyde NO2 production rig (the core is an electric arc, swept with AC magnetic field). Propellant production by nitration in gas phase with a mixture of nitrogen dioxide and ozone should be possible. (Computer-controlled, with a spectrometer for gas composition measurement. A continuous synthesis, intrinsically safe as the reactor volume is grossly limited, should be possible.) An alternative is a chlorate-based gunpowder, where the oxidizer is made in a chlorate cell by electrolysis; a membrane salvaged from a Li-ion cell (a sheet of microporous polyolefin) should do the job.
Uhhhh?
Somewhat related (3D printing and The Hackaday Prize):
I’ve been working on a full color inkjet 3D printer, and the THP contest timeline fits nicely with my project timeline. I haven’t seen a huge community around DIY inkjet 3D printers (not like FDM and SLA printers). The few I have seen were just entirely too slow or had poor print quality (seemingly a function of their inkjet controller).
Would some of you fine folks explain this situation to me? Why does it seem there’s not much interest in these inkjet 3D printers? The main con I see is that the printed items aren’t sturdy and durable like plastic prints, but there are ways to improve that. What else am I missing?
At any rate, I’ll likely enter my 3D printer in the contest. I’d just like to understand if there might be any hope for it in the crowd funding arena (and if not, why).
Until very recently inkjet printers were under patent, which restricted interest (at least in the U.S. They also are more complex and require you to manage a powder bed and powdered material which can be messy. That said, i’md be very excited to see more builds of inkjet 3D printers!
The tech skills and machines needed to build reliable piezeo printheads isn’t trivial.
I’d say it is about the complexity of the inkjet heads (an uneducated personal guess), compounded with the issues with powder handling. Precise dosing of the liquids is apparently a problem.
But good (or at least usable) ink print heads are an important piece of technology that should be available.
So, please – go for it! :)
Thanks all for the feedback. The major theme from above is that the complexity is what’s holding us back. That said, I’ve seen a couple other powder inkjet printers that were created using the InkShield. While that did greatly simplify their builds, the single-color, 96 dpi and extremely slow printing speeds (> 1 minute per layer??) together killed them for me.
The print head control was one of the easier parts. Compared with above: many thousands of colors (just like a standard inkjet printer), ~600 dpi (within a layer), 4 layers per minute (this depends greatly on the area being printed with each layer). I don’t have as much flexibility in the binder recipe as one would with custom print heads, but this seems to work well and should allow me to keep the ultimate cost below $1,000 (though I’ve spent several times that amount, mostly on “spare” parts).
I’m still facing a few minor hurdles, but I’m optimistic I’ll have them resolved by the THP contest deadlines!
The process is essentially solder-printing, which Rhys-Jones was doing for his MEng a few years ago: http://blog.reprap.org/2009/04/first-reprapped-circuit.html http://blog.reprap.org/2012/04/some-more-printed-circuitry.html
It’s nice to see some refinements on the process. I’m not sure if that dry ice is necessary to cool the object down though; I would have thought increased airflow is all he needs if cooling rate is a problem.
Re. damage to hot ends, someone figured this out ages ago using boric acid anodization to protect the aluminum head from corrosive metals
Using silver is expensive but it does work, 0.2% BW isn’t too bad and only adds a small fraction to the overall cost.
I did look into recycling waste Ag containing solder a while back and a company over here was willing to send me some so this could also be an option.
A big issue with this is the tendency for SMD or bit derived iron to get into the mix, you can detect this using hysteresis and compensate by using a small amount of sulfur to form FeS which then precipitates out.
Has the project been removed as a Hackaday prize entry?
It seems like the project page is not there anymore.
https://hackaday.io/project/998-Affordable-Metal-3d-Printer
I thought it was a really interesting concept. So I wondered what happened.
the project was a fake . all the images were mined from other people’s websites. Smart kid made a fool of everyone..!!!
Has this project been removed as an entry to the Hackaday Prize?
It seems the project page is not available anymore.
https://hackaday.io/project/998-Affordable-Metal-3d-Printer
I thought this was an interesting concept and wondered what happened.