
[jjshortcut] has created an easy to make robot arm that has 6 degrees of freedom. There is not much to it, the frame is made out of 4mm thick hardboard, hobby servos provide the power and a handful of hardware holds it together. The frame has been successfully cut out on both a laser cutter and a cnc router, making this design even more obtainable for any aspiring roboticist.
To control the robot arms movements [jjshortcut] plans to use a standard Arduino. There are certainly plenty of servo motor shields available but he still decided to design his own. In addition to the standard motor power and servo connections, a header for an infrared receiver was added for potential future communication options.
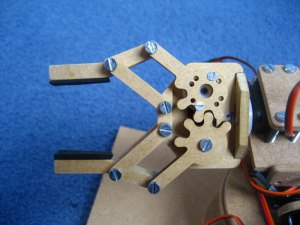 Like any project, there were some hiccups along the way. First, several revisions of the gripper were necessary to get the correct tooth profile that resulted in smooth and tight movement. Also, while making the shield the spacing between banks of headers came out one header too close! On this first board [jjshortcut] just bent the pins so they would fit into the Arduino. You can’t let some minor snafu prevent forward momentum of a project!
[jjshortcut] has done the hard part; the design. He has made all his mechanical and electronic files available… so go and build one! Check out the video after the break.


Yeah, a really easy project to make at home if you have a LASER CUTTER and a CNC in your workshop. GIVE ME A BREAK!!!! And boys and girls, if you have a budget and resources like maybe BEN HECK, we’d all be building our own personal robot overlords!
Bandsaw/jigsaw project.
CNC or laser cutter is basically programming a robot arm to make robot arm parts. “I sent an expensive dedicated machine instructions to make this thing for me” gets no cred.
You’re right. I too use a carefully calibrated catapult whenever I want to send a message to my buddy on the other side of town.
Excellent, that’s a good hack, using a siege engine as a communication device. That requires some skill, too. Not like tapping a screen you bought from AT&T (or using a laser cutter to make shapes out of wood).
…ever heard of a hackerspace, tom?
There are no hackerspaces in Bowling Green, Ky where I live. And the people who want to start them have problems with liability issues. And this article begins with, ”
Robot Arm You Can Build At Home”. I am talking about enthusiasts with very limited budgets and no available hackerspaces.
… so cutting this out with a scroll (jig) saw (follow the link, you’ll find the plans) is out of the question?
I’d sure call that “build at home possible”..
The trick there is to cut the opposing pieces together so all the slots & holes line up. Some very weak double-sided tape (check scrapbook-type stores) to keep them together will do.
(Disclaimer – I own all of the tools mentioned above, but the laser is my favorite.)
i want to build a robot. i have cnc, arduino kit, etc. anyone can help me please?
I see nothing here that couldn’t be made with a scrollsaw and drill in a few hours. Or more primitive tools, given more time. There are many details (like rounded corners) that could be omitted to simplify manual cutting, without affecting function at all. The wood gears may look a little tricky, but all that’s necessary is that they turn without binding, not that they have zero play/backlash.
So when you say you don’t believe this can be made at home, what you’re really saying is that you lack basic woodworking skills. Or it’s a kneejerk reaction to reading “CNC”, and you didn’t actually bother to look at the project, else you’d realize how easily it could be built. There are examples of homemade wood-framed robot arms going back decades, and it sure didn’t take CNC machines to make them.
My woodworking skills are just fine thank you and as for “kneejerk”, there wasn’t any.
Don;t know why I’m even defending myself concerning this, you express an opinion and everybody piles on. I have better things to build thank you. So, go back to your cnc or lasercutter and build something useful.
Chris, you sound like you’re a wee bit arrogant and condescending. I think that Tom was just having a problem with expressing himself, thats all. Really do think you need to knock it down a notch or too. This is just comment section, not a pissing contest.
I designed a similar arm for 3D printers. It requires no fastners and it’s parametric.
https://github.com/GlenSearle/tentacle
http://www.thingiverse.com/thing:500526
Should submit that to Hackaday.
I need a design layout as i have meself a wooden cnc cutting machibe lol. Any idea where i could find the design?
Program it to build copies of itself with a dremel… :P
Should have used dumb weighted balance system instead of two servos.
Step 1 – Have laser cutter, CNC router, lots of servos, a receiver and avionics transmitter.
Step 2 – Build this incredibly complex thing easy peasy.
That is a cool project. Not an easy to make at home one but a very cool robot arm. Reminds me of the Radio Shack on I had years ago.
Whilst robot arms are sort of cool, I do wonder what people actually do with them after they’ve been built. In sure “look. I’ve built a robot arm” wears thin after a while.
I’m not trolling here – if you have one and do anything with it then let me know what. I’m sure building one is fun (and I do have a CNC and a laser cutter on my garage). I might of I didn’t think it would sit around unused afterwards.
I’d start learning inverse kinematics as well as a bit of interfacing with python.
Sure, you can argue that all of this is easily learnable on the web, but I typical have better motivation with a full-on project. ;)
Make a clock!
I’m sure I saw someone moving domino-like blocks with a similar arm to show the time.
Otherwise, dunno, use it to put sugarcubes in your tea?
Use it for the same purpose that robot arms in technology museums do – move some chess pieces and blocks around, then raise up and swing from side to side in a dancing movement behind a glass panel all to the tune of some twee accompanying music. That is, if the ‘Push button to operate’ still works after being mashed by thousands of bored school kids.
Give it tweezers and have it assemble circuit boards for me. Or larger scale assembly, really.
I’ve wondered the same thing. The best I’ve come up with so far is getting it to pick things up off shelves for me that I ask it for. Obviously it would require a significantly larger arm, and my experience with Siri and the like hasnt inspired me with confidence for the voice command stuff. I still want to do it. :p
Use it to pull 3D prints off the print bed. Combine that with OctoPi and you have yourself a small scale production setup that can run autonomously. Granted, each print would need to be identical to the previous one, unless you ran in batches and had the queue setup so it would change over the arm instructions with the part change.
I wonder if it would be strong enough to break a print away from the print bed. Hmmmm….
Security testing: http://media.ccc.de/browse/conferences/sigint12/saal_mp7_og_-_2012-05-19_21_15_-_men_who_stare_at_bits_-_nuit_-_murx_-_64.html
I built this. Except it was from a company called Lynxmotion and made of precut plastic. About 15 years ago I think. It looks absolutely identical.
Just what I was thinking – nice to see the had staff doesn’t know what builds are copies of products available.
Yes, a simple copy of this one:
http://www.robotbuy.ca/products/Lynxmotion_L6AC_KT_6_Robotic_Arm_Combo_Kit_for_PC_serial_port-234-0.html
Nothing about this is original, it’s an exact copy of the LynxMotion arm.
The eagle files for the electronics won’t download either . Bit of a scam I think
I m also working on it. But there are. Two problems
1. I don’t. Know which battery i use.
2. In win avr for atmega 32
If(bit_is_clear(PINB ,0 && PINB ,1))
{
}
else
{
}
Is not working.
I know other programming is ok. Plz help
Hi
Friends
We are Great robot to learn about and play around with robotics programmable, but the positive side to that is you don’t need to do any programming – it just works! I also bought the BotBoarduino along with the whole package because I want to later go back and do some of my own programming, but it’s not required at all know more visit this site
https://robomart.com/
hi rakesh can u give me ur phone no. i want to consult u about robitics and robotic arm
Hi, I was wondering if you could give some more data on the type of motors you used. I’m working on a similar project and I sure would appreciate any help.
Thanks in advance.
Hi there, awesome arm! Nice work. One question though… what did you do at the “elbow” part with your servo? One side of the servo (the rotating piece) is attached to the wood, to turn the second part of the arm, but what’s on the other side? So i mean at the back of the Servo. How is it attached to the wood so that it holds everything together but still being able to rotate?
Would help a lot, thx!