So, what do you do when your Arduino project needs to operate in a remote area or as a portable device? There are LiPo battery shields available, and although they may work well, recharging requires access to a USB port. You can also go the 9v battery route plugged into the on-board regulator of the Arduino but the low mAh rating of a 9v won’t allow your project to stay running for very long. [AI] needed a quick-change battery option for his Arduino project and came up with what he is calling the AA Undershield.
As the name implies, AA sized batteries are used in the project, two of them actually. Yes, two AA batteries at 1.5v each would equal only 3 volts when connected in series. The Arduino needs 5v so [AI] decided to use a MAX756 DC-to-DC step-up regulator to maintain a steady stream of 5v. This article has some nice graphs showing the difference in performance between a 9v battery being stepped down to 5v verses two AA’s being bumped up to 5v.
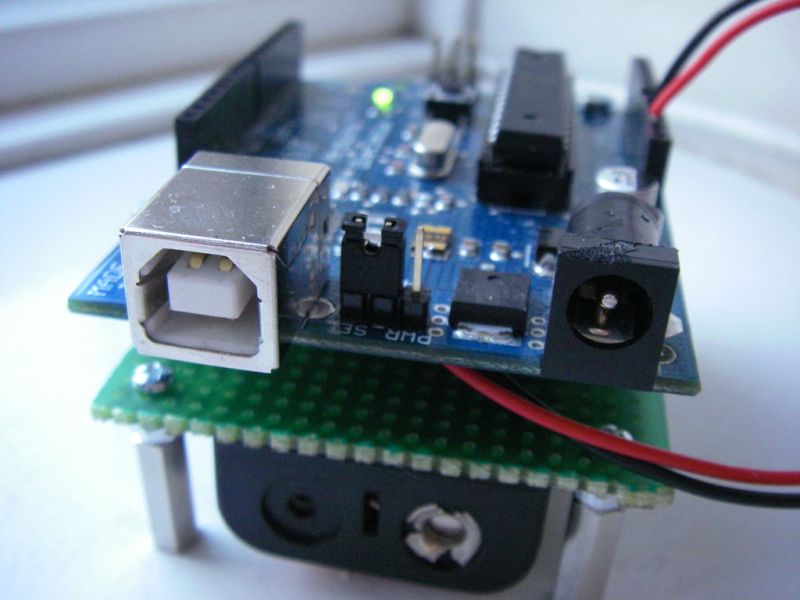
The ‘under’ in Undershield comes from this shield being mounted underneath the Arduino, unlike every other shield on the planet. Doing so allows use of a standard 0.100″-spaced prototype PCB and is an easy DIY solution to that odd-sized space between the Arduino’s Digital 7 and 8 pins. The Arduino mounts to the Undershield via its normal mounting holes with the help of some aluminum stand offs.
[AI] did a great job documenting his build with schematics and lots of photos so that anyone that is interested in making one for themselves can do so with extreme ease.


So use 4 AAAs.
4 AAA cells have significantly less energy storage than 2 AA cells
Six might be better: “If supplied with less than 7V, however, the 5V pin may supply less than five volts and the board may be unstable. If using more than 12V, the voltage regulator may overheat and damage the board. The recommended range is 7 to 12 volts.” (http://arduino.cc/en/Main/arduinoBoardUno)
I think the advantage here is extending the operating life of a physically small build using readily available disposable batteries* (rather than mucking about with chargers etc.) by setting up the supply differently.
________
*my first Palm 3 ran on a pair of AAA batteries that I could get at any drugstore – no charger to forget or break etc. and very good on the road.
6 eh? I was thinking of 5 AA NiCads (6 volts) but if the 5 volt regulator needs more than that, okay. Thanks
There may be an exception: If you supply it properly with regulated 5V via the USB connection, it’ll be fine, though back-feeding it through the 5V pin is a no-no.
“The board can be supplied with power either from the DC power jack (7 – 12V), the USB connector (5V), or the VIN pin of the board (7-12V). Supplying voltage via the 5V or 3.3V pins bypasses the regulator, and can damage your board. We don’t advise it.”
If you provide your own protections, supplying the 5V pin should be fine. But cutting a cheap USB cord for going through the USB jack is probably a valid option for providing power.
I was like, “why didn’t he just use the header to connect the battery shield directly instead of that fugly wire hanging off” then I was like “oh right”. Although I don’t understand the advantage of having it mounted under than how a shield should be mounted.
My recommendation on future version would be so-called ‘pogo pins’. If mounted correctly, they can contact the back of the Arduino, and no wires would be required. Its a nice quick write-up and accomplished what he was after though.
If his concern was that he won’t be able to change the battery if it’s squashed in-between two boards, he could always have the battery shield at the top most, all the other pins are unnecessary for the battery connector since he only needs the power header connected. This would also solve the Arduino’s weird pin header spacing. And with what I have read, his main concern was that he only want to be able to quickly swap out the battery.
If he’s gonna market yet another shield, he better document it better. His documentation is incomplete without showing the ripple output of the converter vs current loads on the arduino. Unstable supply voltages kill the LSBs on your ADC.
Yeah he’s going to “market” a project that’s made on a proto board
It’s an Instructible – telling you how to make it. It doesn’t have any more weight than posting it on a blog, so the expectations shouldn’t be the same level as selling a product.
This is stupid. smh
says the guy who showers in grain alcohol
https://www.adafruit.com/products/2078
“There are LiPo battery shields available, and although they may work well, recharging requires access to a USB port. ”
The whole point here is having the flexibility to swap out batteries in the field. You can get fully charged AA cells, ready to go, at any convenience store. Also with AA cells you can share one charger among many battery powered devices.
Yeah, I didn’t read that part when I made the comment
+++ Breaking News +++ Man connect a
battery to an Arduino +++ Breaking News +++
My thoughts exactly. Must be a slow news week.
Pulled me out of lurking for this, and this is not directed solely towards you, just the final straw…
Not sure what all the hate and criticism is about around here lately. If you have a more interesting project, SHARE IT. One of, if not THE core points of this site is to showcase “I made this”. It spawns ideas, provokes curiosity. and encourages thought.
I was going to say the same thing, before you.
/s
I totally agree. The articles here are sometimes boring, but have a little time to scroll down and read the ideas that people are saying: “this could be better doing it this way”. I find myself sitting in MJ’s seat saying “I’m only here for the comments” (ref: Michael Jackson – Popcorn meme)
Dang, this is one of those ideas so simple that you don’t realize people struggle with it.
This ia an instructable that is 5 years old? Look at the comments on the post. Whats going on HAD , run out of self promotions?
Heres a more recent one of mine . You can have a go back at me now if you like http://www.instructables.com/id/Arduino-ATTiny85-Voltage-Monitor-RGB-LED/
The app note compares a *linear* regulator with a *switching* solution. Hmm. I wonder which one will be more efficient?