Arduino Shield Makes Driving Nixies Easy

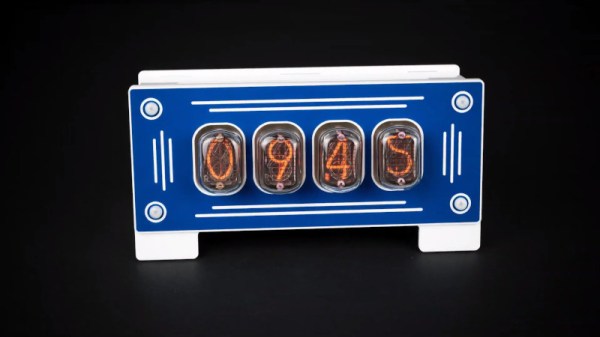
Nixie tubes are adored by hackers across the world for their warm glow that recalls an age of bitter nuclear standoffs and endless proxy wars. However, they’re not the easiest thing to drive, requiring high voltages that can scare microcontrollers senseless. Thankfully, it’s possible to score an Arduino shield that does the heavy lifting for you.

The HV supply is the heart of any Nixie driver.

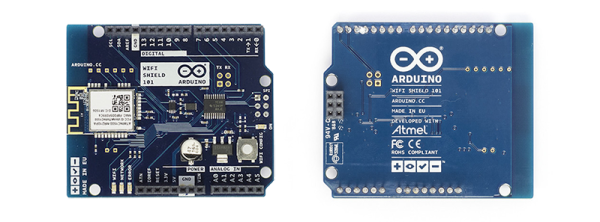
The shield uses HV5812 drivers to handle the high-voltage side of things, a part more typically used to drive vacuum fluorescent displays. There’s also a DHT22 for temperature and humidity measurements, and a DS3231 real time clock. It’s designed to work with IN-12 and IN-15 tubes, with the part selection depending on whether you’re going for a clock build or a combined thermometer/hygrometer. There’s also an enclosure option available, consisting of two-tone laser etched parts that snap together to give a rather sleek finished look.

For those looking to spin up their own, code is available on Github and schematics are also available. You’ll have to create your own PCB of course, but there are guides that can help you along that path. If you’re looking to whip up a quick Nixie project to get your feet wet, this might just be what you need to get started. Of course, you can always go straight to hard mode, and attempt a functional Nixie watch. Video after the break.

Continue reading “Arduino Shield Makes Driving Nixies Easy”

Building An Arduino Smart IC Tester For $25

There’s no question that you can get a lot done with the classic multimeter; it’s arguably the single most capable tool on your bench. But the farther down the rabbit hole of hacking and reverse engineering you go, the more extravagant your testing and diagnostic gear tends to get. For some of us that’s just an annoying reality of the game. For others it’s an excuse to buy, and maybe even build, some highly specialized equipment. We’ll give you one guess as to which group we fall into here at Hackaday.

[Akshay Baweja] is clearly a member of the second group. He’s recently published a guide on building a very slick intelligent Integrated Circuit tester with a total cost of under $25 USD. Whether you’re trying to identify an unknown chip or verifying your latest parts off the slow-boat from China actually work before installing them in your finished product, this $25 tool could end up saving you a lot of time and aggravation.

[Akshay] walks readers through the components and assembly of his IC tester, which takes the form of a Shield for the Arduino Mega 2560. The custom PCB he designed and had manufactured holds the 20 Pin ZIF Socket as well as the 2.4 inch TFT touch screen. The screen features an integrated micro SD slot which is important as you need the SD card to hold the chip database.

With an IC to test inserted into the ZIF socket, the user can have the tester attempt to automatically ID the chip or can manually enter in a part number to lookup. The source code for the Arduino as well as the chip ID database is up on GitHub for anyone looking to add some more hardware to the device’s testing repertoire.

The importance of good test equipment simply cannot be overstated. Between highly specialized gear like this IC tester to classic instruments such as the oscilloscope, your bench is going to be full of weird and wonderful pieces of equipment before too long.

Continue reading “Building An Arduino Smart IC Tester For $25”

Making An Arduino Shield PCB With Fritzing

[Allan Schwartz] decided to document his experience using Fritzing to design, fabricate, and test a custom Arduino shield PCB, and his step-by-step documentation makes the workflow very clear. Anyone who is curious or has been looking for an opportunity to get started will find [Allan]’s process useful to follow. The PCB in question has two shift registers, eight LEDs, eight buttons, and fits onto an Arduino; it’s just complex enough to demonstrate useful design features and methods while remaining accessible.

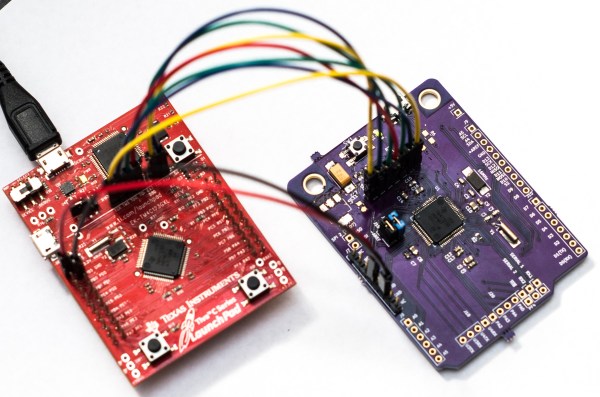
[Allan] starts with a basic breadboard design, draws a schematic, prototypes the circuit, then designs the PCB and orders it online, followed by assembly and testing. [Allan] had previously taught himself to use Eagle and etched his own PCBs via the toner transfer method, but decided to use Fritzing instead this time around and found it helpful and easy to use.

About a year ago we saw Fritzing put through its paces for PCB design, and at the time found that it didn’t impress much from an engineering perspective. Regardless, as a hobbyist [Allan] found real value in using Fritzing for his project from beginning to end; he documented both the process and his observations in order to help others, and that’s wonderful.

Hackaday Prize Entry: Arduino Video Display Shield

The Arduino is the standard for any introduction to microcontrollers. When it comes to displaying video, the bone stock Arduino Uno is severely lacking. There’s just not enough memory for a framebuffer, and it’s barely fast enough to race the beam. If you want video from an Arduino, it’s either going to be crappy, or you’re going to need some magic chips to make everything happen.

[MagicWolfi]’s 2017 Hackaday Prize entry consists of an video display shield that would be so easy to use that, according to the project description, it could be a substitute for the classic Blink sketch.

The project centers around the VLSI VS23S010D-L chip, which packs 1 Megabit SPI SRAM with serial and parallel interfaces. An integrated video display  sends the composite video signal to display, with the mode depending on how many colors and what resolution is desired: for instance, at 640×400 you can display 16 colors. As he describes it, not 4K video but definitely Joust. The chip expects 3.3 V logic so he made use of a MC74LVX50 hex buffer to tailor the Arduino’s 5 V. Currently he’s working on revision two of the shield, which will include SPI flash memory.

You can follow along with the project on Hackaday.io or the current shield design can be found in [MagicWolfi]’s GitHub repository.

Hackaday Prize Entry: A Tiva Shaped Like An Arduino

Texas Instruments’ Tiva C LaunchPad showcases TI’s ARM Cortex-M4F, a 32-bit, 80Mhz microcontroller based on the TM4C123GH6PM. The Tiva series of LaunchPads serve as TI’s equivalent of the Arduino Uno, and hovers at about the same price point, except with more processing power and a sane geometry for the GPIO pins.

The Tiva’s processor runs five times faster than standard ATMega328P, and it sports 40 multipurpose GPIO pins and multiple serial ports. Just like the Arduino has shields, the Tiva has Booster Packs, and TI offers a decent number of options—but nothing like the Arduino’s ecosystem.

[Jacob]’s Arduino-Tiva project, an entry in the Hackaday Prize, aims to reformat the Tiva by building a TM4C123GH6PM-based board using the same form 2″x 3″ factor as the Arduino, allowing the use of all those shields. Of course, an Arduino shield only uses two rows of pins, so [Jacob]’s board would position the spare pins at the end of the board and the shield would seat on the expected ones.

The finished project could be flashed by either the Arduino IDE or TI’s Energia platform, making it an easy next step for those who’ve already mastered Arduinos but are looking for more power.

Scissors Make Great Automatic Cable Cutters

The team at [2PrintBeta] required a bunch of cables, heat shrink, and braid to be cut for their customers. They looked into an industrial cable cutter, but decided the price was a little too high, so they decided to make their own. They had a bunch of ideas for cutting: Using a razor blade?  Or a Dremel with a cutting wheel? What they came up with was a DIY cable cutter that uses a pair of scissors, a pair of stepper motors, a pair of 3D printed wheels and an Arduino.

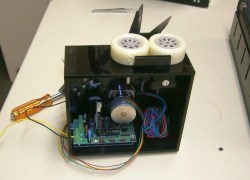
The first thing the team had to do was to mount the scissors so they would cut reliably. One of the stepper motors was attached to a drive wheel that had a bolt mounted on it. This went through one of the scissors’ handles, the other handle was held in place on the machine using screws. The second stepper motor was used to rotate the wheels that drives the cable through to the correct length. [2PrintBeta] used a BAM&DICE shield and two DICE-STK stepper motor drivers on an Arduino Mega to control the cutter.

The [2PrintBeta] team are pretty good at doing things themselves, as we’ve seen previously with their DIY plastic bender. And again, with this automatic cable cutter, they’ve seen a need and resolved it using the things at their disposal and some DIY ingenuity.

Continue reading “Scissors Make Great Automatic Cable Cutters”

Arduino’s Long-Awaited Improved WiFi Shield

Announced at the 2014 Maker Faire in New York, the latest Arduino WiFi shield is finally available. This shield replaces the old Arduino WiFi shield, while providing a few neat features that will come in very handy for the yet-to-be-developed Internet of Things.

While the WiFi Shield 101 was announced a year ago, the feature set was interesting. The new WiFi shield supports 802.11n, and thanks to a few of Atmel’s crypto chip offerings, this shield is the first official Arduino offering to support SSL.

The new Arduino WiFi Shield 101 features an Atmel ATWINC1500 module for 802.11 b/g/n WiFi connectivity. This module, like a dozen or so other WiFi modules, handles the heavy lifting of the WiFi protocol, including TCP and UDP protocols, leaving the rest of the Arduino free to do the actual work. While the addition of 802.11n  will be increasingly appreciated as these networks become more commonplace, the speed offered by ~n isn’t really applicable; you’re not going to be pushing bits out of an Arduino at 300 Mbps.

Also included on the WiFi shield is an ATECC508A CryptoAuthentication chip. This is perhaps the most interesting improvement over the old Arduino WiFi shield, and allows for greater security for the upcoming Internet of Things. WiFi modules already in the space have their own support for SSL, including TI’s CC3200 series of modules, Particle‘s Internet of Things modules, and some support for the ESP8266.