Ever since [will1384] watched “The Lawnmower Man” as a wee lad, he’s been interested in virtual reality. He has been messing around with it for years and even had a VictorMaxx Stuntmaster, one of the first available head mounted displays. Years later, the Oculus Rift came out and [will1384] wanted to try it out but the $350 price tag put it just out of his price range for a discretionary purchase. He then did what most of us HaD readers would do, try building one himself, and with a goal for doing it for around $100.
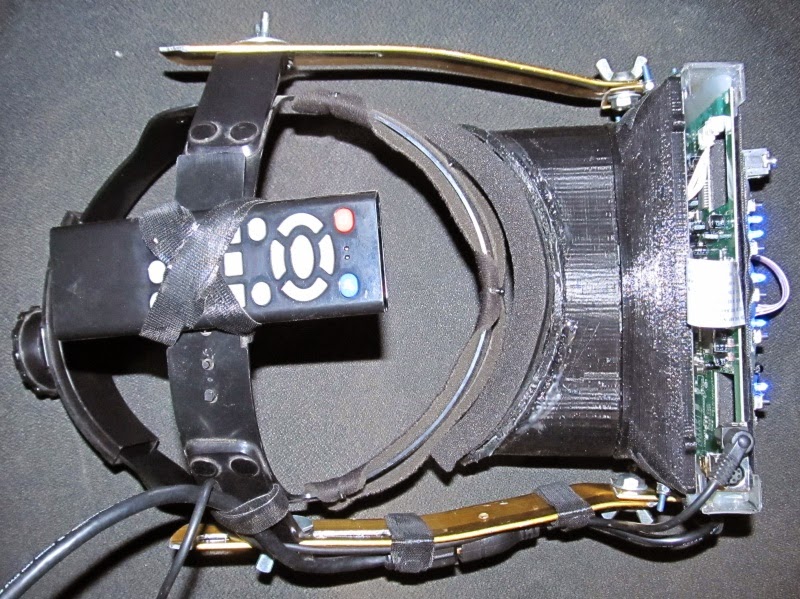
The main display is a 7″ LCD with a resolution of 1024×600 pixels and has a mini HDMI input. Some DIY head mounted display projects out on the ‘web use ski goggles or some sort of elastic strap to hold the display to the wearer’s head. [will1384] took a more industrial approach, literally. He used the head mounting system from a welding helmet. This not only has an adjustable band but also has a top strap to prevent the entire contraption from sliding down. Three-dimensional parts were printed out to secure the LCD to the welding helmet parts while at the same time creating a duct to block out external light.
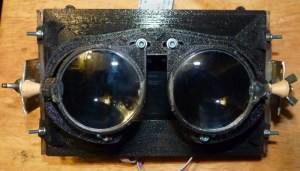
Inside the goggles are a pair of 5x Loupe lenses mounted between the user’s eyes and the LCD screen. These were made to be adjustable so that the wearer can dial them in for the most comfortable viewing experience. The remote mounted to the top strap may look a little out-of-place but it is actually being used to capture head movement. In addition to a standard wireless remote, it is also an air mouse with internal gyroscopes.


Hooray for air mice!
I actually used to strap a WiiMote to my head for FPS gaming with friends. Looked dorky as fuck but worked damn well, and was hella fun to program.
I (and I guess many others) did the opposite, strapping the wiimote above the monitor and a few IR leds on my headset. This works a little better, since you are unlikely to move your head outside of the wiimote’s field of view even when the rotation angle is large.
We have an OR Dev Kit II at work that they picked up for us devs to play with…nobody has touched it.
I think the biggest limiting factor of any tech is that it needs money to be pumped into it to kickstart it…but nobody wants to pump money into it until it is kickstarted. Chicken, meet egg.
the best thing I think could happen to the OR is competition – and this design looks like it could go the distance, especially with the phone screen driver board I saw a few days (a week?) ago on HAD
I want to see it reach a minimum of 75Hz with low persistence first :)
Wow I made it to Hackaday, thats awesome!
A big thanks to Sid over at the Meant to be Seen forums
http://www.mtbs3d.com/phpbb/viewtopic.php?f=26&t=18035
for the nice design and STL files he shared.
Lets not forget Yetifrisstlama and his blog posts
http://yetifrisstlama.blogspot.com/2014/03/the-foculus-rift-part-1-building-head.html
http://yetifrisstlama.blogspot.com/2014/03/the-foculus-rift-part-2-reverse.html
http://yetifrisstlama.blogspot.com/2014/03/the-foculus-rift-part-3-spoofing-edid.html
Yetifrisstlama work helped me to make my DIY HMD into a DIY Rift that is compatible with Oculus Rift DK1 software.
Also geekmaster over at the Meant to be Seen forums
http://www.mtbs3d.com/phpBB/viewtopic.php?p=106599
http://www.mtbs3d.com/phpbb/viewtopic.php?f=140&t=17054
And the DIYRift subreddit
http://www.reddit.com/r/DIYRift/
for making a place to collaborate and share information.
The problem with this type of display is that the cantilevered weight of the display starts to strain your neck. You can counteract it by adding weight to the back of the headset, but then the whole thing starts to get heavy. But then you can counterbalance the weight of the whole thing by attaching a cord to the top, run the cord up to a pulley at the ceiling and then down to a sandbag. You can tweak the weight of the sandbag to balance the weight of the display.
If you are sitting down the experience is very limiting because you really want to turn and look around you but it’s hard to do in a chair, so you want to stand up.
Oh and then there is the eventual feelings of vertigo. You’re going to fall over and hurt yourself and jerk the cables out of the computer and it’s horrible. So you will need to erect some sort of railing system around where you stand so you have something to grab onto when you start to feel funny.
If you dig back into VR research in the 1990s you can see the researchers struggling with these types of displays, trying and failing to make them work well. They are fun for a short while but after the eyestrain and the neck pain and the vertigo it turned out to be not so interesting.
If one places the sensor/control board at the back and the display at the front, it could improve balance without adding weight to the device. I suspect that the actual sensor still needs to be as far from the head as possible to accentuate movement as much as possible.
That being said, I think technology has become compact and lightweight enough for VR to be revisited.
whatever you say, the headset and the plastic have not gotten any lighter at all. the only thing that’s “improved” is the resolution of the display
That’s not entirely true. With the switch from CCFLs to LEDs, the weight of the entire backlight system of LCDs has decreased dramatically. Also, as most VR aficionados will tell you, the improvement in the latency (and, to a lesser extent, the frame rate) of the display system as a whole is the main enabling factor for successful VR. Cheap MEMS motion tracking (including the computation to get something meaningful from the sensor data in real-time) is probably in there somewhere, too…
This is a great build but I think the other comments are well-taken in that tilting horizons, vertigo and the like are likely to be a persistent problem. That said, it would be interesting to have a processed camera signal assisting things like the horizon line/movement tracking in addition to accelerometer/gyro systems so that the VR “matched” the movement of the visual field in front of the user and helped stabilize it.
Even with all that you are still going to see a significant percentage of the population having pretty serious issues with using the display for more than a minute or two. There is no ability to adjust the inter-ocular distance of the display to match the user.
Also without custom optics you are going to have serious issues with keeping the entire image in focus. If the image is out of focus even a tiny bit, the human reaction system takes hold and frantically adjusts the lens of the eye, to bring the image into focus. This process is happening continuously as long as the display is worn and it causes serious eye fatigue in the user after only a few minutes of use.
I can’t speak to the medical issues (other than by saying that I question your “significant percentage” quote – at least until I see hard numbers), but there is nothing stopping a DIY’er from simply building his goggles to match his IPD, or even modifying the Rift itself. If you have an “average-sized” head, you can even do it entirely in software.
Suit yourself :) The real problem is the refresh rate and the lack of low persistency. The rest are mediocre problems.
Is this better than Google Cardboard with a smart phone? It’s quite a bit lighter and smaller and appears to do the same and most smart phones now have a higher resolution than this.
Just FYI the Lawnmower Man movie was not a Stephen King story, as the VR story ahd nothing at all to do with King’s short about a guy mows your lawn by stripping naked and eating the grass. The movie was so different that King sued the producers to make them take his name out of the title.
I work in VR, although this is a great project, it won’t be for everyone. There has been quite a lot of research gone into the OR. Low latency displays, IMUs, etc are all very key to minimising motion sickness. I really look forward to seeing how the whole industry goes in the future and the learnings we get out of making people sick :)
I have had only two problems with this DIY HMD/Rift, one is nausea, with a few games, but not all, the nausea starts in at about 20-30 minutes, and if you don’t stop using it it the nausea just gets stronger, the other problem is the lack of Oculus Rift DK2 compatibility, it has DK1 compatibility, but anything made for the DK2 will not work, and anything upgraded to be DK2 compatible stops working, I can’t use the DK1 mode of DK2 compatible software, I believe the problem is the tracker not being properly recognized by the DK2 software, but I am not a programmer so I have no idea how to fix the tracker code that Yetifrisstlama came up with
Yetifrisstlama blog page on the tracker using a STM32F3DISCOVERY board:
http://yetifrisstlama.blogspot.com/2014/03/the-foculus-rift-part-2-reverse.html
And Yetifrisstlama’s GitHub page with the tracker code:
https://github.com/yetifrisstlama/Foculus_Rift_Tracker_STM32F3DISCOVERY
Some info over at the reddit DIYRift subreddit:
http://www.reddit.com/r/DIYRift/comments/2locor/stm32f3_diy_rift_new_oculus_sdk_lets_make_some/
And a DIY Rift type headset Kickstarter that uses the STM32F3DISCOVERY board:
https://www.kickstarter.com/projects/dotlab/open-dovision-open-source-virtual-reality-for-ever?ref=discovery
and the GitHub page with the tracker code they use with the STM32F3DISCOVERY board:
https://github.com/Kailang/Open-DoVision
I have no problem with weight, the DIY HMD/Rift I made weighs about 1.6 pounds, about the same as a welding helmet, and because I use headgear from a welding helmet, it feels about to use the DIY HMD/Rift as a welding helmet.
Damn – this wouldn’t look much out of place as a homebrew HMD from 1993 or so… Looks great!