[Jeff McGehee] or how he likes to be known, [The Nooganeer] just finished his first big tech project after finishing grad school. It’s a connected thermostat that makes use of his old iPhone 4, and a Raspberry Pi.
Ever since [The Nooganeer] bought his first home with his wife back in the spring of 2014, he’s had ever consuming dream of adding home automation to every appliance. As he puts it…
Home automation has always been a fascination of mine. How much time and irritation would I save if I didn’t have to worry about turning things on and off, or wonder in which state they were left? How much more efficient would my home be? Wouldn’t it be cool to always know the state of every power consumer in my home, and then be able to record and analyze that data as well?
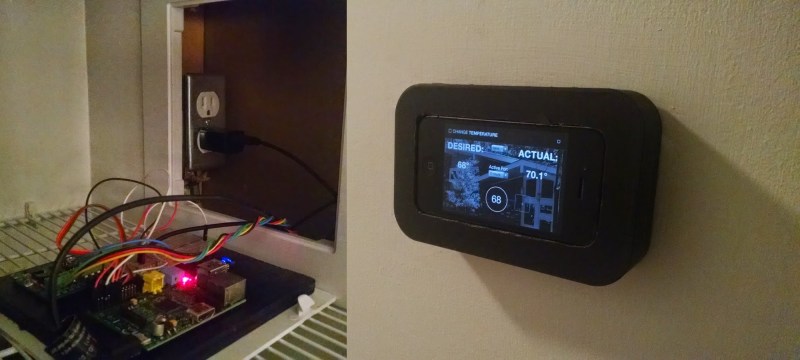
His first challenge was making a smart thermostat — after all, heating and cooling your house typically takes the most energy. Having used a Raspberry Pi before he figured it would be the best brain for his system. After researching a bit about HVAC wiring, [The Nooganeer] settled on a Makeatronics Solid State Relay board to control the HVAC. This allows him to use the GPIO’s on the Raspberry Pi in order to control the furnace and AC unit.
Now most thermostats just use a single thermosensor in order to 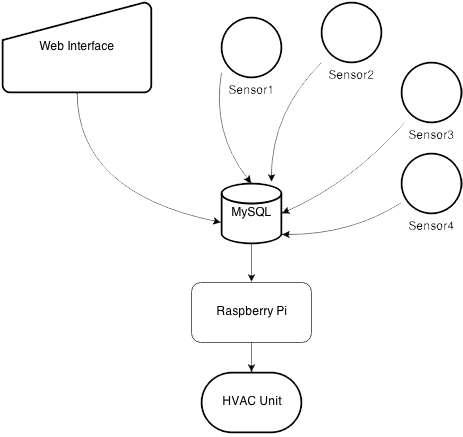 determine the temperature — since he’s got a Raspberry Pi, he figured he’d add temperature sensors in a few rooms using a Spark Core kit! The software he’s using is written in Python for visualizations, and he’s using a MySQL database in order to collect analytics.
It’s connected to the net to allow for easy monitoring and control from wherever he is, and since he had an iPhone 4 lying around he decided to use it as the display screen for the thermostat. His blog has tons of info on how he’s created the device, and in time he hopes to publish a more in-depth tutorial for people so they can connect their homes too.
Next up he plans on integrating humidity, light, and motion sensors into small wireless packages to place around the house. Maybe he’ll add a wireless outlet too…


BTW: The new layout still sucks.
I still visit hackaday, but I don’t read many articles, because it hurts my eyes.
Agreed
I also agree. Really dislike it.
Very nice hack though.
+1
+1000
You need this: https://userstyles.org/
and this: https://userstyles.org/styles/browse?search_terms=hackaday
very easy to use.
What are your thoughts on it? I actually like the new layout, but seem to be in the minority (or maybe we are just not very vocal at expressing that we like it). Just wondering what the issue is with the new layout? To me, it is more readable….. but wondering what the issues people are having with the new style.
Letter-boxed banner images feel crowded and make it hard to see the whole picture. A user published stylish patch corrects this by scaling the image so the entire thing is visible from the blog feed. Much less difficult. Also, the banner size on article makes them often break a line. For those of us who read a lot of content daily, single line presentation on the title makes it less work to read, so reducing the headline font size helps too. White on black contrast is much harder on the eyes than subdued green on black. You wind up with persistent vision “burned in” images when you read it for any length of time.
hate it also
it is painful
I like the new layout but it needs some tweaking. For example, time should be relative to the user, not the server. I’m on the East Coast and the server time is not the same as mine :)
Awesome looking hack, I’m working on a home automation system too with the B+
LOL, I think he wants the user comment timestamp to be translated to his timezone instead of PST. I personally think the comment time stamp is fine as PST, but maybe should say PST… but honestly, I really never look at the time other people comment….
I built something similar as a final project in Uni. We built light controllers, power usage sensors, and a motorized heat vent to control the temperature in each room. Everything was networked together over Ethernet and it of course had a web interface.
We never built it into an actual house, but it would be kind of neat to see [The Nooganeer]’s usage stats and how much money (if any) he’s saving.
PS it was all built on an Olimex PIC-Web (PIC18F), which was the cheapest dev kit we could get our hands on that had Ethernet built in. This was in the pre-Pi days, and Arduino Ethernet shields were a rip off.
>makes use of his old iPhone 4
best use would be to sell it, and buy 2-3 dedicated lcd devkits for the money he gets from the sale
Unless he has or plans to install a zoned HVAC system, multiple temperature measurement sensors may not be that effective.
Also, if the guy has been so obsessed with having home automation, and believes it to be the best thing since sliced bread, he should probably try to contact Steve Ciarcia, and find out from him if his home automation system – which he originally built in the late 1970s (IIRC) – has been as helpful or useful as he imagined. I’m not saying it would or wouldn’t, but something closer to a multi-year empirical data from someone who’s lived with it for a few decades might be useful to know.
It’s too bad so many people slap together a 2W raspberry pi running huge software like mysql just to do something simple like read an analog sensor, record some KB of data, and turn on a relay, when a small battery powered microcomputer would suffice (could be charged from a 2 wire thermostat relay). The Spark Photon (half the price of the Core) would be easily capable of this home automation app. It will be interesting to see what people do with the esp8266.
I tried the demo page and used firebug to test– it took 1.5 minutes and ~2MB on my normal DSL, then went into an infinite loop downloading missing files (5MB and 3 min). One js file was over a megabyte. Sorry, I’m on an anti-bloatware crusade. Sure, throw in an rPI and it’s easy to load in 200MB of linux apps into RAM so it can send megabytes of javascript to a browser. But I long for the elegance when engineers figured out how to do this in a 8K micro.
BTW, a nice relatively low power touchscreen display is a kindle paperwhite. You can use it without jailbreaking by entering a command to disable the screen saver, and some spoofing if you want to connect to an off-net wifi.
[Thanks for the userstyles.org tip– now I can fix the highly user-unfriendly font and color design at hackaday]
Carl, thanks for catching that! This is my first web project and I am obviously no expert. I simply downloaded the static files being served by my flask app from my web browser and threw them up on bitbucket, which obviously caused trouble… I think I sorted some of it out now.
When I have time to get the source code release ready, I hope you can contribute. It’s experts like you that make the open source community so powerful!