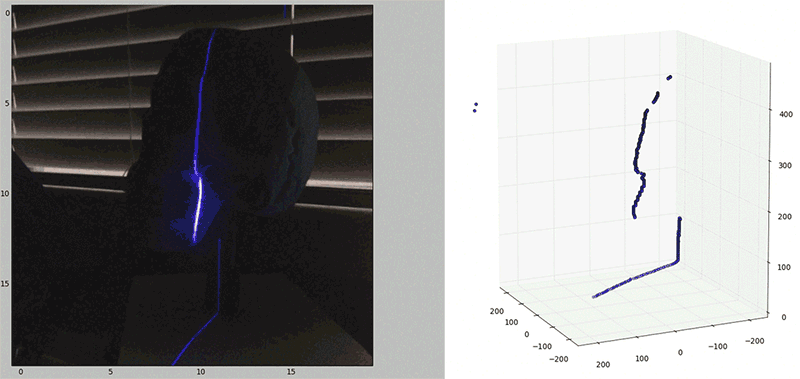
[Will] recently stumbled across the MakerBot Digitizer, a device that’s basically a webcam and a turntable that will turn a small object into a point cloud that can then be printed off on a MakerBotⓇ 3D printer. Or any other 3D printer, for that matter. The MakerBot Digitizer costs $800, and [Will] wondered if he could construct a cheaper 3D scanner with stuff sitting around his house. It turns out, he can get pretty close using only a computer, a webcam, and a Black and Decker line laser/level.
The build started off with a webcam mounted right next to the laser line level. Software consisted of Python using OpenCV, numpy, and matplotlib to grab images from the webcam. The software looks at each frame of video for the path of the laser shining against the object to be scanned. This line is then extracted into a 3D point cloud and reconstructed in MeshLab to produce a 3D object that might or might not be 3D printable.
This is only [Will]’s first attempt at creating a scanner. He’s not even using a turntable with this project – merely manually rotating the object one degree for 360 individual frames. It’s extremely tedious, and he’ll be working on incorporating a stepper motor in a future version.
This is only attempt number 1, but already [Will] has a passable scanned object created from a real-world thing.


I made a similar scanner using a turntable… but some details are impossible to capture using this type of scanner
That’s why you repeat the scans from many angles to get into undercuts. Then use Meshlab to merge the scans and delete overlapping and poor scan areas.
Reblogged this on Imran's Tech Tips and commented:
I think the result will improve by incorporating Stepper Motor and further refining the software.
I use the free Autodesk 123DCatch and a camera to 3D objects.
Great job, it’s somewhat reminiscent of the DAVID 3D scanner but without the dots http://www.instructables.com/id/David-3D-scanner/
(I was going to mention DAVID, but since you already did, I’ll make it a reply.)
Nowadays, the “big thing” in 3D scanning is “structured light”. DAVID supports it, and you can even get open-source implementations. I’ve been wanting to make dedicated hardware that does it and just sends a 3D model to the PC/printer.
There are two basic forms, and one of them can be done in real-time, if you have a fast enough projector and camera (either can be nearly real-time, even with normal, consumer-grade hardware).
I don’t mean to take away from the laser/turntable setup. It’s a much cheaper method, and it can obviously produce decent results. 123D Catch is rubbish, though :P
Ever noticed how the models scanned using 123D have the texture images stuck on the model? Nobody ever shows what the untextured model looks like.
Another thing that bugs me are items posted on thingiverse whereby the image is a photo of the original item, and then you look at the scanned model, only to find that the scan is horrible! Why post a beautiful picture when the model is so bad?
I’ve looked at raw models from Catch. Without the textures, they’re barely recognizable! (and they’re almost always huge, because they capture a bunch of useless “scenery” from around the model, which nobody bothers to chop off). “123D Caught” models should be banned from Thingiverse (and every other online repository) until Autodesk works out the bugs.
personally I disagree, 123d catch is a really great tool for creating basic meshes, and when done properly IE not a cellphone camera, yes the meshes do need cleaning up. but its a very good starting point
http://katzmattcreates.tumblr.com/post/45257485074/katzmatt-start-to-finish-casey-style-ps here is one of my good scans from raw, to digital, to mesh to print
http://katzmattcreates.tumblr.com/post/45179512802/here-kids-let-me-tell-you-a-little-story-about-3d
and here is a example of a good and bad scan just from background
There is also a project called fabScan[0]. I once made a PCB for them but there is nearly no progress in the development.
[0] http://hci.rwth-aachen.de/fabscan
Mario Lukas even showed off the FabScan at Hackaday Munich. ;)
Yes, and i am working on a new Software. Python backend and Browser based frontend, runnable on a raspberry pi.
You can improve the laser line by getting a narrow slit laser cut in a thin piece of metal. Figure out a way to mount that over the laser level’s beam spreader.
What you do not want is too narrow of a slit, which will cause diffraction of the beam.
Shining a laser through two linear polarization filters causes some neat effects that change depending on the rotation of the filters relative to each other.
What doesn’t do a thing to a laser other than slightly dimming it are the lenses in RealD 3D movie glasses. Those use right and left circularly polarized filters. What I found extra odd is that after passing through a left lens, which should have altered the polarization to match, the polarized beam would also pass right through a right lens on a second pair of the glasses. I was hoping for nifty diffraction patterns but got nothing.
Use linear polarizers and white light, after passing through one, the light will not pass through a second filter at 90 degrees to the first. That’s one of the things that make LCD panels work.
The light is neither left not right circular polarized: it is effectively at 45 deg to either and passes, dimmed
Structured light scanning is one of the older, more venerable techniques.
Fairly sure the Stanford bunny and David were done using a Cartesian one of these.
To increase the information per capture, try adding a green and red laser to the projection. Run a batch image filter on the images rgb channels prior to extracting features. If you add a reference plane behind in x and y orientations, you can also move the source (such as rotating it) and two stepper motors become a very thorough scanning platform
Another version of this uses a projector and a sine-wave RGB pattern, then wavelet math to reconstruct depth..
turntable on the cheap for a 3d scanner on the cheap: http://www.wired.com/2011/09/ikea-hack-time-lapse-panning-tripod-from-kitchen-timer/
I did something similar using an Android phone for the camera and and an IOIO to drive a stepper motor turntable. A writeup of the design with the printed parts, as well as the challenges you run into with these simple single beam designs, is here if anyone is interested. http://shortcircuitsandinfiniteloops.blogspot.com/2014/10/androidioio-3d-laser-scanner.html
The more expensive scanners have the user move the scanning head, but they’re on the very expensive CMM arms. But a frame that moves a head up and down might do a lot of good. The Matter & Form machines do that on a linear track next to a turn table.
The next thing after that is cleaning up the point cloud of spurious data.
what would be cool is a device that combines laser, structured light, structure from motion and stereo vision all in same box (bonus points if on same pass) and combines all resulting data in post processing.
Actually, you don’t need servos/etc. You can use a completely electro-mechanical system, based on a Geneva Wheel mechanism, with a switch placed just after the pin disengages, to take the picture. This will completely remove any motion blur, as each frame is grabbed while the object is motionless.