3D-Printed Scanner Automates Deck Management For Trading Card Gamers

Those who indulge in trading card games know that building the best deck is the key to victory. What exactly that entails is a mystery to us muggles, but keeping track of your cards is a vital part of the process, one that this DIY card scanner (original German; English translation) seeks to automate.

At its heart, [Fraens]’ card scanner is all about paper handling, which is always an engineering task fraught with peril. Cards like those for Magic: The Gathering and other TCGs are meant to be handled by human hands, and automating the task of flipping through them presents some challenges. [Fraens] uses a pair of motorized 3D-printed rollers with O-rings to form a conveyor belt that can pull one card at a time off the bottom of a deck. An adjustable retaining roller made from the most adorable linear bearing we’ve ever seen ensures that only one card at a time is pulled from the hopper onto an imaging platen. An adjustable mount holds a smartphone to take a picture of the card, which is fed into an app that extracts all the details and categorizes the cards in the deck.

Aside from the card handling mechanism, there are some pretty slick details to this build. The first is that [Fraens] noticed that the glossy finish on some cards interfered with scanning, leading him to add a diffused LED ringlight to the rig. If an image isn’t scannable, the light goes through a process of dimming and switching colors until a good scan is achieved. Also, to avoid the need to modify the existing TCG deck management app, [Fraens] added a microphone to the control side of the scanner that listens for the sounds the app makes when it scans cards. And if Magic isn’t your thing, the basic mechanism could easily be modified to scan everything from business cards to old family photos.

Continue reading “3D-Printed Scanner Automates Deck Management For Trading Card Gamers”

Archiving Data On Paper Using 2D Images

It seems like only yesterday we covered a project using QR codes to archive data on paper (OK, it was last Thursday), so here’s another way to do it, this time with a dedicated codec using the full page. Optar or OPTical ARchiver is a project capable of squeezing a whopping 200 Kb of data onto a single A4 sheet of paper, with writing and reading achieved with a standard laser printer and a scanner. It’s a bit harder than you might think to get that much data on the page, given that even a 600 DPI printer can’t reliably place every dot each time. Additionally, paper is rarely uniform at the microscopic scale, so Optar utilizes a forward error-correcting coding scheme to cater for a little irregularity in both printing and scanning.

The error-correcting scheme selected was an Extended Golay code (24, 12, 8),  which, interestingly, was also used for image transmission by the NASA Voyager 1 and 2 missions. In information theory terms, this scheme has a minimum Hamming Distance of 8, giving detection of up to seven bit errors. This Golay code implementation is capable of correcting three-bit errors in each 24-bit block, with 12 bits available for payload. That’s what the numbers in those brackets mean.

Another interesting problem is paper stretch during printing. A laser printer works by feeding the paper around rollers, some of which are heated. As a printer wears or gets dirty, the friction coefficient along the rollers can vary, leading to twisting and stretching of the paper during the printing process. Water absorbed by the paper can also lead to distortion. To compensate for these effects, Optar regularly inserts calibration targets throughout the bit image, which are used to locally resynchronize the decoding process as the image is processed. This is roughly similar to how the alignment patterns work within larger QR codes. Finally, similar to the position detection targets (those square bits) in QR codes, Optar uses a two-pixel-wide border around the bit image. The border is used to align to the corners well enough to locate the rows of bits to be decoded.

In the distant past of last week, we covered a similar project that uses QR codes. This got us thinking about how QR codes work, and even if encoding capacity can be increased using more colors than just black and white?

Thanks to [Petr] for the tip!

Improved 3D Scanning Rig Adds Full-Sized Camera Support

There are plenty of reasons to pick up or build a 3D scanner. Modeling for animation or special effects, reverse engineering or designing various devices or products, and working with fabrics and clothing are all well within the wide range of uses for these tools. [Vojislav] built one a few years ago which used an array of cameras to capture 3D information but the Pi camera modules used in this build limited the capabilities of the scanner in some ways. [Vojislav]’s latest 3D scanner takes a completely different approach by using a single high-quality camera instead.

The new 3D scanner is built to carry a full-size DSLR camera, its lens, and a light. Much more similarly to how a 3D printer works, the platform moves the camera around the object in programmable steps for the desired 3D scan. The object being scanned sits on a rotating plate as well, allowing for the entire object to be scanned without needing to move the camera through a full 180° in two axes. The scanner can also be used for scanning more 2D objects while capturing information about texture, such as various textiles.

For anyone looking to reproduce something like this, [Vojislav] has made all of the plans for this build available on the project’s GitHub page including some sample gcode to demonstrate the intended use for the scanner. On the other hand, if you’re short the often large amount of funding required to get a DSLR camera, his older 3D scanner is still worth taking a look at as well.

Continue reading “Improved 3D Scanning Rig Adds Full-Sized Camera Support”

The film scanner [xssfox] found, in the center of a table, with other stuff strewn across the table

Answering All Your ISCSI Scanner Questions

iSCSI is a widely used protocol for exposing SCSI devices over a network connection, and some scanners have in the past been equipped with SCSI ports. So, could you have an iSCSI network scanner? [xssfox] details her journey making a Canoscan FS4000US film scanner work over iSCSI, sparked by someone’s overly-confident StackOverflow comment that it couldn’t be done. Nothing in the spec said it couldn’t actually work, however, and after figuring out a tentative architecture, a hardware setup was put together.

No flatbed scanners with SCSI ports could be found on the cheap, so a film scanner had to be procured. After figuring out a few hitches with the loading mechanism and getting a test image locally, it was time to try and build up the software setup, tearing through SCSI compatibility and cabling, driver and PCI pass-through woes, bluescreens, and intermediate software having dropped some of the necessary features by now. Still, [xssfox] eventually exported the scanner as an iSCSI target – and, on the other end of the network, successfully connected to it and completed a scan. The StackOverflow answer was wrong, after all.

It’s fun to see how far old technology can go, and get answers to questions you never knew you had. Whether you’re reminiscing about SCSI days or wondering what the technology about, we’ve talked about it aplenty, from a retrospective to modern-day experiments, repurposing old SCSI hardware for modern SATA ports, a Raspberry Pi implementation, an emulator, and a fair bit more.

We thank [Valentijn Sessink] and [adistuder] for sharing this with us!

Pi 5 And SDR Team Up For A Digital Scanner You Can Actually Afford

Listening to police and fire calls used to be a pretty simple proposition: buy a scanner, punch in some frequencies — or if you’re old enough, buy the right crystals — and you’re off to the races. It was a pretty cheap and easy hobby, all things considered. But progress marches on, and with it came things like trunking radio and digital modulation, requiring ever more sophisticated scanners, often commanding eye-watering prices.

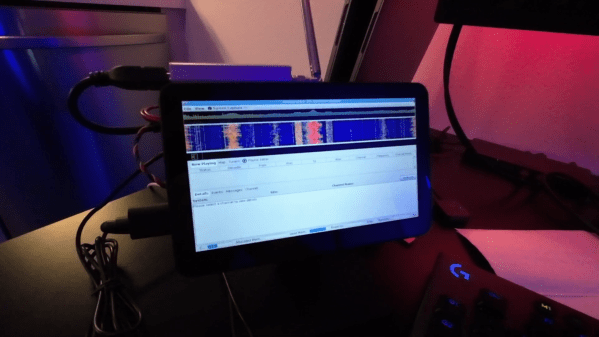
Having had enough of that, [Top DNG] decided to roll his own digital trunking scanner on the cheap. The first video below is a brief intro to the receiver based on the combination of an RTL-SDR dongle and a Raspberry Pi 5. The Pi is set up in headless mode and runs sdrtrunk, which monitors the control channels and frequency channels of trunking radio systems, as well as decoding the P25 digital modulation — as long as it’s not encrypted; don’t even get us started on that pet peeve. The receiver also sports a small HDMI touchscreen display, and everything can be powered over USB, so it should be pretty portable. The best part? Everything can be had for about $250, considerably cheaper than the $600 or so needed to get into a purpose-built digital trunking scanner — we’re looking at our Bearcat BCD996P2 right now and shedding a few tears.

The second video below has complete details and a walkthrough of a build, from start to finish. [Top DNG] notes that sdrtrunk runs the Pi pretty hard, so a heat sink and fan are a must. We’d probably go with an enclosure too, just to keep the SBC safe. A better antenna is a good idea, too, although it seems like [Top DNG] is in the thick of things in Los Angeles, where LAPD radio towers abound. The setup could probably support multiple SDR dongles, opening up a host of possibilities. It might even be nice to team this up with a Boondock Echo. We’ve had deep dives into trunking before if you want more details.

Continue reading “Pi 5 And SDR Team Up For A Digital Scanner You Can Actually Afford”

ThunderScan: The Wild 1980s Product That Turned A Printer Into A Scanner

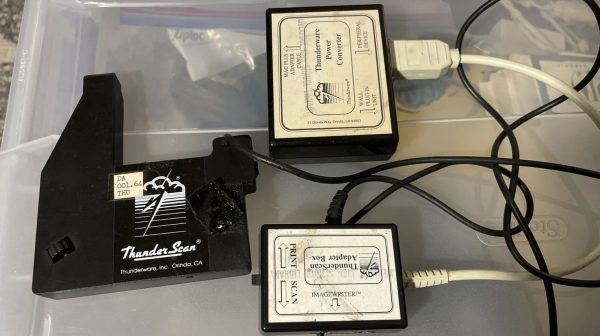
Back in the 1980s, printers were expensive things. Scanners were rare, particularly for the home market, because home computers could barely handle basic graphics anyway. Back in these halcyon days, an obscure company called Thunderware built a device to convert the former into the latter. It was known as the Thunderscan, and was a scanning head built for the Apple ImageWriter dot matrix printer. Weird enough already, but this device hides some weird secrets in its design.

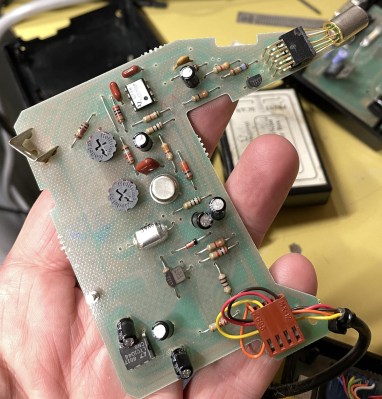
The actual scanning method was simple enough; the device mounted a carriage to the printer head of the ImageWriter. In that carriage was an optical reflective sensor which was scanned across a page horizontally while it was fed through the printer. So far, so normal.

The hilarious part is how the scanner actually delivered data to the Macintosh computer it was hooked up to. It did precisely nothing with the serial data lines at all, these were left for the computer to command the printer. Instead, the output of the analog optical sensor was fed to a voltage-to-frequency converter, which was then hooked up to the handshake/clock-in pin on the serial port.

The scanner software simply looked at the rate at which new characters were becoming available on the serial port as the handshake pin was toggled at various frequencies by the output of the optical sensor. Faster toggling of the pin indicated a darker section of the image, slower corresponded to lighter.

Interestingly, [Andy Hertzfeld] also has his own stories to tell on the development, for which his software contribution seems to have netted him a great sum of royalties over the years. It’s funny to think how mainstream scanners once were; and yet we barely think about them today beyond a few niche uses. Times, they change.

Thanks to [J. Peterson] for the tip!

LiPo Replacement Keeps Portable Scanner In The Action

If there’s anything people hate more than being locked into a printer manufacturer’s replacement cartridges, it’s proprietary batteries. Cordless power tools are the obvious example in this space, but there are other devices that insist on crappy battery packs that are expensive to replace when they eventually die.

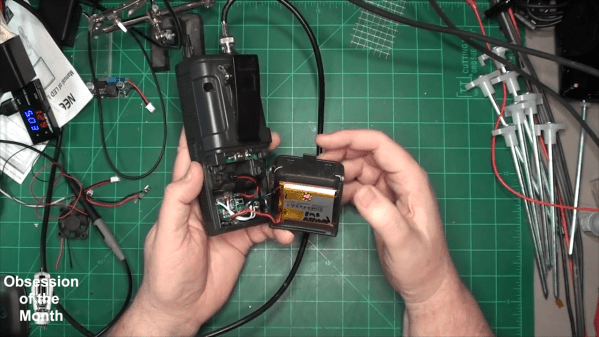
One such device is the Uniden Bearcat BC296D portable scanner that [Robert Guildig] found for a song at a thrift store, which he recently gave a custom LiPo battery upgrade. It came equipped with a nickel-cadmium battery pack, which even under the best of circumstances has a very limited battery life. Using regular AA batteries wasn’t an option, but luckily the space vacated by the OEM battery pack left a lot of room for mods. Those include a small module with BMS functions and a DC-DC converter, a 2,400 mAh 4.2 V LiPo pillow pack, and a new barrel connector for charging. With the BMS set for six volts and connected right to the old battery pack socket, the scanner can now run for seven hours on a one-hour charge. As a bonus, the LiPo pack should last a few times longer than the NiCd packs, and be pretty cheap to replace when it finally goes too. There’s a video after the hop with all the details.

If you’re looking at a similar battery replacement project, you might want to check out [Arya]’s guide to everything you need to know about lithium-ion circuitry.

Continue reading “LiPo Replacement Keeps Portable Scanner In The Action”