Cars are the greatest. They get you to where you need to go… most of the time. They can also let you down at the worst moment if a critical part fails. Wheel bearings get a lot of use while we drive and [Dmitriy] found out the hard way how quickly they can fail. Instead of getting cranky about it, he set out to change the damaged bearing himself. In the process he made a pretty neat DIY bearing puller.
Some wheel bearings, on the front of a 2WD truck for example, are only held on by one large nut and easily slide off the spindle. This was not the case for the rear of [Dmitriy’s] AWD Subaru. The rear bearings are press-fit into a bearing housing. These are hard to remove because Outer Diameter of the bearing is actually just slightly larger than the Inner Diameter of the bearing housing. This method of retaining parts together is called an ‘interference fit‘.

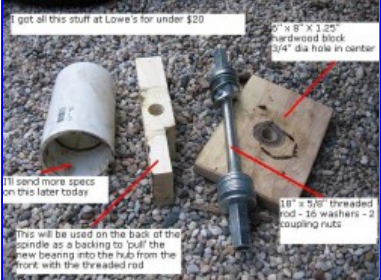
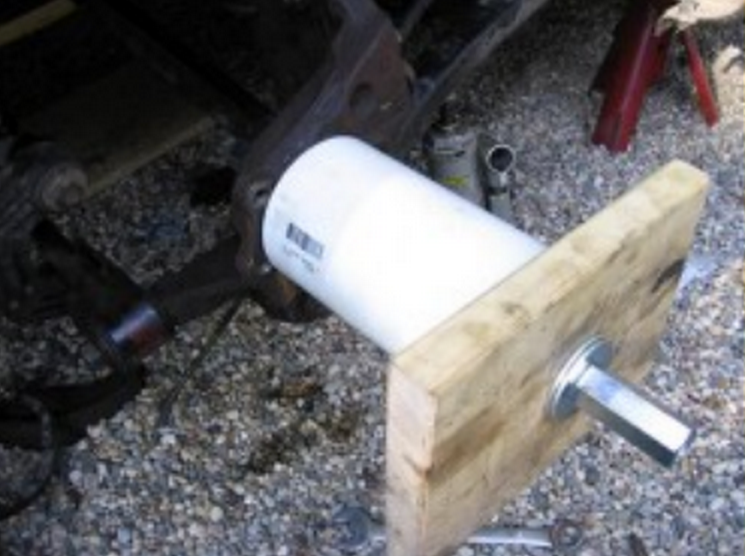
[Dmitriy’s] gadget uses one of Hackaday’s favorite simple machines, the screw, to slowly force the bearing out of its housing. It works by inserting a threaded rod through the bearing and bearing housing. Each side has a large washer and nut installed as well as a PVC pipe spacer providing support for the threaded rod. As the opposing nuts are tightened, one washer presses against the bearing and the bearing slowly slides out of the housing. Installation of the new bearing is the same except the tool is reversed to press the bushing into the housing.
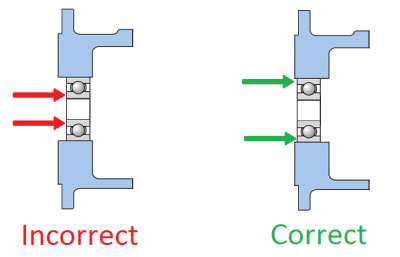
When pressing bearings into tight housings it is important to only press on the outer race. Conversely, when pressing a bearing onto a shaft it is important to press only on the inner race. That way the axial load being applied does not transfer through the bearing balls or rollers. This can indeed damage the bearing which would lead to premature failure. [Dmitriy] handled this by using appropriately sized washers that contacted the bearing’s outer race during removal and installation.
 The graphics below shows the right and wrong way to install a bearing into a bearing housing. In the left graphic, pressing on the inner race will ‘squeeze’ the balls because the inner race wants to go in and the outer race wants to stay in place because there is resistance between the outer race and the bearing housing due to the interference fit. In the right graphic, pressing on the outer race does not put any load or stress on the balls and will result in a properly installed, damage-free bearing.


Nothing new here, DIY car enthusiasts have been doing this for years.
Those flat washers will flex under load and still press on the inner race and probably the cage as well. He should have used a socket or some other arrangement to ensure pressure was only applied to the outer race.
Ah, yes. I have some socket sizes that have been used as bearing presses more than sockets.
Nothing new here. DIY car enthusiasts have been doing this for years.
you can say that again.
Well if I never heard of it before its new to me.
^ This, precisely.
Not everyone has heard of everything. Sometimes a hack that seems like it might be common knowledge can be extremely helpful to those for whom it isn’t.
Except that if stuff like this doesn’t occur to you as you peruse the solution to whatever you are doing then you shouldn’t be doing it. :)
That is what makes you able to mend stuff.
Cars probably are too huh!
Well, for a while now I have always wondered why people got so upset that the Arduino was the solution to everything. Since I know little about digital electronics, I never understood until now. On the mechanical side, this is about as basic as it gets. Oh, and a lot of parts stores loan tools like these for free.
WELL…. we can put a high-torque motor on the all-thread, and install pressure and clearance sensors, attaching them to a shield to make sure it’s done all good and proper…
Stepper motor, raspi and wifi with a bit of HTML. Torque sensor and angle measurement and sit in your chair to do it.
Cool, alot easier than banging on the slide hammer for 10 minutes! Although it is very satisfying making that motion with your arm and having a sudden release.
– Very nice, +1
YES
I’m sure an Arduino can be fitted in there somewhere.
Cheaper than a set of brass drifts, and I bet easier to source the bits, too.
Having very complete socket sets (in Imperial and Metric) gives you a finely graded set of very strong steel bearing pushers. I also save old U joint needle bearing cups, and things like old piston pins for bearing pushers. Rich’s threaded rod is all you really need for fine work. Sure, 50 year old news to me. But a lot of mechanical work has an “oral history” that it never hurts to pass along :-)
The 3/4″ drive sets will let you do the larger bearings…. we used those all the time on tractor wheel bearings….
What old shit you gonna pull out next to pad the page had? Bout time you pissed this stupid large font off!
A couple of big sockets and some threaded bar is the most used solution, this doesn’t flex or burst like pvc
Interesting. I was searching for hacks and found this website promoting automotive mechanics tricks. It’s almost as if they don’t read the topic they wrote about and compare it to the website name.
Wow. I should write up more of the tools I make if they are going to make front page.
Again here as above, have a bunch of sockets that I use mostly not as sockets.
Some used as drifts cannot take a driver any more due to being pounded on :)
As I do lots of work on similar cars of the same marque, I have taken the old bearings and taken off* from the outer race thus they are a perfect fit for either pressing in or out the old bearing.
Doesn’t take long to build up a collection of suitable sizes.
Oh and a proper press helps.
* I’d say milled if I owned a mill. But an angle grinder with sander flap works just as well when precision is not required.
Excuse my nagging please, but opening an article with the unreflected statement “cars are the greatest.” seems to be a no no with respect to all the environmental engagement lately here on had…